


Page 3 of 10
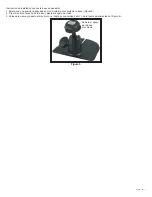
1. Find an appropriate location for installation.
2. Drill holes according to the size of U-bracket and fix the U-bracket.
3. Drill a 3/4” (19mm) hole next to U-bracket.
4. Install the camera and sun-visor on U-bracket.
5. Connect the camera tail with the extension cable from inside the vehicle.
6. Loosen the hex head screws and adjust the camera’s position to get the best view angle in the monitor.
Camera Model EC2014-C
CAUTION!
When drilling into any vehicle surface, make sure that the area is free from any electrical wires, fuel lines, vehicle upholstery, etc. that
could be damaged.
Installation, Wiring and Function
Notes:
1. Larger wires and tight connections will provide longer service life for components. For high current wires it is highly recommended
that terminal blocks or soldered connections be used with shrink tubing to protect the connections. Do not use insulation displacement
connectors (e.g., 3M Scotchlock type connectors).
2. Route wiring using grommets and sealant when passing through compartment walls. Minimize the number of splices to reduce voltage
drop. All wiring should conform to the minimum wire size and other recommendations of the manufacturer and be protected from moving
parts and hot surfaces. Looms, grommets, cable ties, and similar installation hardware should be used to anchor and protect all wiring.
3.
Fuses or circuit breakers should be located as close to the power takeoff points as possible and properly sized to protect the wiring and
devices.
4. Particular attention should be paid to the location and method of making electrical connections and splices to protect these points from
corrosion and loss of conductivity.
5. Ground termination should only be made to substantial chassis components, preferably directly to the vehicle battery.
6. Circuit breakers are very sensitive to high temperatures and will “false trip” when mounted in hot environments or operated close to their
capacity.
Installation
Important! Mount the camera at a location that provides the best view of the area immediately behind the vehicle. Generally, mounting
locations toward the top of the vehicle provide the best field of view. Lower mounting locations reduce the field of view and increase the
likelihood of damage from road spray.
Figure 1