Page 2 of 3
Notes:
1.
Larger wires and tight connections will provide longer service life for components. For high current wires it is highly recommended that terminal blocks or
soldered connections be used with shrink tubing to protect the connections. Do not use insulation displacement connectors (e.g., 3M Scotchlock type con-
nectors). Route wiring using grommets and sealant when passing through compartment walls. Minimize the number of splices to reduce voltage drop.
2.
High ambient temperatures (e.g., under-hood) will significantly reduce the current carrying capacity of wires, fuses, and
circuit breakers. All wiring should conform to the minimum wire size and other recommendations of the manufacturer and be
protected from moving parts and hot surfaces. Looms, grommets, cable ties, and similar installation hardware should be used to anchor and protect all
wiring.
3.
Fuses or circuit breakers should be located as close to the power takeoff points as possible and properly sized to protect the wiring and devices.
4.
Particular attention should be paid to the location and method of making electrical connections and splices to protect these points from corrosion and loss of
conductivity.
5.
Ground termination should only be made to substantial chassis components, preferably, directly to the vehicle battery.
6.
Circuit breakers are very sensitive to high temperatures and will “false trip” when mounted in hot environments or operated close to their capacity.
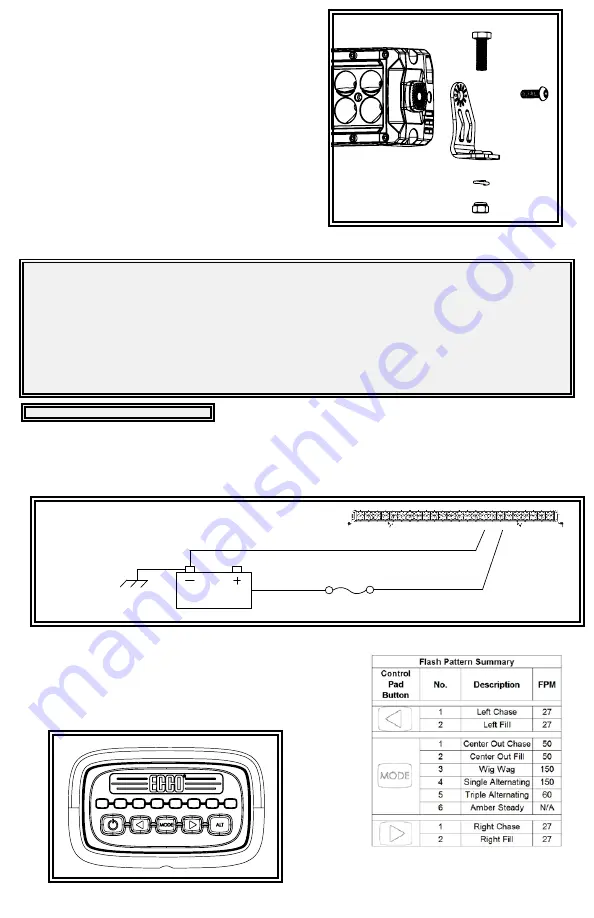
Figure 5
Wiring Instructions:
End Mounting:
1. Loosely secure the end brackets to the lightbar with the head bolts as shown in
FIGURE 3.
2. Position the lightbar in the desired mounting location on the front of the vehicle with
the cable exit to the passenger side. Mark and drill two 1/4” holes and secure the
brackets in place on the vehicle using the included hardware.
3. With the vehicle on a level surface, place the included cardboard cutout over the
lightbar and angle the lightbar on the mounting brackets until the top surface of the
cardboard is level as shown in FIGURE 2. This ensures the light angle of the safety
director and worklight LEDs is optimized.
4. Tighten the button head screw in each end bracket to secure the lightbar at that angle.
Figure 3
Important!
Disable power before wiring the lightbar.
The wiring for this configuration is as shown in FIGURE 4. All wiring should
be a minimum of 14 AWG. The positive line must have a slow blow 20 amp
fuse. Routing the ground wire directly back to negative battery terminal is
recommended. Pack dielectic grease, such as Dow Corning 4, around each
electric connection exposed to moisture or the ambient environment.
GROUND
20 AMP FUSE
BLACK WIRE
RED WIRE
Figure 4
Control Pad Operation:
Press the left power button to power the amber safety director LEDs on and off. The left
arrow, mode and right arrow buttons control the left, center out/wig wag and right patterns
respectively as called out in the flash pattern chart. The keypad LEDs will mimic the
lightbar’s safety director LEDs.
The ALT button enables the white flood LEDs.


