background image

E103-W05

User Manual

W600 20dbm WIFI Module

Содержание E103-W05

Страница 1: ...E103 W05 User Manual W600 20dbm WIFI Module ...

Страница 2: ...STA MODE AS TCP CLIENT 11 3 3 1 Brief Introduction 11 3 3 2 Network model 11 3 3 3 Setting 12 3 4 GUIDE FOR AIRKISS APP FOR ANDROID 15 3 4 1 APP Setting 15 3 4 2 WIFI RF Setting Software Setting 16 3 5 GPIO SETTING 16 3 5 1 AT CIOMODE to Set GPIO working mode 16 3 5 2 AT CIOWRITE to set GPIO Level 17 3 5 3 AT CIOREAD to Read GPIO Level 17 3 5 4 Pin AT Command Example 17 3 6 SERIAL PORT BAUD RATE S...

Страница 3: ...y to use supports serial AT command set server AT command set users can use the Internet through the serial port This module is widely used in IoT applications such as smart appliances smart homes wireless audio and video smart toys medical monitoring industrial control etc 1 2 Features Support transparent transmission at boot automatic connection when disconnected Support multiple baud rates Supp...

Страница 4: ...t For more usage methods please refer to Section 5 Networking Instructions 1 5 Parameters No Name Value Note 1 RF chip W600 Beijing WinnerMicro 2 Dimensions 19 13 0 8mm L W H 3 PCB process 2 layers Impedance debugging 4 Working frequency 2 4 2 4835 GHz 5 Production Process Immersion gold process half hole process machine SMT Wireless products must be machine attached to ensure batch consistency an...

Страница 5: ...eters Para Condition Min Typical Max Unit Storage temperature range 40 Normal temperature 125 Welding temperature IPC JEDECJ STD 020 260 working Voltage 3 0 3 3 3 6 V Any IO VIL VIH 0 3 0 75VIO 0 25VIO 3 6 V VOL VOH N 0 8VIO 0 1VIO N IMAX 12 mA Electrostatic discharge human body model TAMB 25 2 KV Electrostatic discharge machine model TAMB 25 0 5 KV ...

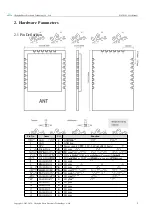
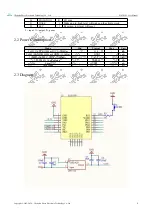
Страница 6: ...ins 5 PA1 GPIO1 IO I O pins 6 PA4 GPIO4 TX O TXD pin used as UART serial port output pin support AT command 7 PA5 GPIO5 RX I RXD pin used as UART serial input pin support AT command 8 PB13 GPIO13 IO I O pins 9 PB14 GPIO14 IO I O pins 10 PB15 GPIO15 IO I O pins 11 PB16 GPIO16 IO I O pins 12 PB17 GPIO17 IO I O pins 13 PB18 GPIO18 IO I O pins 14 PB6 GPIO6 IO I O pins 15 PB7 GPIO7 IO I O pins 16 PB8 G...

Страница 7: ...KE I Wake up pin high level will wake up the chip to work 22 RST I Reset pin low level will reset I input O output P power 2 2 Power Consumption Mode Min Typical Max Unit Tx802 11b CCK 11Mbps POUT 19dBm 230 mA Tx802 11g OFDM 54Mbps POUT 13 5dBm 210 mA Tx802 11n MCS7 POUT 12dBm 210 mA IEEE802 11b g n receivig 100 110 mA Sleep 0 9 mA Deep Sleep 12 uA 2 3 Diagram ...

Страница 8: ...module to server module to client When configuring the parameters of the module the user first needs to ensure that the operating voltage of the module is 3 0 3 6V typical value is 3 3V and then confirm that the serial port pins have been correctly connected with the relevant serial port tools and can communicate normally 3 1 Before Testing Hardware needed 1 E103 W05 model Wi Fi module 2 E103 W05 ...

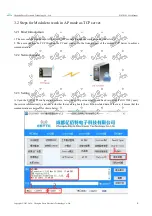
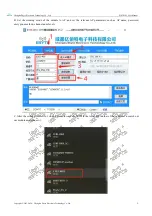
Страница 9: ...ugh the computer and connects to it 2 The user establishes a TCP Client on the PC and connects to the listening port of the module TCP Server to achieve communication 3 2 2 Network model 3 2 3 Setting A Open the E103 W01 configuration software select the serial port number 1 and baud rate 2 default 115200 query the version information 3 and check whether the receiving box 4 has version related dat...

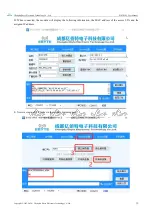
Страница 10: ...c Technology Co Ltd 9 B Set the working mode of the module to AP and set the relevant AP parameters such as AP name password encryption method channel number etc C After the setting is successful we can search through the WIFI in the lower right corner of the computer to search out our module and connect it ...

Страница 11: ...Manual Copyright 2012 2020 Chengdu Ebyte Electronic Technology Co Ltd 10 D When connected the module will display the following information the MAC address of the access STA and the assigned IP address E Now we create a TCP Server in the module listening port ...

Страница 12: ...ion Here users can download the AT instruction manual of E103 W05 in the data download 3 3 Steps for Module to work in STA mode as TCP Client 3 3 1 Brief Introduction We use the E103 W05 module as the STA working mode to search for nearby WIFI and connect it At the same time the computer is also connected to the same WIFI so that the E103 W05 and the computer are in the same local area network Cre...

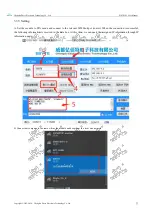
Страница 13: ...ng A Set the module to STA mode and connect to the relevant WIFI hotspot router When the connection is successful the following information is received in the data box At this time we can query the assigned IP information through IP information query B Connect our computer to the same wifi as the module and keep them in a local area network ...

Страница 14: ...Copyright 2012 2020 Chengdu Ebyte Electronic Technology Co Ltd 13 C Create a server on the computer and listen to the relevant port D Set up the module and connect to the server When the connection is successful the receiving box has the following prompt information ...

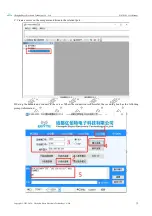
Страница 15: ... between the server and the client but here in order to achieve simple transparent transmission of data we also need to make some settings to enter the transparent transmission mode so that we can avoid specifying each time you send data Awkward operation of width After the client connects to the server perform the following operations to enter transparent transmission Transparent Data Transceivin...

Страница 16: ...ork configuration function Users can use this function to configure the module to connect to the network quickly When the module is in STA mode click SmartC Open to enter the one key network configuration mode If the matching is successful the module will access the same target WIFI as the mobile phone without entering the password and SSID 3 4 1 APP Setting Installed the Airkiss App on a Android ...

Страница 17: ...o the same WIFI as the mobile phone and the following information will be printed in the receiving box 3 5 GPIO Setting In E103 W05 GPIO0 1 6 7 8 9 10 11 12 13 14 15 16 17 18 are used for general GPIO when we want to open the control by AT command When reading the output level of the relevant pin or reading the status of the relevant level we can use the following command 3 5 1 AT CIOMODE to Set G...

Страница 18: ... Command Format AT CIOWRITE pin level pin Pin label mode working mode 1 output mode 0 input mode 3 5 3 AT CIOREAD to Read GPIO Level Command Format pin Pin label 3 5 4 Pin AT Command Example 1 Use GPIO18 as output and output low level AT CIOMODE 18 1 AT CIOWRITE 18 0 Use GPIO18 as input and read the level AT CIOMODE 18 0 AT CIOREAD 18 The module replies as follows ...

Страница 19: ...ort baud rate setting E103 W05 supports the following baud rates 2000000 1500000 1250000 1000000 921600 406800 230400 115200 57600 38400 19200 9600 4800 2400 1800 1200 600 In the setting software we only provide 115200 and 9600 buttons For other braud rate users can use related AT commands to set and the settings will take effect immediately ...

Страница 20: ...e can be used only when the module works in TCP Client and UDP The TCP Server cannot enter the transparent transmission mode After entering the transparent transmission mode you must remember to manually use AT CIPSEND to activate the transparent transmission For transparent transmission you need to make relevant settings in the following interface 4 3 Maximum number of AP connections and server c...

Страница 21: ...If it is absolutely necessary to pass under the module it is assumed that the module is soldered to the Top Layer and copper is laid on the Top Layer of the module contact part all copper And well grounded must be close to the digital part of the module and routed at the bottom layer Assuming that the module is soldered or placed on the Top Layer it is also wrong to randomly route on the Bottom La...

Страница 22: ... is the lower the transmitting power is The use of the antenna and the module is poorly matched or the quality of the antenna itself is defective 6 2 Module is easy to damage Please check the power supply and ensure it is within the recommended range Voltage higher than the peak will lead to a permanent damage to the module Please check the stability of power supply and ensure the voltage not to f...

Страница 23: ...echnology Co Ltd 22 7 Revision history Version Date Description Issued by 1 0 2020 05 15 Initial version Xxx 8 About us Sales hotline 4000 330 990 Tel 028 61399028 Support support cdebyte com Website www ebyte com Address BuildingB5 MouldIndustrialPark 199 XiquAve WestHigh techZone Chengdu 611731 Sichuan China ...

Отзывы: