background image

and is tracking the touch position until the touchscreen state switched 
to un-touch state. 


Click On Release 


With this 

Click On Release

 mode, the driver emulates a mouse click 

event when the touchscreen state was switched from touched state to 
un-touched state.   


Click On Touch without moving cursor 


With this mode, the driver behaves similar as 

Click On Touch

 mode. 

The cursor does not move to the touch position except the first touch 
point. 


Click On Release without moving cursor 


With this mode, the driver behaves similar as 

Click On Release

 mode. 

The cursor does not move to the touch position except the lift-off point. 


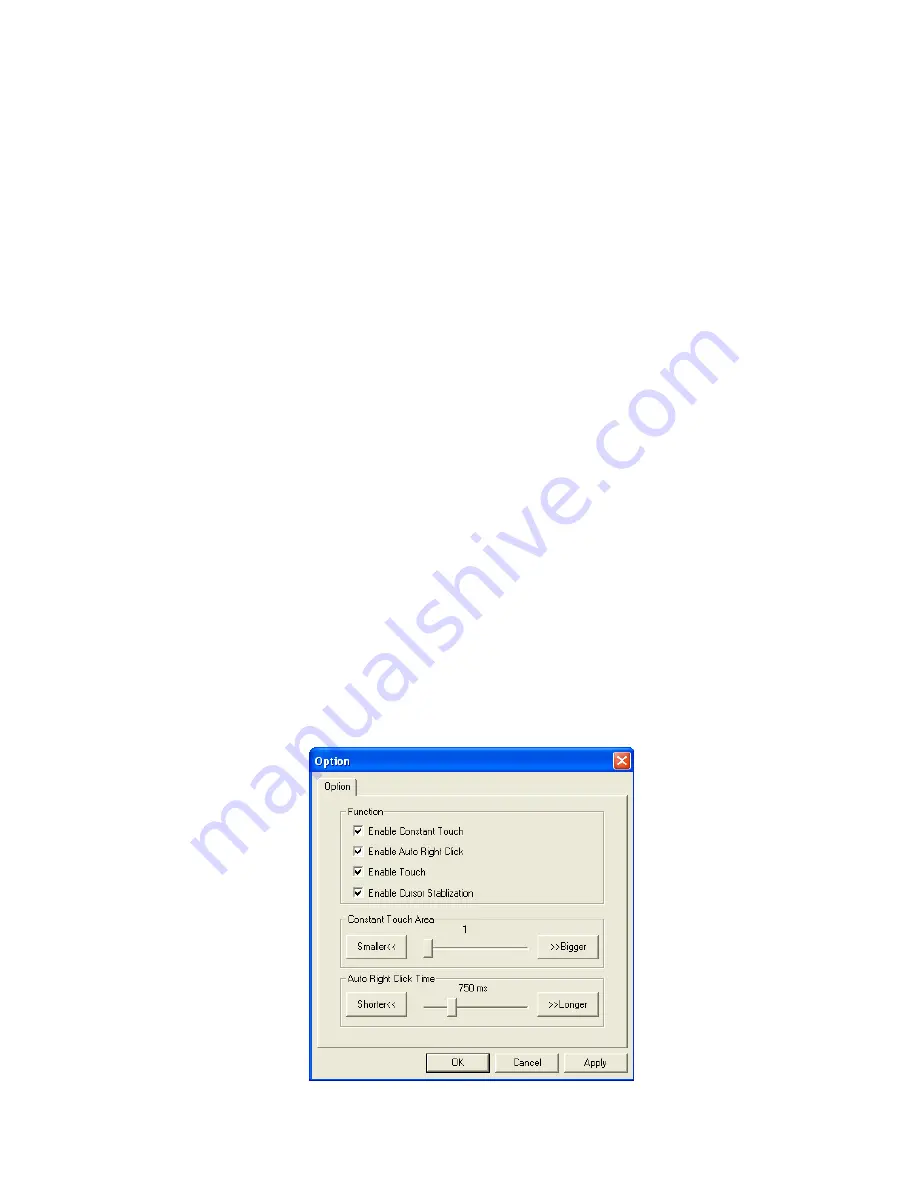
Option 

You can set configuration for some advanced functions with this option 
button. Press this button, a pop up property sheet window will be 
popped up and shown as below. 


Chapter 3 

25

Содержание XPOS72-5B-A16G

Страница 1: ...User s Manual XPOS72 5B A16G...

Страница 2: ...and can radiate radio frequency energy and if not installed and used in accordance with the instructions may cause harmful interference to radio communications However there is no guarantee that inter...

Страница 3: ...96 EC concerning waste electrical and electronic equipment WEEE The Directive determines the framework for the return and recycling of used appliances as applicable throughout the European Union This...

Страница 4: ...MSR 10 1 3 Adjust Angle 11 1 4 Turn on the device 11 2 Basic Driver Installation 12 2 1 Before the installation 12 2 2 Chipset Software Installation 12 2 3 VGA Driver Installation 14 2 4 Touch Screen...

Страница 5: ...Contents iv 5 Specification 33...

Страница 6: ...Front View LED Indicator The Power indicator will glow green when power is on The HDD indicator will blink green when the HDD is accessed The LAN indicator will blink green when transferring data tho...

Страница 7: ...Back Panel I O 1 2 Basic Peripherals Installation All cables and wires from peripherals to the POS device are recommended to connected as the direction as shown below Chapter 1 6...

Страница 8: ...panel of the device USB Mouse USB Keyboard and USB ODD Connect your USB Mouse USB Keyboard and USB ODD to USB ports on the back panel of the device LAN Cable Connect one end of RJ 45 LAN cable to the...

Страница 9: ...er Customer Display 1 Remover the customer display mounting hole cover from the device and pull out the connector from the device 2 Adjust the hinge of the customer display and then connect to the dev...

Страница 10: ...w keys to select Serial Port 6 RI 12V depending on what port the customer display is connected to Select 12V to enable power to the correct COM port Type F10 to save the settings and exit the BIOS set...

Страница 11: ...Chapter 1 10 MSR 1 Remove the MSR cover from the device 2 Connect the cable of the MSR assembly to the device MSR 3 Tighten the two PHILLIPS M3 screws to fix the MSR assembly as shown below...

Страница 12: ...RS232 MSR is powered by COM3 Baud rate is 9000 8 n 1 1 3 Adjust Angle 1 4 Turn on the device 1 Make sure all peripherals are connected properly 2 Press and hold the power switch until the power indica...

Страница 13: ...to the USB power and insert the driver CD and turn on the device The program autoruns and displays the DRIVER BANK screen 2 Follow the on screen instructions 2 2 Chipset Software Installation 1 On th...

Страница 14: ...4 Read the License Agreement carefully and click Yes 4 Click Next 6 Click Finish Chapter 2 13...

Страница 15: ...2 3 VGA Driver Installation 1 On the main screen click XPOS 72 Series 2 Click VGA Driver 3 Click VGA Driver for WIN2K XP 4 Click Next 14 Chapter 2...

Страница 16: ...5 Read the License Agreement carefully and click Yes 6 Click Next 7 Click Next Chapter 2 15...

Страница 17: ...lect restart your computer right now or later and then lick Finish 2 4 Touch Screen Driver and Software Utility installation 1 On the main screen click XPOS 72 Series 2 Click Touch Panel Driver 16 Cha...

Страница 18: ...3 The procedure starts 4 Click Next 5 Click Next 6 Select an item according to your needs and then click Next Chapter 2 17...

Страница 19: ...7 Click OK 8 If you want to use Multi Monitor check the box and click Next 9 Click Next 10 Click Next 18 Chapter 2...

Страница 20: ...11 The driver starts to install 12 Click OK 2 5 LAN Driver Installation 1 After clicking XPOS 72 Series on the main screen click RTL8111C Lan Driver Chapter 2 19...

Страница 21: ...2 1 On the welcome screen click Next 2 2 Click Install to begin the installation 3 Click Finish Chapter 2 20...

Страница 22: ...it Utility There are two alternatives to launch TouchKit Option 1 Under Microsoft Windows XP click start menu and select Programs under TouchKit menu click Configure Utility Option 2 Click icon on the...

Страница 23: ...d TouchKit touchscreen controller It can works with both PS2 mouse and TouchKit touchscreen PS2 controller After the TouchKit PS2 driver was installed this utility assumes the PS2 touchscreen controll...

Страница 24: ...heck boxes in the Settings tab Beep Beep On Touch Check this check box to enable driver to generate a beep sound when touch touchscreen state is switched from untouched to touched state Beep On Releas...

Страница 25: ...Double Click Area Double click area is used to set the double click area Change this value will affects the double click behavior for all of the mouse devices connected to the device Two continuous cl...

Страница 26: ...this mode the driver behaves similar as Click On Touch mode The cursor does not move to the touch position except the first touch point Click On Release without moving cursor With this mode the drive...

Страница 27: ...e multiple monitor support and uncheck it to disable multiple monitor support When this function is disabled the touchscreen will be mapped to the primary monitor automatically When this function is e...

Страница 28: ...lay mode for those applications which do not map the touchscreen to the full screen of the monitor Full screen The touchscreen will be mapped to the full screen of the specified monitor Right screen T...

Страница 29: ...monitor display Customized If the touchscreen needs to be mapped the area other than the above area user can define the mapping area for application With this mode the driver does not correct the mapp...

Страница 30: ...the Edge to Smaller TouchKit will reduce the vertical position of the right edge If you set the Edge to Larger TouchKit will extend the vertical position of the left edge Right If you set the Edge to...

Страница 31: ...op bottom left and right edges will extend 10 of orientation to touch screen and cursor will be moved 10 pixel of X and Y Axis to right and top If you click 10 button the top bottom left and right edg...

Страница 32: ...Connector PIN Description PIN Description 1 12V 3 GROUND 2 12V 4 GROUND 4 2 Serial Port COM Port 1 2 5 PIN Description PIN Description 1 DCD 6 DSR 2 RXD 7 RTS 3 TXD 8 CTS 4 DTR 9 RI 5V 12V 5 GND 10 N...

Страница 33: ...Cash Drawer Control Status Address Value Open 280H Bit 4 1 Close 280H Bit 4 0 Read Status 281H Bit 0 0 1 Chapter 4 32...

Страница 34: ...5 5 Specification XPOS72 5B A16G Chapter 5 33...

Страница 35: ...ype II I O Ports Serial 3 x D sub9 pin 9 with 5V 12V RI option setting by BIOS COM1 has RS 232 422 485 selection Setting by BIOS COM6 for optional customer display Parallel 1 x DB25 USB 4 x USB 2 0 LA...

Отзывы: