background image

EBN Technology Corp. 


3/20/2007                                                                          56/84                                                                            Rev. 1.1 


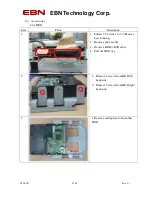
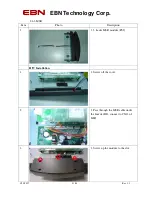
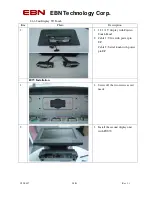
Verification MSR


1.


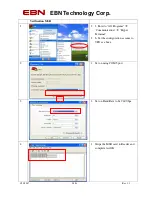
1. Enter to” All Programs” 


“Communication” 

 “Hyper 

Terminal” 

2.


b. Set the configuration as same to 

VFD as above 


1.


Set on using COM5 port. 


1.


Set on Baud Rate to be 9600 bps. 


1.


Stripe the MSR card to Reader and 

complete test OK 

Содержание POS-7012EG-370

Страница 1: ...rv vi ic ce e M Ma an nu ua al l S So ol li id d P PO OS S 7 70 0 S Se er ri ie es s P PO OS S 7 70 01 12 2E EG G 3 37 70 0 P PO OS S 7 70 01 15 5E EG G 3 37 70 0 M Ma ar rc ch h 2 20 00 07 7 Copyrig...

Страница 2: ...Housing 18 2 2 2 Swivel Housing Rear Front 21 2 2 3 P S 220W W PFC 22 2 2 4 I O Board 25 2 2 5 Jumper Cover 27 2 3 Boards 28 2 3 1 Main Board 28 2 3 2 Bridge Board 30 2 3 3 Inverter 31 2 3 4 Touch Co...

Страница 3: ...Chapter 3 Spare parts list 76 3 1 Main Unit 76 3 1 1 Explode of Main Unit 76 3 1 2 Main Unit Parts list quotation 76 3 2 Base Unit 78 3 2 1 Explode of Base Unit 78 3 2 2 Base Unit Parts list quotation...

Страница 4: ...if yes replace with another power button board POS 75 or replace with another MB POS 72 3 If power button not damaged check if power button cable to MB well plugged 4 If fail replace with another pow...

Страница 5: ...place with another mother board for testing 6 If fail system RMA to EBN 1007 Error Message CMOS checksum error 1 On Board Battery 2 3 6 2 MB 2 3 1 1 Shut down power 2 Open upper case check on board ba...

Страница 6: ...upper case check if MSR cable goes underneath inverter and well connected to MB location CN12 Note the cable must go through EMI chassis breach 3 If fail replace with another MSR 4 If fail RMA MSR to...

Страница 7: ...startup disk and then click the start button to make a MS DOS startup disk 2 Once you boot off of the bootable floppy disk replace the bootable floppy disk with the floppy disk containing the bios fil...

Страница 8: ...v 1 1 5 Reboot the system once the bios update has been completed Note The BIOS contained here are exclusively for EBN POS72 75 only EBN assumes no responsibility for any damages resulting from improp...

Страница 9: ...1 1 Front Bezel Sponge Bezel Item Photo Description 1 1 Use screw driver to open upper case 2 2 screws needs to be removed 2 1 Remove 2 screws 2 Remove cover bracket 3 1 Remove 2 screws from MSR cove...

Страница 10: ...ront and back cover 6 1 Remove 12 screws 2 Remove speaker tape 7 1 Turn to front side 2 Remove and replace with another front bezel 2 1 2 Touch Panel Touch Screen Holder Item Photo Description 1 1 Fol...

Страница 11: ...EBN Technology Corp 3 20 2007 11 84 Rev 1 1 Item Photo Description 2 1 Turn to back side and remove tape 3 1 Turn to front side and remove touch panel module 2 Replace with another touch panel module...

Страница 12: ...x 768 Item Photo Description 1 1 Follow 2 1 2 item 1 to item 3 action 1 2 Turn to back side 3 Remove 4 screws 2 1 Cut plastic string 3 1 Remove 2 inverter cables 2 Remove LCD cable from LCD chassis 3...

Страница 13: ...20 2007 13 84 Rev 1 1 Item Photo Description 5 1 Remove 2 screws from left LCD holder 2 Remove 2 screws from right LCD holder 3 Remove and replace with another LCD 2 1 4 MSR Refer to 2 5 4 2 1 5 Moth...

Страница 14: ...EBN Technology Corp 3 20 2007 14 84 Rev 1 1 2 1 6 EMI Chassis Item Photo Description 1 1 Remove 2 screws 2 1 Open upper case 2 Remove 7 screws 3 1 Remove and replace another EMI chassis...

Страница 15: ...orp 3 20 2007 15 84 Rev 1 1 2 1 7 Key Lock Set Item Photo Description 1 1 Follow 2 1 6 item 1 to 3 remove EMI chassis 2 1 Remove 2 screws 2 Remove cover bracket 3 1 Remove 2 antennas 2 Remove tape 4 1...

Страница 16: ...6 84 Rev 1 1 Item Photo Description 5 1 Separate front cover from back cover 6 1 Remove 4 screws from hinge 7 1 Set upper case vertically 2 Remove back hinge cover 8 1 Set upper case horizontally 2 Re...

Страница 17: ...tem Photo Description 9 1 Remove 3 screws at left hinge 2 Remove 3 screws at right hinge 10 1 Separate upper case from bottom case 2 Pull out cables from upper case 11 1 Remove and replace with anothe...

Страница 18: ...se Housing Item Photo Description 1 1 Remove 4 screws from hinge front side 2 1 Set upper case vertically 2 Remove back hinge cover 3 1 Set top upper case horizontally 2 Remove front hinge cover 4 1 R...

Страница 19: ...case from bottom case 2 Pull out cables from upper case 6 1 Turn the bottom case to the bottom side 2 Remove 2 screws to take off the kit cover 7 1 Turn the bottom case top side 2 Take off kit cover...

Страница 20: ...logy Corp 3 20 2007 20 84 Rev 1 1 Item Photo Description 9 1 Turn to the rear side of the bottom case 2 Remove 2 screws to open the HDD cover 10 1 Remove and replace with another base housing from bas...

Страница 21: ...007 21 84 Rev 1 1 2 2 2 Swivel Housing Rear Front Item Photo Description 1 1 Remove 4 screws from hinge 2 1 Set upper case vertically 2 Remove back hinge cover 3 1 Set upper case horizontally 2 Remove...

Страница 22: ...item 1 to 10 Remove base housing 2 Remove power cable 3 Remove HDD to M B cable 4 Pull out HDD tray 2 1 Turn to bottom side and remove 6 screws 3 1 Turn to top side 2 HDD cable is tied with another bl...

Страница 23: ...ivel hinge from base chassis 6 1 Remove black magic sticker used for tightening cables 2 Pull out cables from swivel hinge one by one 7 1 Remove power cable which connects PSU and I O Board 2 Remove 2...

Страница 24: ...0 2007 24 84 Rev 1 1 Item Photo Description 9 1 Pay attention to the position for cable 10 1 Remove 3 screws 11 1 Pull up from the hooker and pull to left direction to remove power supply 2 Replace wi...

Страница 25: ...2 2 3 item 1 to 6 2 Remove USB Cable 3 Remove Power supply to I O board cable 4 Remove 100pin cable 5 Remove power supply to AC input cable 2 1 For USB cable need to remove 1 screw from I O board 3 1...

Страница 26: ...20 2007 26 84 Rev 1 1 Item Photo Description 5 1 Remove 12 screws 6 1 Remove 4 screws on I O board 2 Remove and replace with another I O board 3 Follow steps back to item 1 for assembly 2 2 5 HDD HDD...

Страница 27: ...EBN Technology Corp 3 20 2007 27 84 Rev 1 1 2 2 6 Jumper Cover Item Photo Description 1 1 Turn the bottom case to the bottom side 2 Remove 1 screw 3 Remove and replace with another jumper cover...

Страница 28: ...2 1 Remove 2 screws 2 Remove cover bracket 3 1 Remove Cables M B To Inverter 2 Remove Cables M B To Touch Control Board 3 Remove Cables M B To Speaker 4 Remove Cables M B To I O BD 100P 5 Remove Cable...

Страница 29: ...orp 3 20 2007 29 84 Rev 1 1 Item Photo Description 4 1 Remove Inverter Cable on top 2 Remove Inverter Cable bottom 5 1 Remove 2 screws on bridge board 6 1 Remove bridge board 7 1 Remove 6 screws on M...

Страница 30: ...o Description 8 1 Remove and replace with another M B 2 3 2 Bridge Board Item Photo Description 1 1 Follow 2 3 1 item 1 2 Open upper case 3 Remove VGA cable from bridge board 4 Remove 2 screws on brid...

Страница 31: ...EBN Technology Corp 3 20 2007 31 84 Rev 1 1 2 3 3 Inverter Item Photo Description 1 1 Follow 2 3 1 item 1 2 Remove 3 cables 3 Remove 2 screws 2 1 Remove and replace with another inverter board...

Страница 32: ...Photo Description 1 1 Follow 2 3 3 item 1 to 2 remove inverter board 2 Remove cable from touch control board 3 Remove 4 screws 2 1 Push out black clicker from connector CN2 3 1 Remove touch control bo...

Страница 33: ...3 20 2007 33 84 Rev 1 1 2 3 5 Button Board For POS 75 Item Photo Description 1 1 Follow 2 3 1 item 1 2 Open upper case 2 1 Remove cable from button board 2 Remove 2 screws 3 1 Remove and replace with...

Страница 34: ...bles 2 4 1 Cable M B To Inverter Item Photo Description 1 Part Number 21600003RH 2 1 Use screw driver to open upper case 2 Remove 2 screws 3 1 Remove cable on MB location CN17 2 Remove cable on invert...

Страница 35: ...007 35 84 Rev 1 1 2 4 2 Cable M B To Touch Control BD Item Photo Description 1 1 Part Number 21600004RH 2 1 Use screw driver to open upper case 2 Remove 2 screws 3 1 Remove 3 cables 2 Remove 2 screws...

Страница 36: ...EBN Technology Corp 3 20 2007 36 84 Rev 1 1 Item Photo Description 5 1 Remove and replace with another Touch Control board cable Main Board Location CN 17 2 Follow steps back to item 1 for assembly...

Страница 37: ...21600006RH 2 1 Follow 2 1 1 item 1 to 7 turn to Front side and remove front bezel 3 1 Turn to back side and remove cable on MB location CN 14 2 Remove black tape 4 1 Remove 2 screws on left speaker 2...

Страница 38: ...2 1 7 item 1 to 9 to disassemble upper case 2 Follow 2 2 1 item 1 to 10 to disassemble base unit 3 Follow 2 2 3 item 1 to 7 to remove tapes and power supply cable 4 Remove black magic sticker 5 Pull o...

Страница 39: ...replace with another HDD cable 3 Follow steps back to item 1 for assembly 2 4 6 Cable 2nd VGA to I O Board Item Photo Description 1 Part Number 21600009RH Location on M B CN5 2 1 Follow 2 1 7 item 1...

Страница 40: ...nector 2 Remove power cable from IO board 3 Remove power cable 4 1 Remove black tape 5 1 Remove black tape 2 Remove fan cable 6 1 Remove screw from USB cable 2 Remove USB cable connector in order to t...

Страница 41: ...item 1 to 10 to disassemble base unit 3 Follow 2 2 3 item 1 to 7 4 Remove black magic sticker 5 Pull out cables from swivel hinge one by one 3 1 Remove screw from IO Board 2 Remove and replace another...

Страница 42: ...e LCD to Bridge Board Item Photo Description 1 1 Part No 21600005RH 2 1 Follow 2 1 2 item 1 to item 3 remove touch panel 2 Turn to back side 3 Remove 4 screws 3 1 Cut plastic string 4 1 Remove 2 inver...

Страница 43: ...EBN Technology Corp 3 20 2007 43 84 Rev 1 1 Item Photo Description 5 1 Remove LCD chassis 6 1 Remove tape 2 Remove and replace with another LCD cable 3 Follow steps back to item 1 for assembly 1 2...

Страница 44: ...Main Base Unit assembly Item Photo Description 1 1 Prepare upper and base unit 2 1 Put upper unit on the swivel hinge 3 1 Fasten 3 screws on the left side of neck 2 Fasten 3 screws on the right side...

Страница 45: ...tion 5 1 Cables must go through the hole at center of upper case 2 Connect cables to the MB 6 1 Tied cables with magic tape 2 Fasten cover bracket with 2 screws 7 1 Fasten EMI cover on the upper case...

Страница 46: ...EBN Technology Corp 3 20 2007 46 84 Rev 1 1 Item Photo Description 9 1 Put swivel hinge back cover on case 10 1 Fasten 4 screws...

Страница 47: ...Item Photo Description 1 1 Follow 2 2 1 item 1 to 10 Remove base housing 2 Remove power cable 3 Remove HDD to M B cable 4 Pull out HDD tray 2 1 Remove 2 screws from HDD left hand side 2 Remove 2 screw...

Страница 48: ...1 1 2 6 2 Pole Display Item Photo Description 1 1 Packing List a Assembly 1 Tube and 2 VFD Unit H W Installation 1 1 Remove the customer display cover from rear base 2 1 Remove two screws marked in r...

Страница 49: ...4 1 Connect VFD cable to COM1 and screw up 5 1 Remove jumper cover adjust Pin9 13 14 close for COM1 to be 12V Verification 6 Verify the VFD through by Hyper Terminal as following procedure Enter to A...

Страница 50: ...rp 3 20 2007 50 84 Rev 1 1 Item Photo Description 8 1 Set area code and click OK 9 1 Select on using COM1 port 10 1 Set on Baud Rate to be 9600 bps 11 1 Press random character from keyboard which will...

Страница 51: ...51 84 Rev 1 1 2 6 3 MSR Item Photo Description 1 1 3 tracks MSR module PS2 H W Installation 1 1 Screw off the cover 2 1 Pass through the MSR cable under the Inverter BD connect to CN12 of M B 3 1 Scr...

Страница 52: ...EBN Technology Corp 3 20 2007 52 84 Rev 1 1 Verification 1 1 Enter to Accessories Notepad 2 1 Stripe the MSR card to Reader and complete test OK...

Страница 53: ...53 84 Rev 1 1 2 6 4 MSR I Button Item Photo Description 1 1 3 tracks MSR module PS2 H W Installation 1 1 Screw off the cover 2 1 Pass through the MSR cable under the Inverter BD connect to CN12 of M B...

Страница 54: ...EBN Technology Corp 3 20 2007 54 84 Rev 1 1 Verification 1 1 Enter to Accessories Notepad 2 Complete test OK I Button Data Card Reader Data...

Страница 55: ...scription 1 1 MSR 3 tracks Serial Port Smart Card Reader module USB H W Installation 1 1 Screw off the cover 2 1 Pass through the cables under the Inverter BD connect to COM cable to CN12 as red mark...

Страница 56: ...Verification MSR 1 1 1 Enter to All Programs Communication Hyper Terminal 2 b Set the configuration as same to VFD as above 2 1 Set on using COM5 port 3 1 Set on Baud Rate to be 9600 bps 4 1 Stripe t...

Страница 57: ...Card Driver Installation and Verification 1 1 Select Yes this time only and Click Next 2 1 Install the software automatically Recommended and Click Next 3 1 Click Finish for complete installation 4 1...

Страница 58: ...EBN Technology Corp 3 20 2007 58 84 Rev 1 1 Item Photo Description 5 1 Select STD 200 0 6 1 Insert IC Card to slot 7 1 Show PASS complete test OK...

Страница 59: ...lay W Touch Item Photo Description 1 1 12 1 15 display with Fujitsu Touch Panel 2 Cable 1 VGA with power pin I P Cable 2 Serial touch with power pin I P H W Installation 1 1 Screw off the two screws a...

Страница 60: ...play with 6 screws as red mark Connect cable 1 to VGA port and cable 2 to COM1 4 1 Remove the jumper cover adjust Pin1 21 22 close for COM1 to be 5V Driver Installation and Verification 1 Driver Insta...

Страница 61: ...display by Settings to 2 Multiple Monitors 4 1 Select Extend my Windows Desktop onto this monitor on VIA S3G 5 1 Click Yes for save the settings The 2nd display was shown out the extend the screen In...

Страница 62: ...y Corp 3 20 2007 62 84 Rev 1 1 Item Photo Description 2 1 Select Touch Driver 3 1 Select FUJITSU TOUCH PANEL 4 1 Select Fujitsu Touch Panel Driver SERIAL Interface 5 1 Select Non Plug and Play Device...

Страница 63: ...3 20 2007 63 84 Rev 1 1 Item Photo Description 6 1 Click OK for completed installation 7 1 Select dual port for touch by COM1 and COM6 8 1 Completed installation Click Yes for restart system 9 1 Ente...

Страница 64: ...EBN Technology Corp 3 20 2007 64 84 Rev 1 1 Item Photo Description 10 1 Click Touch Panel icon 11 1 Select Dual monitor set up 12 1 Select Calibration Connected port COM1 COM6...

Страница 65: ...7 65 84 Rev 1 1 2 6 7 RFID Item Photo Description 1 1 RFID module Serial I F H W Installation 1 1 Screw off the cover 2 1 Pass through the RFID cable under the Inverter BD connect to CN12 of M B 3 1 S...

Страница 66: ...Rev 1 1 Verification 1 1 Enter to All Programs Communication Hyper Terminal 2 Set the configuration as same VFD as above 2 1 Set on using COM5 port 3 1 Set on Baud Rate to be 9600 bps 4 1 Attach the R...

Страница 67: ...84 Rev 1 1 2 6 8 Compact Flash Item Photo Description 1 1 Compact Flash 2 1 Use screw driver to open upper case 2 Remove 2 screws 3 1 Remove 2 screws on bridge board 4 1 Take off plastic strings from...

Страница 68: ...EBN Technology Corp 3 20 2007 68 84 Rev 1 1 Item Photo Description 5 1 Put compact flash on socket...

Страница 69: ...t Card Item Photo Description 1 1 MSR 3 tracks Serial Port Smart Card Reader module USB H W Installation 1 1 Screw off the cover 2 1 Pass through the cables under the Inverter BD Connect Smart cable t...

Страница 70: ...Card Driver Installation and Verification 1 3 Select Yes this time only and Click Next 2 4 Install the software automatically Recommended and Click Next 3 5 Click Finish for complete installation 4 6...

Страница 71: ...chnology Corp 3 20 2007 71 84 Rev 1 1 Item Photo Description 5 7 Select STD 200 0 6 8 Insert IC Card to slot 7 9 Show PASS complete test OK 2 6 10 I Button Item Photo Description 1 1 PS2 I button modu...

Страница 72: ...rp 3 20 2007 72 84 Rev 1 1 H W Installation 1 1 Screw off the cover 2 1 Pass through the I button under the Inverter BD connect to CN12 of M B 3 1 Screw up the MSR to slot Verification 1 1 Enter to Ac...

Страница 73: ...ription 2 Complete test OK 2 6 11 Mini PCI Wireless LAN Item Photo Description 1 Mini PCI Wireless LAN 2 1 Use screw driver to open upper case 2 Remove 2 screws 3 1 Insert the WLAN card to mini PCI sl...

Страница 74: ...Press Wireless LAN Card 2 Make sure connected well 5 1 Remove 2 screws from cover bracket 2 Remove cover bracket 3 Antenna cable needs to go under cover bracket 4 Remove EMI cover 6 1 Tied Antenna cab...

Страница 75: ...EBN Technology Corp 3 20 2007 75 84 Rev 1 1 Item Photo Description 8 1 Tighten 7 screws on EMI cover...

Страница 76: ...Black T4000 238 2 4 1 5T 2 Call Sales 12 1 Bezel PC ABS 1CAV 1 Rubber Black T4000 252 1 8 1T 2 1 2 10500025RH Rubber Black T4000 195 1 8 1T 2 Call Sales Fujitsu 15 0 touch panel N010 0510 T237 1 Touch...

Страница 77: ...ll Sales 10 10100004RH FUJITSU Touch Panel Control Board N16B 0558 B280 1 Call Sales 11 10100007RH Bridge Board TTL 18Bit TTL 12 1 LG LCD 1 Call Sales 11 10100006RH Bridge Board LVDS 24Bit 15 AUO LCD...

Страница 78: ...EBN Technology Corp 3 20 2007 78 84 Rev 1 1 3 2 Base Unit 3 2 1 Explode of Base Unit...

Страница 79: ...Sales 5 30200013RH HDD Cover 1 Call Sales 7 30100006RH HDD Tray 1 Call Sales 8 10200004RH 15 12 1 Swivel Hinge Assembly 1 Call Sales 9 10 11 A10400216RH Power Supply Module 1U 220W W PFC 1 Call Sales...

Страница 80: ...e M B To I O BD 100P Call Sales 21600008RH Cable M B To HDD 80P Call Sales 21600009RH Cable 2nd VGA to I O board 10 pin transfer to D SUB 15 pins Call Sales 21600016RH Cable M B To I O BD 20P USB Call...

Страница 81: ...Sales 20700002RH POWER CORD FOR EUR Call Sales 20700004RH POWER CORD FOR Australia Call Sales 3 4 2 HDD Part No Description Photos Price US 20200009RH SEAGATE 5400RPM 40G HDD ULTRA ATA 100 ST340015A...

Страница 82: ...2 Track PS2 Call Sales A10400023RH 2 Track RS232 Call Sales A10400009RH 3 Track PS2 Call Sales A10400024RH 3 Track RS232 Call Sales 3 4 5 2nd Display Part No Description Photos Price US A10400022RH 1...

Страница 83: ...5RH RFID Call Sales 3 4 8 Compact Flash Part No Description Photos Price US 20600001RH Compact Flash 128MB Call Sales 20600002RH Compact Flash 256MB Call Sales 20600003RH Compact Flash 512MB Call Sale...

Страница 84: ...11 I Button MSR 2T KB Part No Description Photos Price US A10400121RH I Button MSR 2T KB Call Sales 3 4 12 Wireless LAN Part No Description Photos Price US 30400001RH ANTENNA 35B L R Call Sales 101000...

Отзывы: