


EGO
EN
11
www.eberg.eu
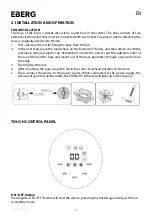
SPEED button
This button is used to select the fan speed. Three levels of fan speed are available:
1 - LOW, 2 - MEDIUM, 3 – HIGH.
WIND button
The „WIND” button is used to select the fan operation mode. Available modes are:
•
NORMAL,
•
NATURAL,
•
SLEEP.
Within the NORMAL mode, you can choose between three fan speeds, described above
(SPEED button).
Fan operation in NATURAL mode is characterized by irregular variability of fan speed. The fan
operation in this mode gives the impression of natural, variable gusts of wind. NATURAL mode
can be activated at any of the available speed levels (1 - LOW, 2 - MEDIUM, 3 - HIGH). The natural
mode at each of the available speeds is characterized by a different variability of fan operation.
Under the SLEEP mode, 3 fan speeds are also available (SPEED button).
SLEEP mode - speed 3 - HIGH:
For the first half hour the fan will work as in NATURAL mode at speed 3 - HIGH, for the next half
hour it will work as in NATURAL mode at speed 2 - MEDIUM, and then after that time it will work
as in NATURAL mode at speed 1 – LOW.
SLEEP mode - speed 2 - MEDIUM:
For the first half hour, the fan will work as in NATURAL mode at speed 2 - MEDIUM, and t h e n
after that time it will work as in NATURAL mode at speed 1 – LOW.
SLEEP mode - speed 1 - LOW:
The fan will work as in NATURAL mode at speed 1 - LOW. Within 60 seconds of entering SLEEP
mode, the display automatically turns off.
OSCILLATION button:
After activating the OSCILLATION function, the fan will rotate around its axis by a certain
angle, until it reaches the extreme position to the right, then to the left. Pressing the
OSCILLATION button again will deactivate this function and the fan will stop at its current
position.
TIMER button:
To set the device to turn off automatically between 0-15 hours, use the TIMER button. After 60
seconds of no operation, the panel automatically turns off.