EB TECHNOLOGY TX-MINI Скачать руководство пользователя страница 17

2002/95/EC

Ernestino Bandera     

Busto Arsizio, 27/11/2014
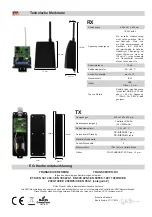
Dimensions

b50 x h160 x d25 mm

Alimentation

2 batterie LR06/AA 

(1,5V-2600mAh)

Working temperature

-15 ÷ +50 °C

Autonomie en attente

TX - DIP1 OFF 

1 année

TX - DIP1 ON 

2 ans

Portée maxi

20 m

Entrées

2

Degré de protection

IP54 Test avec pression milieu 

Boitier

POLYCARBONATE

PC épaisseur: > 3 mm

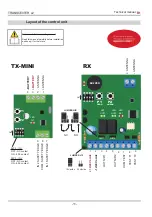
TRANSCEIVER-TXMINI                                TRANSCEIVER-RX

correspondaux dispositions pertinentes suivantes:

ETSI EN 301 489-3 EN 300 220-1 EN 300 220-3 EN 60950: 1997 1999/5/CEE

 2004/108/CE 2006/95/CE EN 954-1 (catégorie 2)

Le dispositif est considéré comme un système associé à d’autres systèmes. 

Les caractéristiques EMC peuvent changer selon le type d’installation et il est nécessaire de contrôler les caractéristiques EMC de l’installation.

Le produit correspond aux normes actuelles s’il est branché avec TEST.


Déclaration CE de conformité


Caractéristiques techniques

Dimensions

b65 x h81 x d30 mm

Alimentation

12/24 Vac/dc

Avec l’isolation du réseau 

électrique pas inférieur entre 

le circuit primaire et secon- 

daire du transformateur de 

sécurité conforme à la norme 

IEC 61558-2-6 ou équivalent. 

Dans le cas où la source d’a- 

limentation est en courant 

continu avec une puissance 

supérieure à 100VA (>8A) un 

sectionneur est nécessaire 

entre cell et le RX.

Courant absorbé

70 mA

Température

de fonctionnement

-20 ÷ +60 °C

Nombre de canaux radio

max 16 TX

Degré de protection

IP44

Boitier

ABS

épaisseur: > 2 mm

Type de relais

Charge  optique,  tension 

maximum    NO/NF    <=      30 

Vac  ou  <=  60  Vdc,  courant 

1…100mA. Apte pour les cir-

cuits SELV.

RX

5mm

25mm

160mm

140mm

TX

75 mm

95 mm

195 mm

40 mm

25 mm

Содержание TX-MINI

Страница 1: ...X regeln 868 Mhz radio bidirectional device wireless which transmits a signal to a control device The receiver constantly checks the status of the transmitters connected to it It can manages up to 16...

Страница 2: ...per garantire sempre il corretto funzionamento veri care dopo la sostituzione le funzionalit del sistema Prima della chiusura del contenitore del modulo TX accertarsi che guarnizione e sede relativa s...

Страница 3: ...lle caratteristiche EMC dell intero impianto necessaria Il seguente prodotto risponde alle normative vigenti solo se collegato con TEST Dichiarazione CE conformit Caratteristiche tecniche Dimensioni b...

Страница 4: ...2 3 4 JUMPER N R NA NC 1 2 3 4 5 6 7 8 9 12 24 Vac dc 12 24 Vac dc OUT N R 1 OUT N R 2 COM TEST TEST T1 TEST T2 9 ING 2 COSTA ON P1 LED TX1 P2 P1 PROG P2 CHECK BUZZER LED OUT1 N R1 N R2 ON LED OUT2 L...

Страница 5: ...ne Ricevitore Reset della memoria del ricevitore Questa operazione deve essere effettuata sempre al primo utilizzo Trasmettitore 4 Collegare nei morsetti del TX il contatto di sicurezza NC oppure il c...

Страница 6: ...si 3 segnali acustici 4 Una volta effettuata la memorizzazione il ricevitore esce automaticamente dalla modalit di apprendimento e il LED RX1 si spegne Per memorizzare un altro TX sullo stesso ingress...

Страница 7: ...azione Se si sceglie di operare con questa con gurazione si consiglia di eseguire l installazione con DIP 1 OFF sia su TX che RX in modo da eseguire il test di funzionamento con il sistema CHECK e poi...

Страница 8: ...3 beep veloci se ha rilevato problemi Durante il modo CHECK l utilizzatore potr eseguire comunque le manovre dell automazione Segnalazione Batteria Scarica Il Ricevitore emette 3 brevi beep se il TX c...

Страница 9: ...rmed about Replacing the battery every 12 months to guarantee the correct operation testing the complete installation after replacing Before closing the TX make sure the O RING is undamaged and clean...

Страница 10: ...tallation is necessary This product complies with the current norms only if it connected with TEST EC declaration of con rmity Technical features Dimensions b65 x h81 x d30 mm Power supply 12 24 Vac d...

Страница 11: ...NA ANTENNA DIP 2 IN 1 OFF NC contact ON 8 2K contact DIP 3 IN 2 OFF NC contact ON 8 2K contact 12 Vac dc 24 Vac dc RX ANTENNA ANTENNA JUMPER J12 8 7 1 2 3 4 JUMPER N R NO NC 1 2 3 4 5 6 7 8 9 12 24 Va...

Страница 12: ...all previously memorized installations First Installation Receiver Cancel of the memory of the receiver This operation should be done at the rst installation Transmitter 4 Connect to the terminal boa...

Страница 13: ...lready memorized the buzzer beeps three times 4 Once the memorization has been completed the receiver works automatically and the LED RX1 turns off If you need to memorize extra transmitters start fro...

Страница 14: ...signal from the transmitter the RECEIVER switches on the alarm output for the corresponding TX Installation To test this operating mode put DIP 1 OFF in the transmitter and in the receiver after compl...

Страница 15: ...s out of the CHECK operation the receiver will give one long beep if the transmission with the TX is correct while it will beep 3 times if there is a problem with the tx During the CHECK operation the...

Страница 16: ...t cr er des situations dangereuses Le dispositif r pond aux normes requises EN 954 1 cat gorie 2 SEULEMENT si on utilise la con guration TEST avec contr le active DIP1 TX RX OFF Il faut v ri er que le...

Страница 17: ...cessaire de contr ler les caract ristiques EMC de l installation Le produit correspond aux normes actuelles s il est branch avec TEST D claration CE de conformit Caract ristiques techniques Dimension...

Страница 18: ...t NC ON contact 8 2K 12 Vac dc 24 Vac dc RX ANTENNE ANTENNE JUMPER J12 8 7 1 2 3 4 JUMPER N R NA NC 1 2 3 4 5 6 7 8 9 12 24 Vac dc 12 24 Vac dc OUT N R 1 OUT N R 2 COM TEST TEST T1 TEST T2 9 ON COM PA...

Страница 19: ...tteur est effac e Premi re installation R cepteur Effacer la m moire du r cepteur Cette op ration doit tre effectu e toujours la premi re utilisation Emetteur 4 Connecter aux bornes de TX le contact d...

Страница 20: ...tteur a t m moris correctement si l metteur a t d j m moris le buzzer sonne trois fois 4 Le r cepteur sort de la programmation automatiquement et LED RX1 s teint Pour m moriser un autre metteur il fau...

Страница 21: ...X le r cepteur met en alarme le TX Installation Si vous choisissez d utiliser avec cette con guration il est recommand de placer DIP 1 OFF de TX de RX de mani re effectuer la fonction de test avec le...

Страница 22: ...omalies Au terme de la v ri cation du contr le il est possible de faire des manoeuvres Indications batteries faibles Le receiver met bips sonores si la pile du TX est able Pour la con guration avec le...

Страница 23: ...eses Produkt entspricht den wesentlichen Sicherheitsanforderungen der folgenden weiteren Richtlinien Kat 2 EN 954 1 nur im Test Kon guration mit aktiver Kontrolle DIP 1 TX RX OFF Pr fen die lesbare CE...

Страница 24: ...ist notwendig die Kontrolle der EMC Beschreibungen Diese Produkt etnspricht die gesetzliche Richtlinien nur wenn mit Funktion TEST verwendet wird EG Konformitatserklarung Technische Merkmale Abmessug...

Страница 25: ...ATTERIE ANTENNE ANTENNE DIP 2 Eingang Nr 1 OFF n geschlossen Kontakt ON 8 2K Kontakt DIP 3 Eingang Nr 2 OFF n geschlossen Kontakt ON 8 2K Kontakt 12 Vac dc 24 Vac dc RX ANTENNE ANTENNE JUMPER J12 8 7...

Страница 26: ...ht Erste Installation Empf nger Den Speicher des Senders l schen Dies sollte bei der ersten Installation gemacht werden Funksender 4 Verbinden Sie den N C Kontakt oder den 8 2 K Widerstandsendkontakt...

Страница 27: ...der Summer drei Mal 4 Wenn die Programmierung fertig ist schaltet das Funkempf nger sofort aus und LED RX1 schaltet sich aus Um ein neuen Sender zu programmieren fangen Sie wieder von Punkt 1 an Um d...

Страница 28: ...ekunden Wenn der Empf nger nach 30 Sekunden kein Signal vom Sender erh lt bringt der Empf nger eine Warnmeldung in den Ausgang des entsprechenden TX Installation Wenn Sie sich f r diese Bedienungsinst...

Страница 29: ...ertragung des TX anzuzeigen Wenn der Empf nger nicht mehr im Check Vorgang ist piept er ber einen l ngeren Zeitraum Sollte es Probleme mit dem TX geben piept der Empf nger dreimal W hrend des Check Vo...

Страница 30: ...instrumento y consultar siempre que haya duda sobre el uso y leerlo a la hora de hacer el mantenimiento Este dispositivo est conforme a las normas de la unidad Europea EN 954 1 con el TEST activo DIP1...

Страница 31: ...er sticas EMC pueden variar seg n el tipo de instalaci n entonces es necesario averiguar las caracter sticas EMC de toda la instalaci n El producto siguente responde a la norma solamente si est conect...

Страница 32: ...AD ENTRADA 1 BANDA DE SEGURIDAD BATERIA BATERIA ANTENNA ANTENNA DIP 2 Entrada 1 OFF contacto NC ON contacto 8 2K DIP 3 Entrada 2 OFF contacto NC ON contacto 8 2K 12 Vac dc 24 Vac dc RX ANTENA ANTENA J...

Страница 33: ...elada Primera Instalacion Receptor Borrar la memoria del receptor Esta operaci n debe ser efectuada siempre a la primera utilizaci n Trasmisor 4 Conectar en las terminales del Tx el contacto de seguri...

Страница 34: ...3 se ales ac sticas 4 Une vez efectuada la memorizaci n el receptor saldr en autom tico de la modalidad de Grabacion y el LED RX1 se apaga Para memorizar otro TX en el mismo acceso comenzar del punto...

Страница 35: ...con guraci n se veri ca un control activo de la seguridad y del sistema segun normativa la recepci n de la se al del transmisor TX est siempre activa y abr un consumo mayor de bater a En el caso de 2...

Страница 36: ...itidos consecutivos si falta cobertura En modalidad CHECK se puede hacer manobrias en el automatismo Bateria descargada El receptor emite 3 senales acusticas si el TX tiene una bater a descargada si e...

Отзывы: