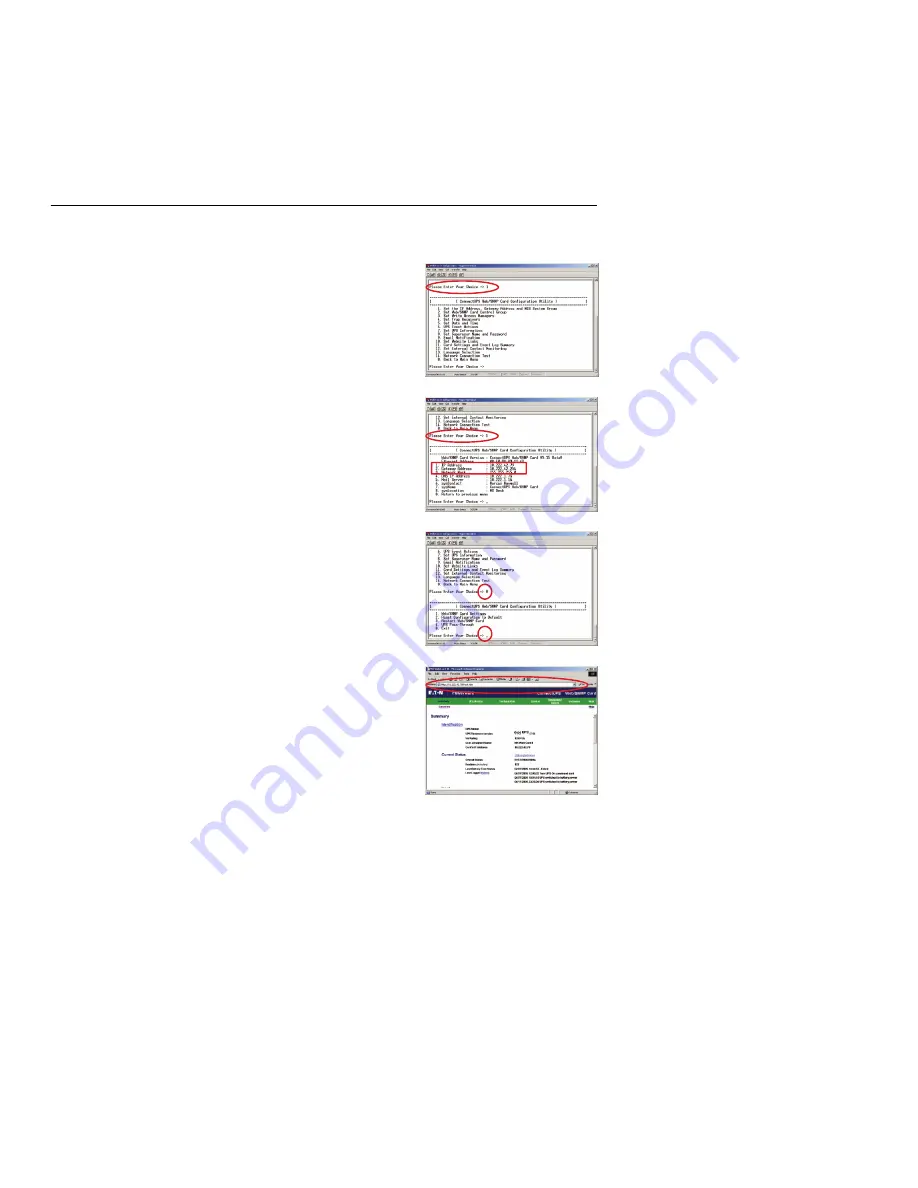
manualshive.com logo in svg
background image

Figure 12.

Configure Adapter Settings

Figure 13.

Set ConnectUPS Adapter IP Address

Figure 14.

Save and Exit

Figure 15.

ConnectUPS Adapter Summary Page

EATON

Powerware

®

ConnectUPS

t

Web/SNMP Adapter (E Model) Quick Start Instructions 164950186 Rev A

9

Section 4

Configure the Adapter

To configure the adapter after you have connected it:

1.

Type

1

on the Main Menu to display the Web/SNMP Adapter

Settings screen (see Figure 12).

2.

Type

1

to display the Set the IP Address, Gateway Address

and MIB System Group screen (see Figure 13).

3.

To set the IP Address, type

1

and press

Enter

. Type the IP

Address and press

Enter

(see the Checklist).

4.

Type

0

to return to the previous menu.

5.

Repeat Steps 3 and 4 to set the Gateway Address and
Network Mask.

6.

Change any other options as needed for your particular
configuration by typing the corresponding number shown in
the menu.

Each Configuration Menu setting is described in detail in the
Appendix of the

ConnectUPS Web/SNMP Card User’s Guide

.

You can change the other options later if you prefer.

7.

Type

0

until you return to the Main Menu (see Figure 14).

8.

Type

0

to save all settings and exit the adapter configuration.

9.

Verify network communication by using a Web browser (see
Figure 15). Type the IP Address of your adapter and select

Go

. The ConnectUPS Adapter summary page opens.

NOTE

Once the adapter is reachable on the network, you

can use a Web browser, Telnet, or similar utility to adjust any
of the configuration settings. The menus are identical to
those seen during serial configuration and are
password-protected for Superuser access only.

Содержание Powerware 9150 UPS

Страница 1: ...ConnectUPSt Web SNMP Adapter S Male DB 9 to RJ 45 Serial Cable with Detachable DC Power Cable S Female DB 9 to RJ 45 Serial Cable labeled PC S External Power Supply with Detachable Power Cord S Software Suite CD with User Guide PDF S Quick Start Instructions S Ethernet Cable ...

Страница 2: ...inistrator must set up the DHCP server to provide a static address each time the adapter makes a DHCP request Provide the network administrator with the adapter s MAC address on the bottom of the adapter J MAC address 3 If you need e mail functionality obtain the following network settings either SMTP only or DNS and Host Name J SMTP mail server IP Address J DNS name server IP Address J Host Name ...

Страница 3: ...ironment set DIP switch 2 to the 1 on position 2 Open or remove the UPS front cover and locate the female 9 pin RS 232 port labeled X100 See Figure 2 3 If the X100 port is available use the supplied unlabeled serial cable to connect the UPS port on the ConnectUPS E to the female 9 pin RS 232 port on the UPS see Figure 3 Insert the DC power cable into the power inlet on the ConnectUPS E labeled 12 ...

Страница 4: ...tected receptacle 5 Replace the UPS front cover 6 Connect an active Ethernet cable supplied to the network connector on the ConnectUPS E 7 To configure the adapter locally using the supplied serial cable continue to Connect the Adapter on page 7 To configure the adapter remotely through a network using a Web browser or Telnet or similar utility refer to the ConnectUPS Web SNMP Card User s Guide PD...

Страница 5: ... DIP switch 2 to the 1 on position 2 Remove the UPS front cover and locate the female 9 pin RS 232 port see Figure 6 3 If the female port is available use the supplied unlabeled serial cable to connect the UPS port on the ConnectUPS E to the female 9 pin RS 232 port on the UPS see Figure 7 Continue to Step 5 4 If the female port is not available use the supplied serial cable labeled PC to connect ...

Страница 6: ...e 8 Replace the UPS front cover 9 Connect an active Ethernet cable supplied to the network connector on the ConnectUPS E 10 To configure the adapter locally using the supplied serial cable continue to the following section Connect the Adapter To configure the adapter remotely through a network using a Web browser or Telnet or similar utility refer to the ConnectUPS Web SNMP Card User s Guide PDF o...

Страница 7: ... UPS port To connect the adapter to the computer and start the configuration 1 Plug the RJ 45 end of the supplied serial cable labeled PC into the PC port on the adapter Verify that you have used the port labeled PC The other port on the adapter will not work for configuration 2 Plug the other end of the serial cable into the serial COM port on the computer 3 Open your terminal emulation program s...

Страница 8: ...lowing conditions S Verify the serial line is set to 9600 baud No parity 8 data bits 1 stop bit and no flow control S If the serial line settings are correct check the cabling to verify all connections are secure S Verify that your terminal program is on the correct communication port for the serial connection S Verify that the adapter has power one or more LEDs on the adapter are illuminated The ...

Страница 9: ...to set the Gateway Address and Network Mask 6 Change any other options as needed for your particular configuration by typing the corresponding number shown in the menu Each Configuration Menu setting is described in detail in the Appendix of the ConnectUPS Web SNMP Card User s Guide You can change the other options later if you prefer 7 Type 0 until you return to the Main Menu see Figure 14 8 Type...

Страница 10: ...r guides for instructions Use the following procedure to install NetWatch software after you have installed and configured the adapter 1 Insert the Software Suite CD into the computer s CD ROM drive The CD menu displays after a few seconds 2 Select Software Wizard from the Main Menu 3 Select Install NetWatch see Figure 16 4 Select the operating system 5 Select Launch the Installer see Figure 17 6 ...

Страница 11: ...lect Next 12 Verify the configuration settings are correct and select Finish see Figure 22 13 A pop up message indicates that communication with the adapter is established see Figure 23 Select Clear to acknowledge the message 14 Repeat Steps 1 through 13 on all computers powered by the corresponding UPS using this specific adapter NetWatch installation and configuration is now complete Powerware L...

Страница 12: ...MBERS UNITED STATES 1 800 356 5737 or 919 870 3149 CANADA 1 800 461 9166 ext 260 www powerware com ALL OTHER COUNTRIES Call your local sales representative 2006 Eaton Corporation All Rights Reserved 164950186 Rev A ...

Отзывы: