background image

2

EATON  

ET4001 Crimp machine operator´s manual  W-EQCR-TM022-E3  March 2019

Table of contents

1.  PREVENT 

UNAUTHORIZED 

OPERATION. Do not 

permit anyone to operate 

this equipment unless 

they have read and 

thoroughly understood 

this manual.

2. WEAR SAFETY GLASSES.
3. AVOID PINCH POINTS. 

Do not rest your hand 

on the crimp ring. Keep 

your hands clear of all 

moving parts. Do not 

allow anyone, other than 

the operator, close to the 

equipment while it is in 

operation.

4. MAINTAIN DIES WITH 

CARE. Dies used in 

the ET4001 crimp 

machine are hardened 

steel, offering the best 

combination of strength 

and wear resistance for 

long life. Hardened dies 

are generally brittle and 

care should be taken to 

avoid any sharp impact. 

Never strike a die with a 

hardened instrument.

5. USE ONLY SPECIFIED 

EATON PRODUCTS.  

Make hose assemblies 

using only Eaton's  

hose and Eaton fittings 

specified for this 

assembly equipment. 

6. VERIFY CORRECT 

CRIMP DIAMETERS. 

Check and verify correct 

crimp diameters of all 

fittings after crimping. 

Do not put any hose 

assemblies  into  service     

if the crimp diameters 

do not meet Eaton crimp 

specifications.

7. MAKE SURE ALL DIES 

ARE COMPLETELY IN 

PLACE, the spacer ring 

rests against the locator 

bracket, and the pusher 

halves are closed before 

crimping.

8. DO NOT OVER 

PRESSURIZE. Do not 

exceed the 5,000 psi 

hydraulic pressure 

supplied to the machine

9.  DIE CHANGE. DO NOT 

INSERT/REMOVE DIES 

WHILE THE POWER IS 

ON OR MACHINE IS IN 

OPERATION.

10. SECURE THE 

EQUIPMENT TO 

A STABLE WORK 

SURFACE. Prior to 

operation, secure the 

crimp machine to a 

stable work surface to 

prevent the equipment 

from tipping. See 

pages 4-5 for mounting 

instructions.

11. UNPLUG THE POWER 

SUPPLY WHEN NOT IN 

USE.

12. KEEP WORK AREA 

CLEAN. Cluttered areas 

and benches invite 

accidents.

13. DO NOT OPERATE 

WITHOUT THE BASE 

ADAPTER RING IN 

PLACE.

Safety instructions

ET4001 Crimp machine

WARNING 

Eaton's hose and Eaton hose fittings should only be assembled 
using Eaton approved assembly equipment. Do not use any 
combinations of Eaton's hose, Eaton hose fittings, or Eaton 
assembly equipment with hose, hose fittings, or assembly 
equipment supplied by another manufacturer. 
Eaton hereby disclaims any obligation or liability (including 
incidental and consequential damages) arising from breach of 
contract, warranty, or tort (under negligence or strict liability 
theories) should Eaton hose, Eaton hose fittings, or Eaton 
assembly equipment be used with any hose, hose fittings, or 
assembly equipment supplied by another manufacturer, or in the 
event that product instructions for each specified hose assembly 
are not followed. (Reference SAE J1273 – Recommended practice 
for hydraulic hose assemblies).

WARNING 

Failure to follow Eaton processes and product instructions and 
limitations could lead to premature hose assembly failures, 
resulting in property damage, serious injury, or death. 
Eaton fitting tolerances are engineering to match Eaton's hose 
tolerances. The combination or use of Eaton's hose and hose 
fittings supplier by another manufacturer may result in the 
production of unreliable and/or unsafe hose assemblies and is 
neither recommended nor authorized by Eaton.  

Read and understand the operator’s manual before 

attempting to operate any equipment. 

Section  

Page

Safety instructions 


2

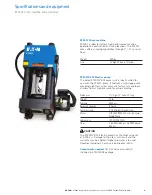
Specifications and equipment    


3

ET4001 Crimp machine 

3

ET4001P-002 Electric pump 


    3

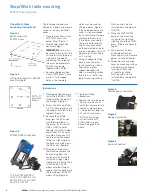
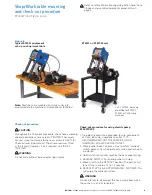
Shop/Work Table Mounting Instructions


              4 - 5

Check-out procedure 


5

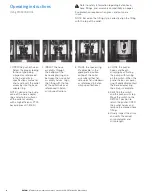
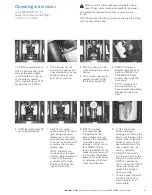
Operating instructions  


6 - 9

ET4000AR-001:  Using ET4000AR-001 Base adapter rings 

6

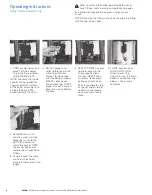
ET4000AR-002:   Using ET4000AR-002 Base adapter rings for heavy 4-wire 

7  

and 6-wire fittings (-20 thru -32 collets)

T-410-25 Adapter ring 

8

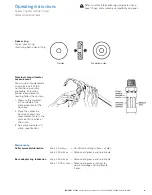
Spacer ring and nominal crimp diameter measurement 

9

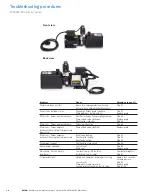
Troubleshooting procedures                                                                                                          

11

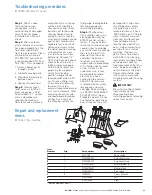
Repair and replacement items 


11

Содержание ET4001

Страница 1: ...Eaton ET4001 Crimp machine operator s manual ...

Страница 2: ...ATE WITHOUT THE BASE ADAPTER RING IN PLACE Safety instructions ET4001 Crimp machine WARNING Eaton s hose and Eaton hose fittings should only be assembled using Eaton approved assembly equipment Do not use any combinations of Eaton s hose Eaton hose fittings or Eaton assembly equipment with hose hose fittings or assembly equipment supplied by another manufacturer Eaton hereby disclaims any obligati...

Страница 3: ... features a two stage pump providing high flow at low pressure for fast ram approach and low flow at high pressure for actual crimping Dimensions 7 high 10 wide 22 long Weight 75 lbs Pressure 5000 psi Reservoir capacity 6 Quarts Outlet port size 16 Straight thread O ring Motor 1HP 3450 RPM 220 volts 60 cycle Single Phase Hydraulic oil ISO 32 SAE 10W Flow 2 6 GPM to 900 psi 0 6 GPM above 900 psi CA...

Страница 4: ...tern on mounting surface Remove power unit and drill holes 6 Replace pump and align holes on mounting surface with base plate of pump Insert bolts from top of mounting surface Washers and nuts are installed from underneath TIGHTEN Figure 1 Bench layout for ET4001 press Figure 4 Connection at top plate Figure 5 Gauge installation Figure 6 Hose connection Figure 2 Lifting hole layout on ET4001 press...

Страница 5: ...NG Do not attempt to disconnect the hose sssemblies when the pusher is not fully retracted Check out procedure Check out procedure for using electric pump ET4001P 002 1 Plug electric cord into a grounded 4 wire connection 220 volt 60 cycle single phase outlet IT IS RECOMMENDED THAT THE PUMP BE ON AN INDIVIDUAL 20 AMP SERVICE OUTLET 2 Close pusher halves on press Due to safety interlock switch powe...

Страница 6: ...tions 3 PLACE the spacer ring if applicable in the appropriate position on top of the collet assembly either flat side up or flat side down as referenced in Eaton crimp specifications 4 CLOSE the pusher halves and begin crimping by activating the pump with turning on the switch When the pusher halves or spacer ring if applicable contact the base adapter ring the crimp is complete 5 RELEASE the swi...

Страница 7: ... assembly into the base adapter ring NOTE Lubricate the inside cone of the base adapter ring and external surfaces of the collet assembly with a high efficiency PTFE based lubricant T 400 G 8 INSERT the hose assembly through the bottom of the base adapter ring and between the two collet assembly halves To achieve a full flat crimp for 4SP 6SP fittings locate the bottom of the socket approximately ...

Страница 8: ...ced in the crimp specifications manual INSERT hose assembly from below between collet halves PLACE appropriate side of spacer ring on top of collet with uncrimped hose assembly held in place 5 RELEASE the switch and the pusher will stop Move the switch to the RETRACT position to return the pusher OPEN the pusher halves and remove the crimped hose fittings 6 Visually inspect the crimp and verify th...

Страница 9: ...the crimped portion of the hose end 2 Place the caliper in a position to allow for a measurement across the pressed flat portion of the crimp 3 See crimp diameters in crimp specifications Maintenance Collet assembly lubrication Every 30 crimps Re lubricate sliding surfaces of dies Every 250 crimps Remove old grease and re lubricate Base adapter ring lubrication Every 250 crimps Remove old grease a...

Страница 10: ...oid malfunction Step 5 Motor runs Pusher advances Pump unload valve stuck shut Replace pump but doesn t develop final crimp pressure blows fuse Motor runs Pusher advances Relief valve leaking Step 3 but doesn t develop final crimp pressure Shuttle valve leaking Step 4 Relief valve set low Step 3 Pusher won t retract Shuttle valve stuck closed Step 4 Erratic pusher movement Low oil level Step 2 Wor...

Страница 11: ...shuttle valve is in a closed position and the ET4001 pusher will not retract it may be helpful to tap the shuttle valve cap several times to dislodge any silt that may be causing the stem to bind If this does not free the valve and allow the pusher to retract use extreme caution prior to proceeding with shuttle valve removal as the system is still under pressure It may be advisable to relieve pres...

Страница 12: ...s Group Europe Route de la Longeraie 7 1110 Morges Switzerland Tel 41 0 21 811 4600 Fax 41 0 21 811 4601 Eaton Hydraulics Group Asia Pacific Eaton Building No 7 Lane 280 Linhong Road Changning District Shanghai 200335 China Tel 86 21 5200 0099 Fax 86 21 2230 7240 2019 Eaton All Rights Reserved Printed in USA Document No W EQCR TM022 E3 March 2019 ...

Отзывы: