background image


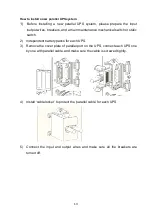
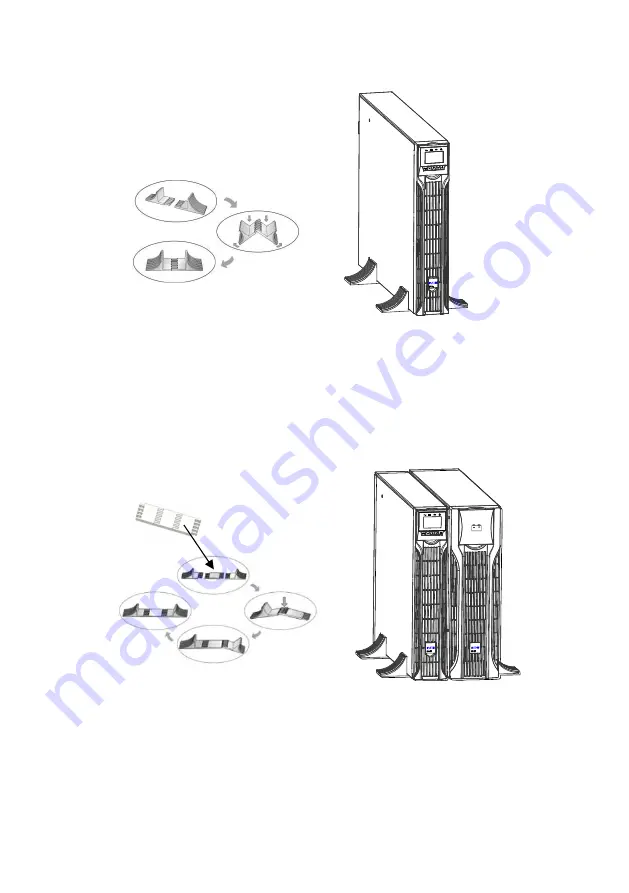
    2. Set up the ‘Stabilizer bracket’, then take the unit into ‘Stabilizer bracket’. 


EBM model


1. Set up the ‘Extension plate’ as below and install to ‘Stabilizer bracket’ from 
UPS. 
2. Take the UPS& EBM into ‘Stabilizer bracket’ individually. 
3.  Connect  to  UPS  with  ‘Battery  power  cable’---  Refer  to  rack  position 
installing. 


Note:   
This unit is recommended to be installed to UPS’s right side. 
If  installing  additional  unit,  place  it  next  to  the  previous  unit  in  their  final 
location.     


Содержание DX RT 10K UPS

Страница 1: ...Eaton DX RT Online UPS 6000 10000VA XL IN USER MANUAL ...

Страница 2: ......

Страница 3: ...000 4 8 Conducted magnetic field level 4 Performance IEC EN 62040 3 Special symbols The following are examples of symbols used on the UPS or accessories to alert you to important information RISK OF ELECTRIC SHOCK Observe the warning associated with the risk of electric shock symbol Important instructions that must always be followed Do not discard the UPS or the UPS batteries in the trash This pr...

Страница 4: ...ling Wear rubber gloves and boots Do not lay tools or metal parts on top of batteries Disconnect charging source prior to connecting or disconnecting battery terminals Determine if battery is inadvertently grounded If inadvertently grounded remove source from ground Contact with any part of a grounded battery can result in electrical shock The likelihood of such shock can be reduced if such ground...

Страница 5: ...y Special precautions The unit is heavy wear safety shoes and use vacuum lifter preferentially for handling operations All handling operations will require at least two people unpacking lifting installation in rack system Straps are provided only for unpacking manually the unit from the carton don t use the straps to carry the unit around The unit can slip from the straps during handling risk of i...

Страница 6: ...npacking the Unit 5 3 3 Checking the accessory kit 6 3 4 Install the unit 7 4 Power cables connection 10 4 1 Access to terminal blocks AC source to UPS 11 4 2 Access to terminal blocks PDU source to R T UPS Optional 12 4 3 Parallel Installation and Operation Optional 12 5 Operation 17 5 1 Control panel 17 5 2 LCD description 19 5 3 Display functions 21 5 4 User settings 22 5 5 UPS startup and shut...

Страница 7: ... 7 1Equipment care 35 7 2 Transporting the UPS 35 7 3 Storing the equipment 35 7 4 Replacing batteries 36 7 5 Recycling the used equipment 37 8 Troubleshooting 38 8 1 Typical alarms and faults 38 8 2 Silencing the alarm 42 9 Specifications 43 9 1 Model specifications 43 10 Glossary 47 ...

Страница 8: ...ilitate recycling separate the various packing components The cardboard we use comprises over 50 of recycled cardboard Sacks and bags are made of polyethylene Packing materials are recyclable and bear the appropriate identification symbol Materials Abbreviations Number in the symbols Polyethylene terephthalat PET 01 High density polyethylene HDPE 02 Polyvinyl chloride PVC 03 Low density polyethyle...

Страница 9: ...l be erratic These power problems have the potential to corrupt critical data destroy unsaved work sessions and damage hardware causing hours of lost productivity and expensive repairs With the UPS you can safely eliminate the effects of power disturbances and guard the integrity of your equipment Providing outstanding performance and reliability UPS s unique benefits include True online double co...

Страница 10: ... 6 Parallel card optional 7 Dry IN OUT 8 Input Output terminal Standard model 5pole IPL IPN PE OPL OPN long backup model has 2 version one is 5 Pole Another is 7pole 7pole add bat bat and no external battery connector 10 9 Input switch 10 External battery connector 11 Maintenance bypass switch optional 12 EBM connector ...

Страница 11: ...4 2 3 EBM Front panel 2 4 EBM rear panel RT EBM 13 Fuse board cover replace EBM fuse 14 EBM plug 15 EBM connector 2 3 Circuit diagram ...

Страница 12: ...as been damaged during shipment keep the shipping cartons and packing materials for the carrier or place of purchase and file a claim for shipping damage If you discover damage after acceptance file a claim for concealed damage 3 2 Unpacking the Unit Unpacking the unit in a low temperature environment may cause condensation occurred in and on the cabinet Do not install the unit until the inside an...

Страница 13: ...s to facilitate sorting 3 3 Checking the accessory kit Verify that the following additional items are included with the unit Eaton DX RT UPS 6000VAIN 10000VAIN Eaton DX RT UPS 6000VAXLIN 10000VAXLIN DXRT EBM Battery power cable USB cable V V RS232 cable O O Parallel cable O O Dry contractor V V EPO contractor Stabilizer bracket V V Extension plate of Stabilizer bracket V Ear bracket V V V Rail kit...

Страница 14: ...d to be selected 1 Install Ear bracket to the unit by the M4 screws flat head 2 Slide the unit into rail kit and make sure tighten the rack mounting screw EBM model Identify the final position and keep 3U space for this installing and it is recommended to be installed below to UPS Note that you already installed a rail kit to rack cabinet for this operation and 2U rail kit is recommended to be sel...

Страница 15: ...ection The battery number can be adjusted from 16pcs 1 strings to 20pcs 1 strings for this unit if you ordered other type EBM please contact with local sale center If installing additional unit place it next to the previous unit in their final location 4 UPS external battery 1 8 meters long Note Before connecting the battery please refer the wiring label and G Tower position installing UPS model 1...

Страница 16: ...nd install to Stabilizer bracket from UPS 2 Take the UPS EBM into Stabilizer bracket individually 3 Connect to UPS with Battery power cable Refer to rack position installing Note This unit is recommended to be installed to UPS s right side If installing additional unit place it next to the previous unit in their final location ...

Страница 17: ...d cable cross sections Model DX RT 6K UPS DX RT 10K UPS Protective earthing conductor Min cross section 6mm 2 8AWG 10mm 2 6AWG Input L N G Min conductor cross section 6mm 2 8AWG 10mm 2 6AWG Input fuse 80A 100A Output L N Min conductor cross section 6mm 2 8AWG 10mm 2 6AWG It is recommended that an external isolating device should be installed between the mains input and UPS as shown in Figure AC Co...

Страница 18: ... qualified electrical personnel Before carrying out any connection check that the upstream protection devices Normal AC source and Bypass AC source are open O Off Always connect the ground wire first 1 Remove the cover of terminal block 2 Connect the AC cable to terminal blocks refer to the indication on rear panel R T model 3 Tie up the AC cable to the rear panel 4 Install back the cover of termi...

Страница 19: ...the UPS s terminal blocks from PDU s source detail operation please refer to PDU s user manual 4 3 Parallel Installation and Operation Optional As long as the UPS is equipped with parallel board and parallel cables up to 3 UPSs can be connected in parallel to configure a sharing and redundant output power ...

Страница 20: ...hanical switch or static switch 2 Independent battery packs for each UPS 3 Remove the cover plate of parallel port on the UPS connect each UPS one by one with parallel cable and make sure the cable is screwed tightly 4 Install cable locker to protect the parallel cable for each UPS 5 Connect the input and output wires and make sure all the breakers are turned off ...

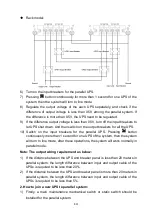
Страница 21: ...ers for the parallel UPS Pressing button continuously more than 1 second for one UPS of the system then the system will turn to line mode after these operations the system will work normally in parallel mode Note The output wiring requirement as below 1 If the distance between the UPS and breaker panel is less than 20 meters in parallel system the length difference between input and output cable o...

Страница 22: ...ll turn on after that the system will work in Line mode 3 How to remove a single UPS from parallel system 1 Firstly a main maintenance mechanical switch or static switch should be installed for the parallel system 2 Ensure the bypass is normal and the auto bypass setting is enable press the button to turn off the UPS system and the UPS system will turn to bypass mode 3 Transfer the main maintenanc...

Страница 23: ... and the auto bypass setting is enable press the button to turn off the UPS system and the UPS system will turn to bypass mode 3 Transfer the main maintenance switch or static switch from UPS to BPS then switch off the output breakers input breakers and mains breaker in the parallel system and the UPS will shut down The line will power the load via maintenance mechanical switch or static ...

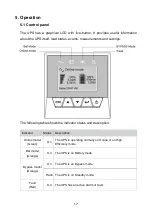
Страница 24: ...settings The following table shows the indicator status and description Indicator Status Description Online model Green On The UPS is operating normally on Online or on High Efficiency mode Bat model Orange On The UPS is on Battery mode Bypass model Orange On The UPS is on Bypass mode Flash The UPS is on Standby mode Fault Red On The UPS has an active alarm or fault ...

Страница 25: ... 100ms 1s to scroll down the menu option Enter next menu tree Press this button for 100ms 1s to select the present menu option or enter next menu but do not change any setting Select one menu option Press this button for 100ms 1s to select the present menu option or enter next menu but do not change any setting Confirm the present setting Press this button for 1s to confirm the edited options and ...

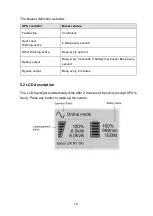
Страница 26: ... Beep every second Other Warning active Beep every second Battery output Beep every 4 seconds if battery low buzzer Beep every second Bypass output Beep every 2 minutes 5 2 LCD description The LCD backlight automatically dims after 2 minutes of inactivity except UPS is fault Press any button to wake up the screen ...

Страница 27: ...ing the equipment with the battery power Prepare your equipment for shutdown High Efficiency mode The UPS is operating on High Efficiency mode Once the mains are loss or abnormal the UPS would transfer to Line mode or Battery mode and the load is supplied continuously 1 The function could be enabled through the LCD setting or the software Winpower etc 2 It is reminded that the transfer time of UPS...

Страница 28: ... will lose its protection 5 3 Display functions Use the two middle buttons and to scroll through the menu structure Press the Enter button to select an option Press the ESC button to cancel or return to the previous menu When starting the UPS the display is in the default UPS status summary screen Main menu Submenu Display information or Menu function UPS status status summary screen Alarm Battery...

Страница 29: ...ish User password disabled Enabled disabled Audible alarm enabled disabled enabled Output voltage 208V 220V 230V 240V Can be changed in Standby mode and Bypass mode 230V Output frequency autosensing 50HZ 60HZ autosensing Power strategy normal high efficiency converter normal Auto bypass enabled disabled enabled Auto restart enabled disabled Authorize the product to restart automatically when mains...

Страница 30: ...e after the UPS is turned on Take off all of the connected loads before turning off the UPS Starting the UPS with utility Verify that the total equipment ratings do not exceed the UPS capacity to prevent an overload alarm Start the UPS with utility Check all the connection is correct Power on the UPS the fan begins to rotate After that the LCD will show the default UPS status summary screen Pressi...

Страница 31: ...he UPS turns into Battery mode If the utility power comes back the UPS will transfer to Line mode without output interruption of the UPS UPS shutdown with utility To shut down the UPS with utility Pressing button continuously for more than 3 seconds and the buzzer will beep 300ms After that the UPS will turn into Bypass mode at once When completing the above action UPS output voltage is still pres...

Страница 32: ...t the user own requirements optimize the function of UPS The main menu In the default UPS status summary screen when pressing or 300ms the detailed information about alarm battery the system status would be shown In the default UPS status summary screen when pressing ESC 300ms the display would enter main menu tree The main menu tree includes six branches UPS status menu measurement menu event log...

Страница 33: ...g on the menu of UPS status the display would enter the next UPS status menu tree The content of UPS status menu tree is same as the default UPS status summary menu By pressing ESC 300ms the display would return the last main menu tree ...

Страница 34: ...ld enter the next measurement menu tree A lot of detailed useful information could be checked here Ex the output voltage and frequency the output current the load capacity the input voltage and frequency etc By pressing ESC 300ms the display will return to the last main menu tree ...

Страница 35: ...layed one by one The max number of record is 100 when the number is larger than 100 the latest will replace the previous By pressing ESC 300ms the display would return the last main menu tree The control menu By pressing on the menu of Control the display would enter the next control menu tree Start Battery Test this is one command that control the UPS to do the battery test Reset Fault status whe...

Страница 36: ...ypass mode And the reason of fault should be checked and deleted before UPS is turned on again by manual operation Restore factory settings all the settings would be recover to default factory settings It could only be done in Bypass mode ...

Страница 37: ...ting menu Please contact your local distributor for further information before using the settings Some settings would be changed the specification and some settings would enable or disable some functions The unsuitable option setting by user may result in potential failures or protecting function loss even directly damage the load battery or UPS AH setting could be set via RS232 or USB communicati...

Страница 38: ...31 ...

Страница 39: ...0V By press 1s The option would flash Output voltage 230V By press 1s Setting menu tree Output voltage 220V By press or 100ms to select the wanted option Output voltage 220V By press 1s to confirm the setting The option would stop flashing after being confirmed ...

Страница 40: ...nction When the EPO function is enabled default setting once the EPO port is pulled out the UPS would shut off the output and enter into EPO mode and the UPS would not respond anything ON OFF request unless the port is plugged back Dry in Dry out Dry in allows remote action to switch On switch Off maintain bypass the UPS When contact changes from closed to open the UPS is switch On switch Off main...

Страница 41: ...on 2 MODBUS card provides connection to Modbus protocol with standard RS485 signal To see more detail please check the MODBUS user manual 3 This series UPS has AS400 card an optional accessory for AS400 communication protocol Please contact your local distributor for details 6 3 UPS Management Software WinPower is a new software for UPS monitoring which provides user friendly interface to monitor ...

Страница 42: ...perature of 25 C 77 F If the UPS requires any type of transportation verify that the UPS is disconnected and turned off The batteries are rated for a 3 5 year service life The length of service life varies depending on the frequency of usage and ambient temperature Batteries used beyond expected service life will often have severely reduced runtimes Replace batteries at least every 4 years to keep...

Страница 43: ...der new batteries Proper disposal of batteries is required Refer to your local codes for disposal requirements Never dispose of batteries in a fire Batteries may explode when exposed to flame Do not open or mutilate the battery or batteries Released electrolyte is harmful to the skin and eyes and may be extremely toxic Take care if the battery is inadvertently grounded If grounded remove source fr...

Страница 44: ...M cable s into the battery connector s 4 Verify that the EBM connections are tight and there are adequate bend radius and strain relief exist for each cable Testing new batteries 1 Charge the batteries for 48 hours 2 By pressing on the menu of Control 3 Select Control then Single battery test The UPS can starts battery test only in line mode without active alarms During the battery test the UPS tr...

Страница 45: ... intended to alert the user Events are silent status information that are recorded into the Event log Example Battery charging Alarms are recorded into the Event log and displayed on the LCD status screen with the logo blinking Some alarms may be announced by a beep every 1 second Example Battery low Faults are announced by a continuous beep and red LED recorded into the Event log Example Out shor...

Страница 46: ...ier Fault code A503 Fault light flashes 1 beep every 1 second UPS charger fault Output voltage is too low Please contact your supplier Fault code F613 Fault lamp lights long Beep continuous Indicates that the battery quantity is incorrect Please contact your supplier Fault code F300 Fault lamp lights long Beep continuous Indicates that the UPS get positive BUS over voltage fault Please contact you...

Страница 47: ...lt lamp lights long Beep continuous Indicates that the UPS has detected abnormally low impedance placed on its output and considers it a short circuit Remove all the loads Turn off the UPS Check if UPS output and loads is short circuit Ensure short circuit is removed before turning on again Fault code F70D Fault lamp lights long Beep continuous Indicates that the UPS get invert over voltage fault ...

Страница 48: ... UPS has cut off the output and transferred to fault mode because of overload in bypass mode Remove some of the equipment from the UPS Fault code A900 Fault LED is flash 1 beep every 1 second An overload or a fault has occurred or a command has been received and the UPS is in Bypass mode Please contact your supplier Fault code F806 Fault lamp lights long Beep continuous Shut down in emergency Plea...

Страница 49: ... cable connect OK Fault code A012 AC18 Fault LED is flash 1 beep every 1 second Parallel system UPS1 line ok UPS2 line loss Check the line input Fault code A00F AC19 Fault LED is flash 1 beep every 1 second Parallel system UPS mode normal converter HE different Check UPS OP mode Keep OP mode be the same Fault code F811 Fault lamp lights long Beep continuous Negative output power Please contact you...

Страница 50: ...Vdc 7Ah 6000 10000VA Eaton DXRT EBM 192 09 RT3U IN RT 192Vdc 9Ah 6000 10000VA Table 3 Weights and dimensions Description Weights kg Dimensions mm W x H x D Eaton DX RT 6000VAIN 13 3 438 86 3 573 Eaton DX RT 6000VAXLIN 13 6 438 86 3 573 Eaton DX RT 10000VAIN 15 2 438 86 3 573 Eaton DX RT 10000VAXLIN 15 5 438 86 3 573 Eaton DXRT EBM 192 07 RT3U IN 46 438 129 593 Eaton DXRT EBM 192 09 RT3U IN 52 438 ...

Страница 51: ... RT 10000VAXLIN Table 6 Electrical output All models Normal mode Battery mode Voltage regulation 1 1 Efficiency 98 High Efficiency mode 95 93 Frequency regulation 50Hz 0 1Hz 50Hz 0 1Hz Nominal output 208 220V 230V 240V voltage configurable 6000 10000VA 6000 10000W Frequency 50 or 60Hz autosensing or configurable as a frequency converter Output overload 100 105 no alarm 105 125 load transfers to By...

Страница 52: ... EN 62040 2 Cat C3 IEC EN 62040 3 EN 60950 1 EMC Emissions Conduction C3 IEC EN 62040 2 Radiation C3 IEC EN 62040 2 EMC Immunity IEC 61000 4 2 Level 3 IEC 61000 4 3 Level 3 IEC 61000 4 4 Level 4 also on signal ports IEC 61000 4 5 Level 4 Criteria B IEC 61000 4 6 Level 3 IEC 61000 4 8 Level 4 IEC 61000 4 11 for output cable 10m Agency markings CE Operating temperature 0 40 full load no derating 40 ...

Страница 53: ...ear float service life at 25 C 77 F Lifetime is reduced above 30 C Monitoring Advanced monitoring for earlier failure detection and warning Battery port External ANEN SA30 connector on power module for connection to EBM EBM battery cable length 100cm for tower models 50cm for RT models Table 10 Communication options Communication bay available independent communication bay for connectivity cards C...

Страница 54: ...er Load Devices or equipment connected to the UPS output HE mode Operating mode by which the load is supplied directly by the AC source if it is within the tolerances defined by the user This mode reduces the consumption of electrical power Manual bypass Rotary switch controlled by the user used to connect the loads directly to the AC source Transfer of the load to the manual bypass enables UPS ma...

Страница 55: ...48 ...

Страница 56: ...49 614 02180XT1 ...

Отзывы: