Operations and Maintenance Manual
for Eaton Pressure Filters, Change-Over
DA/EDA 103,253,403,633,1003, related specification
Sheet No.
67630-4D
Page 2/4
When fastening the counter flanges, use the torque values in the table below. Ensure faces are parallel
before fastening connections.
Type
DA/EDA 103
DA/EDA 253, 403
DA/EDA 633, 1003
Connection
1“ (DN25)
2“ (DN50)
3“ (DN80)
Torque Nm
lbf.-ft.
10
2
7
.08
28
6
21
.24
71
15
52
.56
3. Commissioning
Ensure the filter installation is complete and the system is clean before commissioning. Follow these
instructions to purge the filter before commissioning the system:
1. Before commissioning, ensure that the filter element and seals are clean and properly installed.
2. Place the switchgear lever in the middle position.
3. Fill both sides of the filter housing at the regular operating fluid flow.
4. Open the air bleed screws or connections. Connect tubes that lead to a drain pan (air-bleed
connection information can be found on data sheet 1659).
5. Allow the operating fluid to drain (reduce volume flow from 10 to 50 l/min (2.6 to 13.2 GPM))
until
it is bubble-free and flows out of both air bleeding tubes.)
6. Shut off application flow.
7. Remove the air bleeding tubes and close the air-bleed bore holes or air-bleed connections.
8. Switch to the filter housing you would like to operate first by using the switch gear lever.
9. After finishing step 7, tighten the locking screws.
After following these instructions for commissioning, the serviced filter vessel is ready for operation.
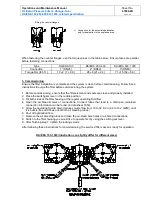
DA/EDA 103-1003 (illustration can slightly differ for different sizes)
1) Connection for the potential equalization,
only for application in the explosive area.
Fitting the counter flanges


