background image

9

Empty enclosures GHG 716; industrial

GB

 Applications other than those described are not permitted 

without Cooper Crouse-Hind’s / CEAG prior written consent.

The instructions stated in section 7 of the operating instructions 

shall be observed during operation.

The user alone is responsible for the appropriate use of this 

junction box in consideration of the basic conditions existing at the 
plant (see technical data).

6 Installation

For the mounting and operation, the respective national regulations as 
well as the general rules of engineering will have to be observed.

6.1 Mounting

The units can be mounted without opening their enclosure.

If cable entries are used from the top, mount only in dry rooms or attach 
where protected from moisture.

In case the terminal boxes are mounted directly onto the wall, they may 
rest evenly only at the respective fastening points.

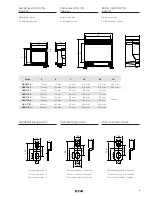
The chosen screw shall match the fastening hole (see dimensional 
drawing) and it must not damage the hole (e. g. use of a washer).          


If the screws are overtightened, the apparatus can be damaged.

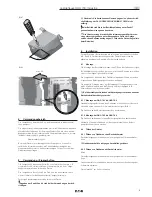
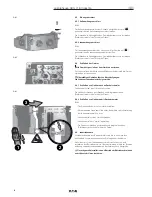
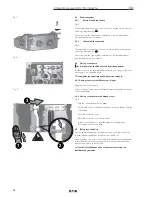
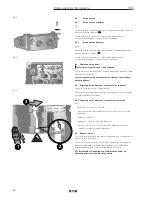
6.1.1   Assembly of GHG 76.1  to GHG 76.3

Fix the fixing lugs to the bottom of the enclosure; facing either upwards 
and downwards, or to the left and right (Fig 1).

Fix the enclosure with the fixing lugs to the wall.

6.1.2  Assembly of GHG 76.3 to GHG 76.8

Screw the enclosure onto the moulded-on fixing lugs. 

Alternatively, the enclosures can be mounted using fixing lugs  
that are available separately. 

6.2 

Opening of enclosures

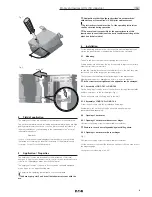
6.2.1  Opening of enclosures without cover hinges

Unscrew cover fixing screws with a suitable screwdriver.

 Enclosure cover is not safeguarded against falling down.

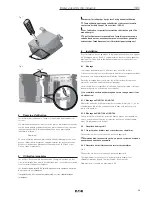
6.2.2  Opening of enclosures with cover hinges

Fig. 2

Unscrew cover fixing screws with a suitable screwdriver.

Lift the enclosure cover until the retension springs of the two side bolts of 
the hinges engage.  

Swing the cover sideways, max. 80°

max. 80°

90°

 Fig. 1

 Fig. 2

Field of application

The empty enclosures are suitable for in-/outside use in industrial area.

The enclosure materials used, including any external metal parts, are high 
quality materials which ensure a corrosion protection and resistance to 
chemical substances corresponding to the requirements in a “normal 
industrial atmosphere”:

 - 

Aluminum

In case of use in an extremely aggressive atmosphere, you can obtain 
information concerning the chemical resistance of the materials used 
from your Cooper Crouse-Hinds branch.

Application / Properties

The empty enclosures are intended for the distribution of electrical 
energy e.g. light circuits, heater circuits, control circuits, intrinsically safe 
circuits etc. in hazardous areas (see technical data).

The empty enclosures of sizes 6 to 8 sizes can be optionally equipped 
with a hinge for the upper housing part.

The permissible operating temperature, see technical data.

The data as per point 3 and 4 shall be taken into account with the 

use.

Содержание Crouse-hinds series

Страница 1: ...CROUSE HINDS SERIES Leergeh use GHG 716 Industrie Enclosures GHG 716 industrial Bo tier vide GHG 716 industrie Betriebsanleitung Operating instructions Mode d emploi GHG 710 7001 P0007 D GB F...

Страница 2: ...arately D claration de conformit jointe s par ment 1 Technical data 8 2 Legende 8 2 1 Safety instructions 8 3 Conformity with standards 8 4 Field of application 9 5 Application Properties 9 6 Installa...

Страница 3: ...569 mm 283 mm 110 mm 550 mm 230 mm C Dimensions in mm X xing dimensions Dimensions en mm X dimensions de xation Leergeh use GHG 716 Industrie Enclosures GHG 716 industrial Bo tier vide GHG 716 industr...

Страница 4: ...fahr DieseWarnung nicht zu beobachten kann Tod oder die Zerst rung von Einrichtungen zur Folge haben Achtung Dieses Symbol warnt von einem m glichen Ausfall Wird diese Warnung nicht beobachtet kann de...

Страница 5: ...ten liegt allein beim Betreiber 6 Installation F r das Errichten Betreiben sind die relevanten nationalen Vorschriften z B BetriSiV Ger tesicherheitsgesetz f r Deutschland sowie die allgemein anerkann...

Страница 6: ...Schlie en von Geh usen ohne Deckelscharnier Geh usedeckel auf dem Unterteil ausrichten Die Geh useschrauben anschrauben und diagonal anziehen Pr fdrehmoment sieheTechnische Daten 6 4 2 Schlie en von...

Страница 7: ...ng von COOPER CROUSE HINDS CEAG Originalersatzteilen vorgenommen werden Reparaturen d rfen nur von CCH oder einer quali zierten Fachkraft in bereinstimmung mit national geltenden Regeln durchgef hrt w...

Страница 8: ...gnoring this warning can result in death or the destruction of the installation Attention This symbol indicates a possible failure Ignoring this warning can lead to the total failure of the device sys...

Страница 9: ...lded on xing lugs Alternatively the enclosures can be mounted using xing lugs that are available separately 6 2 Opening of enclosures 6 2 1 Opening of enclosures without cover hinges Unscrew cover xin...

Страница 10: ...on category 6 4 1 Closing of enclosure without cover hinges Align the cover with the base Screw in the enclosure screws and tighten them diagonally test torque see technical data 6 4 2 Closing of encl...

Страница 11: ...s may only be carried out by COOPER CROUSE HINDS or a quali ed electrician Competent person in compliance with the applicable national rules For replacement and repair only original parts from COOPER...

Страница 12: ...ve Cet avertissement peut pas observer la mort ou la destruction des installations ont abouti Attention Ce symbole met en garde contre un ventuel chec Si cet avertisse ment est pas observ l chec total...

Страница 13: ...boitier en utilisant les points de xation pr vus en standard En option vous pouvez utiliser les accessoires de xation vendus s par ment Ne jamais percer le boitier 6 2 Ouverture du dispositif 6 2 1 Ou...

Страница 14: ...4 1 Fermeture des boitiers avec couvercles sans charni res Aligner le couvercle avec le fond du boitier Vissez les vis du couvercle et serrez les en diagonale couple de serrage voir caract ristiques...

Страница 15: ...se reportera au chapitre 8 de ce mode d emploi 8 R parations Remise en tat Modi cations Les remises en tat r parations doivent exclusivement tre effectu es l aide de pi ces de rechange d origine COOP...

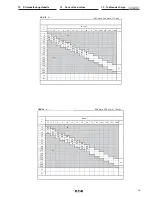
Страница 16: ...35 50 70 95 120 150 185 240 3 6 12 4 10 10 12 16 4 11 20 5 25 35 50 63 80 100 125 5 160 200 225 250 3 315 400 500 1 2 GHG712 2 111 mm x 83 mm x 60 mm I A mm 1 5 2 5 4 6 10 16 25 35 50 70 95 120 150 1...

Страница 17: ...0 150 185 240 3 6 41 4 10 14 27 16 5 16 30 20 7 17 33 25 5 13 35 50 63 80 100 125 5 160 200 225 250 3 315 400 500 1 2 GHG712 4 223 mm x 128 mm x 80 mm I A mm 1 5 2 5 4 6 10 16 25 35 50 70 95 120 150 1...

Страница 18: ...18 35 16 7 20 39 20 9 22 43 25 6 17 42 35 2 13 35 50 4 16 63 6 80 100 125 5 160 200 225 250 3 315 400 500 1 2 GHG712 6 233 mm x 283 mm x 110 mm I A mm 1 5 2 5 4 6 10 16 25 35 50 70 95 120 150 185 240...

Страница 19: ...100 9 23 125 5 8 160 200 225 250 3 315 400 500 1 2 GHG712 8 569 mm x 283 mm x 110 mm I A mm 1 5 2 5 4 6 10 16 25 35 50 70 95 120 150 185 240 3 6 81 4 10 27 53 16 11 31 60 20 15 34 66 25 10 26 64 35 3...

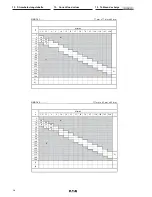
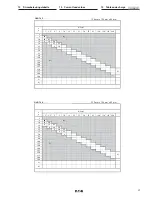
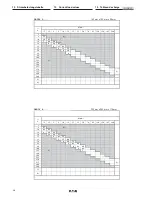
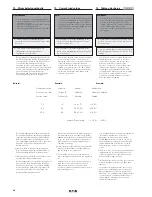
Страница 20: ...ts admissibles pour les sections on doit tenir compte des courants de charge max des bornes utilis es et des c bles et lignes raccord s Les lignes l int rieur des bo tiers quip s selon le tableau ci d...

Страница 21: ...21 Notizen Notes Remarques D GB F...

Страница 22: ...22 Notizen Notes Remarques D GB F...

Страница 23: ...23 Notizen Notes Remarques D GB F...

Страница 24: ...Crouse Hinds CEA DWVWRvyb je VDYo DOyje 9 R HNVSOXDW FLMDV instrukciju vDlsts vDlod YDUDW SLHSUDV t j su YDOVWV DWELOd JDM Cooper Crouse Hinds CEAG p rst vniec b M JistJ u jitolbu dDn il mDQwDO fil li...

Отзывы: