background image

25-75 kW

User's and Installation Guide


32

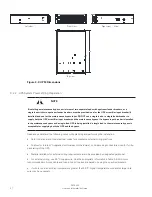
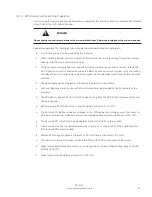
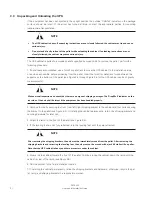
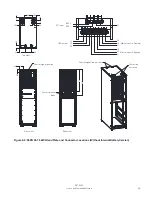
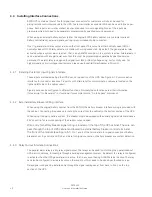
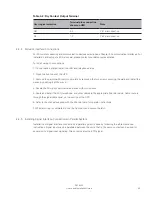
8. Secure the UPS cabinet in position by lowering the leveling feet until the cabinet is not resting on the
casters and the cabinet is level.

9. If permanently mounting the system, proceed to Step 11;

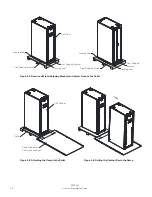
10. Using the retained hardware, reinstall the shipping brackets removed in Step 2 and Step 5 to the front 
and rear of the UPS cabinet with the angle facing outward (see Figure 3-4 and Figure3-5).

11. Secure the cabinet to the floor with customer-supplied hardware.

          NOTE

If the cabinet is removed from its original installation location and transferred to a new location on the pallet, the 
leveling feet must be lowered until the cabinet is not resting on the casters. In addition, the shipping brackets 

must be attached to the cabinet and pallet.

Содержание 93PR 25(75)

Страница 1: ...User s and Installation Guide Eaton 93PR UPS 25 75 kW ...

Страница 2: ......

Страница 3: ...Eaton 93PR UPS 25 75 kW User s and Installation Guide ...

Страница 4: ...ustrial application in the second environment Installation restrictions or additional measures may be needed to prevent disturbances 2017 Eaton Corporation The contents of this manual are the copyright of the publisher and may not be reproduced even extracts without the written approval of Eaton Corporation Every care has been taken to ensure the accuracy of the information contained in this manua...

Страница 5: ...Eaton Hot Sync 15 2 3 3 Module Hot Swap Feature 15 2 3 4 Variable Module Management System VMMS 16 2 4 Software and Connectivity Features 15 2 4 1 Customer Interface 16 2 4 2 Power Management Software 16 2 5 Options and Accessories 16 2 5 1 External Switch Cabinet ESC 19 2 5 2 Field Installed UPM 19 2 5 3 ParallelTie Cabinet PTC 19 2 5 4 External Battery Cabinet EBC 19 2 5 5 Precise Power distribu...

Страница 6: ...PowerWiring Overview 45 4 5 2 Control Signals Overview 47 4 5 3 Installing Bypass ControlWiring 47 4 5 4 Installing Eaton Sync Control 50 5 Communication interfaces 51 5 1 Mini slots 52 5 2 Intelligent Power Software 54 5 3 Signal Input Monitoring 54 5 4 General Purpose Relay Contact 54 6 UPS operating instructions 55 6 1 UPS Controls and Indicators 57 6 1 1 Control 57 6 1 2 Status Indicators 58 6...

Страница 7: ...ouble Conversion Mode to Maintenance Bypass 71 6 9 Transfer UPS from Maintenance Bypass to Double Conversion Mode 73 6 10 STS Module 73 7 UPS maintenance 75 7 1 Important Safety Instructions 75 7 2 Performing Preventive Maintenance 76 7 2 1 DAILY Maintenance 76 7 2 2 MONTHLY Maintenance 76 7 2 3 PERIODIC Maintenance 76 7 2 4 ANNUAL Maintenance 77 7 2 5 BATTERY Maintenance 77 7 3 Recycling the Used...

Страница 8: ...ate and Connector Locations Without Internal BatteryVersion 38 Figure 4 3 Take Out the Battery Modules from the Package 39 Figure 4 4 Open the BatteryTerminal Cover 39 Figure 4 5 Install the Battery Module 40 Figure 4 6 Connections of the EPO Switch 42 Figure 4 7 Principle of Paralleled UPS Systems 46 Figure 4 8 Communication Interfaces 47 Figure 4 9 Pimplified CAN and Pull ChainWiring for Paralle...

Страница 9: ...ommended Multi core Cable Sizes 28 Table 3 6 Minimum Recommended Multi core Cable and Fuse Sizes 28 Table 3 7 Rated and Maximum Currents for Rated Power andVoltage 28 Table 3 8 UPS Power CableTerminations 29 Table 4 1 Remote EPOWireTerminations 42 Table 4 2 Dry Contact OutputTerminal 44 Table 6 1 UPS Menu Structure 60 Table 8 1 Standards 79 Table 8 2 UPS System Input 80 Table 8 3 UPS System Output...

Страница 10: ...idethe UPS WARNING The UPS is powered by its own energy source batteries The output terminals may be energised even when the UPS is disconnected from an AC source To reduce the risk of fire or electric shock install this UPS in a temperature and humidity controlled indoor environment free of conductive contaminants Ambient temperature must not exceed 40 C 104 F Do not operate near water or excessi...

Страница 11: ... ensure proper cooling airflow and to protect personnel from dangerous voltages inside the unit Do not install or operate the UPS system close to gas or electric heat sources The operating environment should be maintained within the parameters stated in this manual Keep surroundings uncluttered clean and free from excess moisture Observe all DANGER CAUTION and WARNING notices affixed to the inside...

Страница 12: ...ishments 1 4 Environment The UPS must be installed according to the recommendations in this manual Under no circumstances should the UPS be installed in an airtight room in the presence of flammable gases or in an environment exceeding the specifications Excessive amount of dust in the operating environment of the UPS may cause damage or lead to malfunction The UPS should always be protected from ...

Страница 13: ...ates that you should not discard waste electrical or electronic equipment WEEE in the trash For proper disposal contact your local recycling reuse or hazardous waste center 1 6 Conventions Used in this Manual This manual uses these type conventions Bold type highlights important concepts in discussions key terms in procedures and menu options or represents a command or option that you type or ente...

Страница 14: ...d by the manufacturer Please quote the type code and the serial number of the equipment Call your local service representative if help is needed with any of the following Scheduling initial startup User s and Installation Guide Regional locations and telephone numbers A question about any of the information in this manual A question this manual does not answer ...

Страница 15: ...ass The available static bypass ratings are 75 kW The static bypass size is chosen according to UPS system power For example if future requirement is to upgrade the UPS capacity the UPS bypass rating will have to be selected accordingly In addition the bypass ratings of all UPS cabinets in a parallel system need to be matched Eaton 93PR output power ratings are based on 25 kW rated uninterruptible...

Страница 16: ...s the power delivered through the bypass line or to the input of the UPS Transfers to static bypass are seamless and performed automatically by the system as needed for example in case of an extended system overload Each UPM power module includes a rectifier battery converter inverter and independent controls The UPM is hot swappable Hot Swap Each UPM is able to operate and share the load independ...

Страница 17: ...5 75kW UPS includes a 75 kW rated static bypass section max 8 internal paralleled UPM modules It s including internal battery version and without Internal Battery Version Figure 2 2 93PR 25 75 kW UPS Wiring Diagram Without Internal Battery Version ...

Страница 18: ...25 75 kW User s and Installation Guide 9 Figure 2 3 93PR 25 75 kW UPS Wiring Diagram With Internal Battery Version ...

Страница 19: ...ility AC power In this mode the battery charger also provides charging current for the battery if needed In Energy Saver System ESS mode the critical load is supported securely by utility power through static bypass switch with double conversion available on demand with typically less than a 2 ms transition time should any abnormal condition be detected in the utility When operating in ESS mode th...

Страница 20: ...d without interruption When utility power returns the UPSreturns to Double Conversion Mode automatically If the UPS becomes overloaded or unavailable the UPS seamlessly switches to Bypass Mode and continues supplying the load through the static bypass The UPS automatically returns to Double Conversion Mode when the abnormal condition such as an extended time overload is cleared and system operatio...

Страница 21: ...ugh its inverter In case of a complete utility outage or if input power is outside the tolerances of the system the UPS transfers to Battery Mode and continues to supply conditioned clean power to the critical load When operating in ESS the UPS superior detection and control algorithms continuously monitor incoming power quality and allow the fast engagement of power converters Typical transition ...

Страница 22: ...thout disturbance If the UPS static bypass is supplied from the same source as the UPS rectifier the backfeed protection contactor K5 also opens The opening of K1 and K5 prevent system voltages from bleeding backwards and re entering the input source through the static switch or rectifier If the input power fails to return or is not within the acceptance windows required for normal operation the b...

Страница 23: ...k up the load from the inverter without interruption The backfeed protection is normally always closed ready to support the static switch unless the bypass input source becomes unavailable Figure 2 7 Path of current through the UPS in Bypass Mode NOTE The critical load is not protected while the UPS is in Bypass mode Internal relay contacts Figure 2 7 Path of current through the UPS in bypass mode...

Страница 24: ... system reliability The Hot Sync technology is incorporated in all Eaton 93PR UPSs and it is utilised in both multi module internal parallel and external parallel systems Hot Sync technology enables all uninterruptible power modules UPMs to operate independently in a parallel system even without inter module communications The power modules utilising the Hot Sync technology are completely autonomo...

Страница 25: ... more information 2 5 Options and Accessories Contact an Eaton sales representative for information about the available options 2 5 1 External Switch Cabinet ESC The external ESC is enclosed in its own separate cabinet includes UPS external maintenance bypass switches EMBS rectifier input breaker RIB and battery circuit breaker BCB The MBS wiring has two different options two and three switch conf...

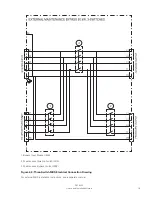
Страница 26: ...25 75 kW User s and Installation Guide 17 1 Maintenance Bypass Switch MBP 2 Maintenance Isolation Switch MIS Figure 2 8 Two Switch MBS Electrical Connection Drawing ...

Страница 27: ...tion Guide 18 1 Bypass Input Breaker BIB 2 Maintenance Isolation Switch MIS 3 Maintenance Bypass Switch MBP Figure 2 9 Three Switch MBS Electrical Connection Drawing For external MBS installation instructions see a separate manual ...

Страница 28: ...VA power rating PPM inputs are 380 400 415 Vac 3 phases The output has default 84 branches and max 168 branches 2 cabinet in paralleled PPM can satisfy large power rate and multi output branches power distribution requirements PPM monitors system various power parameters from main inputs to each output branch such as voltage current power power factor harmonics etc by monitor module All monitoring...

Страница 29: ...S Power Rating The maximum attainable UPS system power rating is determined by the size of static bypass The number of UPM power modules determines the nominal power rating of the UPS If upgradeability is required the system static bypass should be chosen according to the future maximum load rating and number of UPMs is chosen according to Day1 capacity requirements The following UPS configuration...

Страница 30: ...control and monitoring Standard Standard SNMP web interface Option Option Internal MBS Standard Standard Rectifier input switch IS Standard Standard Internal battery breaker BB Standard Battery start Standard Standard Integrated backfeed protection Standard Standard Air filter Standard Standard Internal battery Standard Internal transformer Internal distributor Additional options and accessories a...

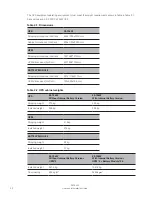
Страница 31: ...em being installed Use the procedures and illustrations in Chapter 3 2 Site preparations and Chapter 4 UPS system installation to create a logical plan for installing the system 3 2 Site Preparations For the UPS system to operate at peak efficiency the installation site should meet the environmental parameters outlined in these instructions If the UPS needs to be operated at an altitude higher tha...

Страница 32: ...595 130mm BATTERY MODULE Shipping dimensions WxDxH 227x1114x277 mm UPM dimensions WxDxH 107x900x156 mm Table 3 2 UPS cabinet weights UPS 25 75kW Without Internal Battery Version 25 75kW With Internal Battery Version Shipping weight 375 kg 449 kg Installed weight 265 kg 339 kg UPM Shipping weight 31 5 kg Installed weight 27 5 kg BATTERY MODULE Shipping weight 33 kg Installed weight 31 kg 25 75kW Wi...

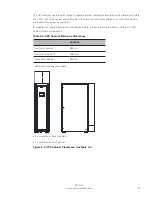
Страница 33: ...ehind each cabinet for proper air circulation The clearances required around the UPS cabinet in both of these situations are shown in Table 3 3 UPS cabinet minimum clearances Table 3 3 UPS Cabinet Minimum Clearances 25 75kW From top of cabinet 800 mm From front of cabinet 1000 mm From back of cabinet 800 mm Cabling may require more space X clearance at back of cabinet Y clearance at top of cabinet...

Страница 34: ...perature rise of max 5 C requires the airflow of 600 m per 1 kW of losses Temperature rise of max 10 C requires the airflow of 300 m per 1 kW of losses An ambient temperature from 20 to 25 C is recommended to achieve a long life of the UPS and batteries The cooling air entering the UPS must not exceed 40 C Avoid high ambient temperature moisture and humidity The UPS ventilation requirements are sh...

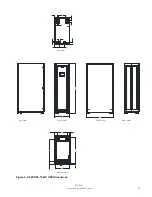
Страница 35: ...25 75 kW User s and Installation Guide 26 Figure 3 2 93PR 25 75 kW UPS Dimensions Left view Front view Top view Bottom view Right view Back view ...

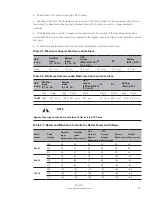
Страница 36: ...both the UPS and the bypass Read and understand the following notes while planning and performing the installation Refer to national and local electrical codes for acceptable external wiring practices To allow for future kVA upgrades software and or hardware consider using conductors sized for full by pass rating of the UPS Material and labor for external wiring requirements are to be provided by ...

Страница 37: ...L1 L2 L3 N PE Battery BAT BAT 75 kW 70 1 mm2 70 1 mm2 70 1 mm2 70 2 mm2 70 1 mm2 70 2 mm2 Table 3 6 Minimum Recommended Multi core Cable and Fuse Sizes UPS rating Rectifier input L1 L2 L3 Bypass input L1 L2 L3 UPS output 380 400 415V L1 L2 L3 N PE Battery BAT BAT Fuse Cable Fuse Cable Cable Cable Cable Fuse Cable 75 kW 160A 35 1 mm 180A 35 1 mm 35 1 mm 50 1 mm 50 1 mm 210A 50 1 mm NOTE Bypass fuse...

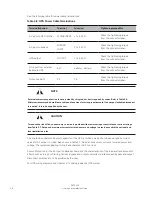
Страница 38: ... core cable and fuse sizes for wiring requirements If an output lockable disconnect is required it is to be supplied by the user CAUTION To reduce the risk of fire connect only to a circuit provided with maximum input circuit breaker current ratings fromTable 3 7 Rated and maximum currents for rated power and voltage in accordance with the national and local installation rules The line to line unb...

Страница 39: ...es for each alarm input and common The signal inputs can be programmed to display the alarm functional name LAN and telephone drops for use with Mini slot cards must be provided by facility planners or the customer The UPS Battery Aux and 24 VDC Shunt Trip signal wiring from the UPS to the DC source disconnect device is optional Battery Aux and 24 VDC Shunt Trip wiring should be a minimum of 1 5 m...

Страница 40: ...Make a visual inspection and check that there are no signs of shipping damages The Drop Tell indicator on the rear side of the unit shall be intact if the equipment has been handled properly 2 Remove four bolts securing the front rear left right shipping bracket to the cabinet and four bolts securing the bracket to the pallet see Figure 3 4 If installing the cabinet permanently retain the shipping...

Страница 41: ...pping brackets removed in Step 2 and Step 5 to the front and rear of the UPS cabinet with the angle facing outward see Figure 3 4 and Figure3 5 11 Secure the cabinet to the floor with customer supplied hardware NOTE If the cabinet is removed from its original installation location and transferred to a new location on the pallet the leveling feet must be lowered until the cabinet is not resting on ...

Страница 42: ...ipping Brackets and Screw Fixed on the Pallet Front Shipping Bracket Leveling Feet Leveling Feet Leveling Feet Leveling Feet Front Door UPS Cabinet Pallet Rear Shipping Bracket Right Shipping Bracket Left Shipping Bracket Figure 3 5 Attaching the Ramp to the Pallet Figure 3 6 Rolling the Cabinet Down the Ramp ...

Страница 43: ...em see Figure 3 7 3 Take out the UPM module see Figure 3 7 NOTE The UPS is heavy It requires two people for transportation due to its weight NOTE Check whether the UPS is damaged during the process of transportation or not Should any damage be observed or parts be found missing do not start the machine Contact the forwarder and distributor immediately Figure 3 7 Instruction for Femoving the UPM Mo...

Страница 44: ... Heavy unit It must be carried by two people at the same time to avoid injury NOTE Check whether the UPS is damaged during the process of transportation or not Should any damage be observed or parts be found missing do not start the machine Contact the forwarder and distributor immediately WARNING ELECTRIC SHOCK Only professionals be allowed to remove the battery terminal covers before installatio...

Страница 45: ...PR UPS can only support top cable entry The customer power wires and control wiring can pass through openings on the top rear of UPS cabinet connect to UPS terminal blocks at rear of UPS see Figure 4 1 93PR 25 75 kW Gland Plate and Connector Locations With Internal Battery Version and Figure 4 2 93PR 25 75 kW Gland Plate and Connector Locations Without Internal Battery Version 1 Unlocked the door ...

Страница 46: ...R 25 75 kW Gland Plate and Connector Locations With Internal Battery Version BAT BAT L1 L1 L1 N L2 L2 L2 L3 L3 L3 DC input Mains input to Bypass Mains input to Rectifier UPS output Top view Front view Back view Control signal junction Power terminal block Control signal line entrance Power line entrance ...

Страница 47: ... 25 75 kW Gland Plate and Connector Locations Without Internal Battery Version N BAT BAT DC input Mains input to Bypass Mains input to Rectifier UPS output Top view Front view Back view Control signal junction Power terminal block Control signal line entrance Power line entrance L1 L1 L1 L2 L2 L2 L3 L3 L3 ...

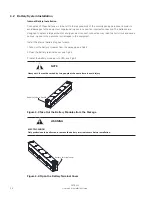
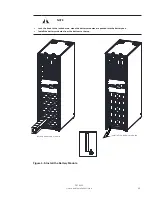
Страница 48: ...cuit and cause serious injuries to the personnel or damages to the equipment Install the internal battery steps as follows 1 Take out the battery modules from the package see Fig4 3 2 Open the battery terminal cover see Fig4 4 3 install the battery modules into UPS see Fig4 5 NOTE Heavy unit It must be carried by two people at the same time to avoid injury Figure 4 3 Take Out the Battery Modules f...

Страница 49: ...gure 4 5 Install the Battery Module Install one battery module Install all the battery modules NOTE Lock the knob to the locked state when the battery modules are pushed into the battery box Install the battery modules from the bottom to the top ...

Страница 50: ...They must be kept clean and their connections checked periodically to ensure they are tight and that there is no evidence of corrosion It is inevitable that the batteries will lose charge during transportation and storage before attempting to carry out an autonomy test ensure that the batteries are fully charged as this may take several hours Cell performance typically improves after a few dischar...

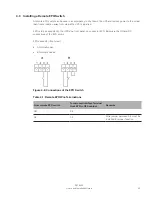
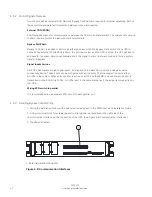
Страница 51: ...stalled EPO is to be connected to the UPS s top front panel on connector EPO Below are the NO and NC connections of the EPO switch EPO connector front view A Normally open B Normally closed Figure 4 6 Connections of the EPO Switch Table 4 1 Remote EPO WireTerminations From remote EPO switch To customer interfaceTerminal block EPO in UPS cabinet Remarks NO 3 4 NC 1 2 Wire jumper between 3 4 must be...

Страница 52: ...ation cables are located on the right and left side of the cable conduit Signal inputs can be configured to different functions Normally these functions are either informative for example On Generator or functional for example remote Go to bypass command 4 4 2 External Battery Breaker Wiring Interface When using the original battery cabinet from the EATON the battery breaker interface wiring is pr...

Страница 53: ...ing the two screws securing the plate and install the device by pushing it all the way in 4 Secure the Mini slot communication device with two screws 5 Route and install the LAN telephone and other cables to the appropriate Mini slot cards Cable route is through the signal cable canal on top section of the UPS 6 Refer to the manual supplied with the Mini slot card for operator instructions 7 When ...

Страница 54: ...ment ensures bypass control even if the CAN bus is lost WARNING Units with an internal MBS switch may not be connected in parallel 4 5 1 Power Wiring Overview Refer to Chapter 3 2 2 UPS system power wiring preparation for recommended cable and external fuse sizes and installation practices Input Feed The Input feed is defined as the power source connected to the UPS rectifier The feed to all UPS s...

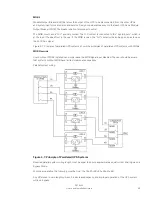
Страница 55: ... so as to open the Pull Chain signal Figure 4 7 Principle of paralleled UPS systems shows the principles of paralleled UPS systems with MOBs MOB Override Users without MOBs installed can simply leave the MOB signal input disabled The user should be aware that systems without MOB have limited maintenance capability Parallel system wiring Figure 4 7 Principle of Paralleled UPS Systems Required paral...

Страница 56: ...ass Signal Inputs Actions Each UPS has maximum eight signal inputs 5 native and one in each Mini slot when using a suitable connectivity device These inputs can be configured with action items The following action items affect all UPSs in the system When an action item is active on a UPS and the MOB is closed the action item is transmitted on the ECAN to all UPSs All UPSs react in the same manner ...

Страница 57: ...ure 4 9 Pimplified CAN and Pull Chain Wiring for Parallel UPP System NOTE This drawing is for distributed bypass wiring purposes and is not a floor layout plan UPPs can be placed in any physical order NOTE External CAN connections between UPPs require shielded twisted pair wire NOTE Use twisted pair wiring between the UPP and MOB AUX contacts ...

Страница 58: ...contacts are defined with breaker in OFF open position If MOB contacts have pigtail leads use the same wire gauge to connect to the UPP and use the correct crimp connections for the wire gauge External CAN connections between UPP cabinets require shielded twisted pair wire Use twisted pair wiring between the UPP and MOB AUX contacts Always confirm contact operation prior to wiring ...

Страница 59: ...em A Output Voltage Phase A UPS System A Output Voltage Phase B UPS System A Output Voltage Neutral UPS System B Output Voltage Phase A UPS System B Output Voltage Phase B UPS System B Output Voltage Neutral On Bypass Common UPS System A On Bypass NO UPS System B On Bypass NO UPS System A Building Alarm 1 see Note UPS System A Building Alarm 1 Return UPS System B Building Alarm 1 see Note UPS Syst...

Страница 60: ... UPS has the following communication interfaces 1 Mini slot 1 2 Mini slot 2 3 Mini slot 3 4 USB device connection to computer 5 Emergency Power Off EPO 6 Relay output 7 USB host connection to accessories 8 Signal inputs 9 RS 232 port for service 10 External parallel connector 11 External battery breaker trip Figure 5 1 Communication interfaces ...

Страница 61: ... system NMS using SNMP and connects to a twisted pair Ethernet 10 100BaseT network Figure 5 2 Network Card MS PX Gateway Card Provides remote monitoring through a Web browser interface e mail and a network management system NMS using SNMP and connects to a twisted pair Ethernet 10 100BaseT network The card also provides direct integration of UPS information meters and status to a Building Manageme...

Страница 62: ...MODBUS Card MS Provides remote monitoring through a Web browser interface e mail and a network management system NMS using SNMP and connects to a twisted pair Ethernet 10 100BaseT network The card also provides direct integration of UPS information meters and status to a Building Management System BMS using the Modbus RTU protocol Figure 5 5 Network and MODBUS Card MS Industrial Relay Card MS The ...

Страница 63: ...elivered on a CD with the UPS Alternatively you can download it from the Eaton web page 5 3 Signal input Monitoring This standard feature lets you connect the UPS to your signal inputs such as smoke detectors or overtemperature alarms The customer interface terminals for external connections are located inside the UPS You should use twisted pair wires for each alarm input and common The signal inp...

Страница 64: ...d the system operates properly Read these instructions and have a thorough understanding of UPS operation before attempting to operate any of the controls The UPS is configured to operate with one of following nominal voltages 380 400 or 415 VAC Before operating the UPS confirm the UPS nominal voltage and frequency from display by selecting Settings Info If the UPS need to be operated with another...

Страница 65: ...Figure 6 1 UPS Switch Position Input switch Output switch Maintenance bypass switch Input switch Output switch Maintenance bypass switch With Internal Battery Version Without Internal Battery Version Battery switch Neutral switch Neutral switch ...

Страница 66: ... of the Display The display consists of the following parts A Status bar The status bar displays the UPS name state current date and time meters information and a sign in out button Active alarms and warnings are also shown B Main navigation Select a screen by tapping on its name C Secondary navigation additional information bar The bar displays buttons and selectors related to the current screen ...

Страница 67: ...w On The UPS is in Battery Mode Because Battery Mode is a nor mal condition of the UPS the Normal indicator also remains illuminated Figure 6 4 Yellow Symbol Battery Mode Yellow On The UPS is in Bypass Mode and the power is supplied from bypass The Bypass Mode indicator light is on while the Normal Mode indicator light is off Figure 6 5 Yellow Symbol Bypass Mode Red On Please pay attention immedia...

Страница 68: ...he left and right sides of the UPS cab net door The LEDs are of red green and yellow RGY The color of the LEDs is used to show the condition of the UPS Only one color is shown at one time The most urgent condition is always shown The priority rank is Red Yellow and Green Figure 6 7 UPS Status Lights 6 1 4 System Events incoming utility power In Battery or Bypass Modes the UPS may issue alarms to l...

Страница 69: ...ule map Module map shows the status of each UPM System overview System overview shows the status and meters summary for each UPS ESS ESS mimic screen shows the approximated consumption and energy savings of ESS mode Logs Active events All active events are displayed System log A log of all system events Service log A detailed log of UPS opera tions Change log A log of all changed settings and thei...

Страница 70: ...pe your passcode and press OK 3 You are signed in Press Continue to return to the previous screen There are three attempts to input the password If an incorrect password is given more than three times you need to wait for 30 minutes before trying again To modify the user settings you need to enter level 2 password For the default passwords see Chapter 11 APPENDIX A User settings ...

Страница 71: ...dicate SHUTDOWN 8 Press the Go online button on the System Controls screen If Auto Bypass is enabled factory default the critical load is immediately supplied by the bypass source in Bypass Mode until the inverter turns on and the UPS transfers to Double Conversion Mode The status indicator on the UPS control panel indicates the UPS is in Bypass Mode If auto bypass is not enabled the UPS output re...

Страница 72: ...trols screen the system status should indicate SHUTDOWN 8 Press the Go to bypass button in the System Controls screen The critical load is immediately supplied by the bypass source in Bypass Mode 9 The UPS system is now operating in Bypass Mode and the BYPASS status indicator is illuminated 6 4 3 Transfer from Double Conversion Mode to Bypass Mode To transfer the critical load to Bypass Mode perfo...

Страница 73: ...ers to Energy Saver System mode and the critical load is supplied by the bypass source If the bypass source is not available or conditions are not correct for ESS mode the power module remains on and an alarm sounds The NORMAL status indicator is illuminated The UPS status indicates UNIT ONLINE ESS The UPM status indicates READY 6 4 6 Transfer from Energy Saver System Mode to Double Conversionmode...

Страница 74: ...em Controls screen This button can be pressed to control the UPS output The Load Off button de energizes the critical load and powers down the UPS system The UPS system including Bypass remains off until restarted 1 Press Load Off The shut down screen appears providing a choice to proceed or abort the shutdown NOTE All power to the critical load is lost when Load Off is selected in the following s...

Страница 75: ...Bypass is enabled factory default the critical load is immediately supplied by the bypass source in Bypass Mode until the inverter turns on and the UPS transfers to Double Conversion Mode The status indicator on the UPS control panel indicates the UPS is in Bypass Mode If auto bypass is not enabled the UPS output remains off until the UPS system transfers to Double Conversion Mode 9 Press the Go o...

Страница 76: ... of the UPS that the total load needs X represents the number of the redundant modules of the UPS i e the number of the fault modules that the system can handle simultaneously The bigger X is the higher the system reliability is The 93PR can be installed up to 8 modules in its cabinet and the N X parallel redundancy system can be configured as 1 1 or 3 3 etc multiple different modes The UPM module...

Страница 77: ... not inserted otherwise it will cause hot air return at the rear 2 Remove 2pcs screw shown above and take plastic cover away We can see the view from the front and 3 screws pre installed see Figure 6 8 WARNING Do not remove these screws 3 Set the position lock located on the front panel of the module to 4 After UPM is installed switch UPM lock in lock state see Figure 6 8 5 Right side is unlock st...

Страница 78: ...TION CONFIDENTIAL AND PROPRIETARY 1 OF 1 SHEET 0 036 SCALE SIZE A0 APPROVED 9106 PRO E DRAWING SAFETY STATE DOCUMENT TYPE CHECKED MODIFIED REVISION NAME ECO ORIGINATED DESCRIPTION DIMENSIONS ARE IN MILLIMETERS AFTER PLATING DIMENSIONS AND TOLERANCES IN ACCORDANCE WITH ASME Y14 5M 1994 SEE NOTES FOR TOLERANCES EATON CORPORATION THIRD PROJECTION METRIC 查看细节 A 2 3 4 5 6 7 8 9 10 11 12 13 14 15 16 17 ...

Страница 79: ...rols screen press Module controls Select module screen is displayed 10 Select the UPM you want to start UPM 1 UPM 8 11 The UPM control screen is displayed and the UPM status should indicate SHUTDOWN 12 On the UPM control screen select Start module 13 Verify the following messages display sequentially on the UPM status line READY ACTIVE The UPM rectifier and inverter turn on and the UPM will transf...

Страница 80: ...s provided with the switch DANGER Do not attempt to restart the system after Load Off until the cause of the shutdown has been identified and cleared 6 8 Transfer the UPS from Double Conversion Mode to Maintenance Bypass Mode The operation of the internal MBS is allowed for a trained person only who is familiar with the UPS behavior and functions The full UPS wiring diagram with a MBS switch is pr...

Страница 81: ...then turn off the output switch 4 Refer the chapter 6 4 7 to shut down the USP system 5 Turn off the rectifier switch to disconnect UPS rectifier input 6 Turn off the static bypass switch to disconnect UPS bypass input 7 Turn off the N line switch UPS is now in the Maintenance Bypass Mode Figure 6 10 Maintenance Bypass Mode Maintenance bypass input Maintenance bypass input Static bypass input Stat...

Страница 82: ...er the chapter 6 4 2 to start the UPS in Bypass Mode 4 Turn on the output switch and then turn off MBS Lock the protective cover plate in front of the MBS 5 Refer the chapter 6 4 4 to transfer the Maintenance Bypass Mode to Normal Mode The UPS is now in Double Conversion Mode Figure 6 12 Double Conversion Mode Maintenance bypass input Static bypass input Rectifier input Bypass switch Input switch ...

Страница 83: ...tic bypass function which includes SCR and SCR input contactors and cooling fan Support hot swap NOTE Cannot disconnect and remove the STS module while the UPS is in Bypass Mode NOTE STS module all repairs and service should be performed by AUTHORISED SERVICE PERSONNEL ONLY Figure 6 13 STS Module ...

Страница 84: ...e panels removed Do not make any assumptions about the electrical state of any cabinet in the UPS system Since each battery string is an energy source in itself opening the battery circuit breaker does not deenergize the voltage within the battery string DO NOT ATTEMPTTO ACCESS ANY INTERNAL AREA OFTHE BATTERY STRINGYOURSELF VOLTAGES ARE ALWAYS PRESENT INTHE BATTERY STRING If you suspect that a bat...

Страница 85: ...er 8 Technical data 4 Ensure the UPS is in Normal Mode Normal status indicator is illuminated If an alarm lamp is illuminated or the Normal status indicator is not illuminated contact your service representative 7 2 2 MONTHLY Maintenance Perform the following steps monthly 1 Monitor system parameters on the control panel Chapter 6 2 Steps to operate the UPS 2 If the optional air filters are instal...

Страница 86: ...onnel 7 3 Recycling the Used UPS or Batteries Before scrapping UPS or its battery cabinet the battery bank must be removed Local requirements must be followed in battery recycling or discard The removal of batteries is allowed only by authorized service personnel due to high energy and voltage Do not discard waste electrical or electronic equipment in the trash For proper disposal contact your loc...

Страница 87: ...may contain HIGH VOLTAGES and CAUSTIC TOXIC and FLAMMABLE substances Batteries can injure or kill people and damage equipment if used improperly DO NOT DISCARD unwanted batteries or battery material in the public waste disposal system Follow ALL applicable local regultions for storage handling and disposal of batteries and battery materials Figure 7 2 Recycling Batteries Symbol DANGER ...

Страница 88: ...e 8 1 Standards Safety IEC 62040 1 IEC 60950 1 EMC Emissions IEC 62040 2 2005 EMC Immunity IEC 61000 2 2 Low frequency conducted IEC 61000 4 2 ESD IEC 61000 4 3 RF electromagnetic field IEC 61000 4 5 Surge IEC 61000 4 6 Conducted RF common mode IEC 61000 4 8 Power frequency magnetic field Performance Tests IEC 62040 3 Environmental IEC 62430 RoHS 2002 95 EC WEEE 2002 96 EC ECO Design Directive 200...

Страница 89: ...onfigurable FrequencyTolerance 40 to 72 Hz Number of Input Phases Rectifier Input Number of Input Phases Bypass Input 3 phases N Input Power Factor 0 99 Rated Mains Input Current Maximum Mains Input Current See Table 3 7 Rated and maximum currents for rated power and voltage on page 31 Input Current Distortion at Rated Input Current iTHD 3 Rectifier Ramp up Rectifier Start and Load Step 5 A s per ...

Страница 90: ...erload Capability at Ambient 40 C on Inverter 10 min 105 110 load 60 sec 111 125 load 10 sec 126 150 load 300 ms 150 load Overload Capability at Ambient 40 C on Inverter Stored Energy Mode 10 min 105 110 load 60 sec 111 125 load 300 ms 126 load Overload Capability at Ambient 40 C on Bypass Continuous 125 load 10 ms 1000 load Note Bypass fuses may limit the overload capability Output Current See Ta...

Страница 91: ...and voltage may not be connected in parallel Battery Voltage 480 V 40 blocks to 504V 42 blocks Recharge Profile ABM or float charge End of Discharge Voltage 1 67 VPC to 1 75 VPC configurable or automatic load adaptive Charge Current Configurable Single UPM default 4A configurable max 25A per UPM Battery Start Option Yes Note For external battery connection 24 VDC Shunt Trip signal wiring from the ...

Страница 92: ...emperature Range From 25 C to 55 C in the protective package Ambient ServiceTemperature Range UPS From 5 C to 40 C No output power derating required Relative Humidity Range 5 to 95 no condensation allowed Maximum Service Altitude 5 to 95 no condensation allowed Maximum 2000 m 6600 ft with 1 derating per each additional 100 m Maximum recommended operating and storage temperature with VRLA batteries...

Страница 93: ...ll also be performed only by a service engineer approved by Eaton Otherwise the warranty will be voided If the product fails to meet its published specifications due to a defect in material and workmanship covered by this warranty the seller will repair or replace the warranted product Such repair or replacement will be made by Eaton or by a service provider approved by Eaton Repair or replacement...

Страница 94: ...ment is installed and operating correctly The area around the installed UPS system is clean and dust free It is recommended that the UPS be installed on a level floor suitable for computer or electronic equipment Adequate workspace exists around the UPS and other cabinets Adequate lighting is provided around all UPS equipment A 230 VAC service outlet is located within 7 5 meters of the UPS equipme...

Страница 95: ...he user interface language Unit Name Change the unit name Clock Change the date and time change the clock for mat or enable disable NTP clock setup Signal Inputs Select signal input name and function Relay Outputs Configure the relay outputs BatteryTest Change the power level and duration for battery test Bypass Limits Change bypass voltage bypass frequency or by pass slew rate limits Screen Saver...

Страница 96: ......

Страница 97: ......

Страница 98: ...614 02087 00 ...

Отзывы: