Easymount Sign EM-S1400C Скачать руководство пользователя страница 15

14 


Laminating adjustments 

Temperature 

The Easymount Sign Cold system does not have a temperature control and operates cold.


The Easymount Sign Hot system has the option of a heat assisted top roller with a fixed temperature of 45°C/113°F.  By 

using heat it will soften 

the adhesive and reduces ‘silvering’ when laminating.


Speed 

Adjust the speed until you get the required results. 
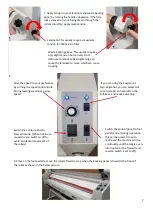
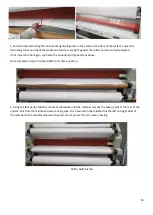
Roller 

Pressure


Under normal operation, wind the roller pressure adjustment handle until the rollers meet and the handle goes into a neutral 

mode, then turn gently until you feel resistance. Then just apply an extra 

1

/

8

 of a turn to ensure there is sufficient pressure. If 

‘BOW’ marks appear across the laminated document, there is too much roller pressure applied and the roller should be lifted 

slightly.


Cleaning and maintenance of your system 

The most expensive part of a laminator is usually the rollers. If these become damaged they are costly to repair.  Always 

ensure you look after the rollers and clean them regularly to avoid a build-up of glue (see advice below).  Never hold a 
sharp object such as a knife close to the rollers in case of catching the rubber as this could cause 
permanent damage that will affect the result of your work.


When your laminator is cooling down, always separate the rollers using the roller pressure control, this 

will ensure that your rollers do not touch when still hot as this could leave a ‘flat spot’.


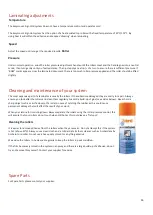
Cleaning the rollers 

It is easier to remove adhesive from the rollers when they are warm. Do not attempt this if the system 

is hot (above 40

o

C). Always use a clean cloth and a mild anti-static foam cleaner such as Amberclens by 

Ambersil or similar. Do not use a heavy-duty solvent or anything abrasive. 

We advise the rollers to be cleaned regularly to keep the rollers in peak condition.


If the film becomes jammed in the system in any way and there is a large build-up of adhesive, do not 

try and remove this yourself. Contact your supplier for advice. 

Spare Parts 

For Spare Parts please contact your supplier.


Содержание Sign EM-S1400C

Страница 1: ...0 EM S1400C EM S1600C EM S1400H EM S1600H ...

Страница 2: ...nvironmental requirements Page 4 Control panel and specifications Page 5 to 8 Installation of laminating films Page 9 to 10 Loading of media rolls Page 11 to 13 Trouble shooting guide Page 14 Laminating adjustments and maintenance Page 15 Warranty and incorrect use ...

Страница 3: ...ngth Mount prints on to boards and apply vinyl s tapes and adhesive films quickly and easily Ideal for laminating single banners reel to reel laminates posters graphics signs pop up displays and many more Please read these instructions carefully before starting to use the system to ensure you get the best results and are competent at operation Should you experience any problems please contact your...

Страница 4: ... injuries could occur Please don t put burrs sharp blades or over thick rigid materials between the roller for example tools rulers and knives etc Don t cut adhesive films directly on the surface of the roller to avoid damage Please shut down the system after laminating At the end of the working day always gape the rollers to ensure no flat spots or distortions occur When you need to move the syst...

Страница 5: ...220V 240V 50Hz 60Hz Rate Input Power 38W 38W Dimensions 1846 x 550 x 1365mm 2046 x 550 x 1365mm Gross Machine Weight 136Kg 156Kg EM S1400H EM S1600H Max Laminating Width 1420mm 1620mm Max Laminating Thickness 25mm Laminating Speed 5m min Rated Working Voltage Frequency 220V 240V 50Hz 60Hz Rate Input Power 1000W 1200W Dimensions 1846 x 550 x 1365mm 2046 x 550 x 1365mm Gross Machine Weight 136Kg 156...

Страница 6: ... mandrel brackets 2 Lock the mandrels in place by turning the black locking collars anti clockwise Connect the foot pedal to the power socket as shown in the above picture 3 Remove the film mandrel and load the film onto the mandrel Ensure the film roll is positioned in the centre of the system ...

Страница 7: ...ckwise 5 Move towards the rear of the system and pull the laminate tight from the middle towards you while holding lower the laminating roller by turning the handle clockwise When the two rollers meet the handle will go loose using one finger flick the handle clockwise Using too much pressure can cause a wave in the middle of the laminate 6 Cut through just the backing paper using the snitty cutti...

Страница 8: ...visable to start we advise you switch to off to During avoid accidental movement of operation this can be pressed to the rollers Auto mode and the machine will run continually until the magic eye is interrupted or the switch is set to Off mode 7 Apply tension to your laminate and waste backing paper by turning the handles clockwise If the film looks creased or is not being drawn through the roller...

Страница 9: ...llers 10 Loosen the waste backing paper along the length of the laminate pull up the waste backing paper only from the middle and stick onto the waste mandrel using tape Once secured in the middle stick the left and right sides of the waste backing to the mandrel wherever they fall Do not pull the backing as this can cause creasing 11 Place the media always the same size or bigger than the laminat...

Страница 10: ...g the Roller Up Down Switch and pull down the feed table Feed the media from the mandrel directly to the bottom laminating roller and through the rollers as shown above Please ensure you have not threaded it under the stand beam it must go directly from the roll to the lower laminating roller 1 Remove the media mandrel load the media onto the system lock into place and ensure it is centralized If ...

Страница 11: ...to the mandrel wherever they fall Do not pull the media Roll to Roll Finished 4 Pull both the laminating film and media tightly together in the centre at the back of the system Lower the laminating roller and check the media and laminate are tight against the rollers and are correctly aligned If not raise the roller again centralize the material and repeat steps above Once completed return the fee...

Страница 12: ...ockwise Please note you can only have a pressure reading on the gauge when the roller is in the down position Incorrect roller pressure Higher the laminating roller pull the material from the middle at the rear of the system and start to lower the roller slowly Once to roller meet the handle becomes slack loose Using one finger flick the handle in the downwards direction clockwise The weight of th...

Страница 13: ... on the waste backing paper can cause the waste to be pulled through the laminator see below image The above picture shows either not enough tension to the laminate or too much tension to the waste backing paper Laminating film requires lots of tension to stop creasing The waste backing paper usually does not require much tension The below picture shows not enough tension on the waste backing pape...

Страница 14: ...er and check to ensure it is tight against the laminating roller The picture to the left shows the laminate is not tight to the roller on one side Raise the laminating roller pull the laminate from the centre at the rear of the system ensuring the laminate is tight against the roller on both sides and roller the roller ...

Страница 15: ...hey are costly to repair Always ensure you look after the rollers and clean them regularly to avoid a build up of glue see advice below Never hold a sharp object such as a knife close to the rollers in case of catching the rubber as this could cause permanent damage that will affect the result of your work When your laminator is cooling down always separate the rollers using the roller pressure co...

Страница 16: ...feeds or other operator related errors which would be chargeable Your Easymount Sign Laminator rollers are covered against manufacturing defects It does not cover against any damages caused by misuse i e being cut with a knife or damage from non Laminating or Mounting processes Your warranty will be void if the system has been modified by a third party not approved by the manufacturer Vivid Lamina...

Отзывы: