

2.0 Softwareinstallation
With the provided software you can advise 53 different
functions on the
3rd button (wheel button). Aside from that the scroll mode
can be changed. For that, please cklick with the right button on the mou-
se symbol in the task bar after installation; then click with the left
mouse button on "Setting".
2.1 Installation der Software
• Windows 98SE/ME
Put in the floppy disk into the device drive. Click on the Windows
Desktop on "Start"
➯
"Execute", fill in "setup" (without quotation) and
press "Enter". Now follow the instructions on the screen.
• Windows 2000/XP
Click on "Start"
➯
Settings
➯
Software
➯
"Add new programs".
Follow the instructions on the screen then.
The EasyLine Wireless Mouse frees your desktop from incommodio and
interfering cables due to sending digtal signals on the radio way to the
receiver (USB-dongle). This radio signals work properly on a distance up
to 1,5 metres - even away from the field of view.
With the precise wheel you can search conviniently in documents or
websites. The rounded shape is suitable for left- or righthanders.
1.0 Installation of hardware
1.1 Installation of batteries
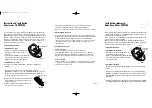
• Remove the the cover on the bottom side
of the mouse (picture 1).
• Put the provided AAA (Micro) batteries
into the battery case (the right polarity
as specified).
1.2 Installation of mouse
• Connect the USB-receiver (dongle) with the USB-interface on the PC
Advice: Depending on the Windows version you run, you will be
requested to put in the Windows installation CD. Please put in then this
CD into your CD- bzw. DVD-ROM drive and follow the further guidelines
on the screen.
• Afterwards please press the button on the USB-
receiver first (picture 2). Then the LED on the
receiver starts to blink slow.
• Now press the button on bottom side of the mouse.
(picture 1)
• The frequencies of sender (mouse) and receiver
will be tuned. The LED of the receiver blinks faster.
• After 1-2 seconds the mouse and the receiver are
ready for use.
Installation Guide
Wireless Mouse WM100
picture 1
push
button
picture 2
push
button
LED
battery
case
• Betätigen Sie nun den Taster auf der Unterseite der
Maus (Bild 1)
• Jetzt werden die Frequenzen des Senders (Maus)
und Empfängers miteinander abgestimmt. Die LED
des Empfängers blinkt schneller.
• Nach ca. 1-2 Sekunden sind Maus und Empfänger
einsatzbereit.
2.0 Softwareinstallation
Mittels der beigelegten Software lassen der 3. (Rad)-Taste insgesamt 53
verschiedene Funktionen zuweisen. Außerdem kann der Scrollmodus
(Bildlauf) verändert werden. Klicken Sie dazu nach erfolgter Installation
mit der rechten Maustaste auf das Maussymbol in der Taskleiste,
anschließend mit der linken Taste auf "Setting".
2.1 Installation der Software
• Windows 98SE/ME
Legen Sie die beigelegte Diskette in das Diskettenlaufwerk.
Klicken Sie auf dem Windows-Dektop auf Start
➯
Ausführen, geben
"Setup" (ohne Anführungszeichen) ein und bestätigen mit Enter. Folgen
Sie den Vorgaben auf dem Bildschirm.
• Windows 2000/XP
Klicken Sie auf Start
➯
Einstellungen
➯
Systemsteuerung
➯
Software
➯
"Neue Programme hinzufügen". Folgen Sie den Vorgaben auf dem
Bildschirm.
Bild 2
Taster
LED
00018888BDA 20.01.2004 14:36 Uhr Seite 4