background image


  14 - 

5.2 Set up recording 

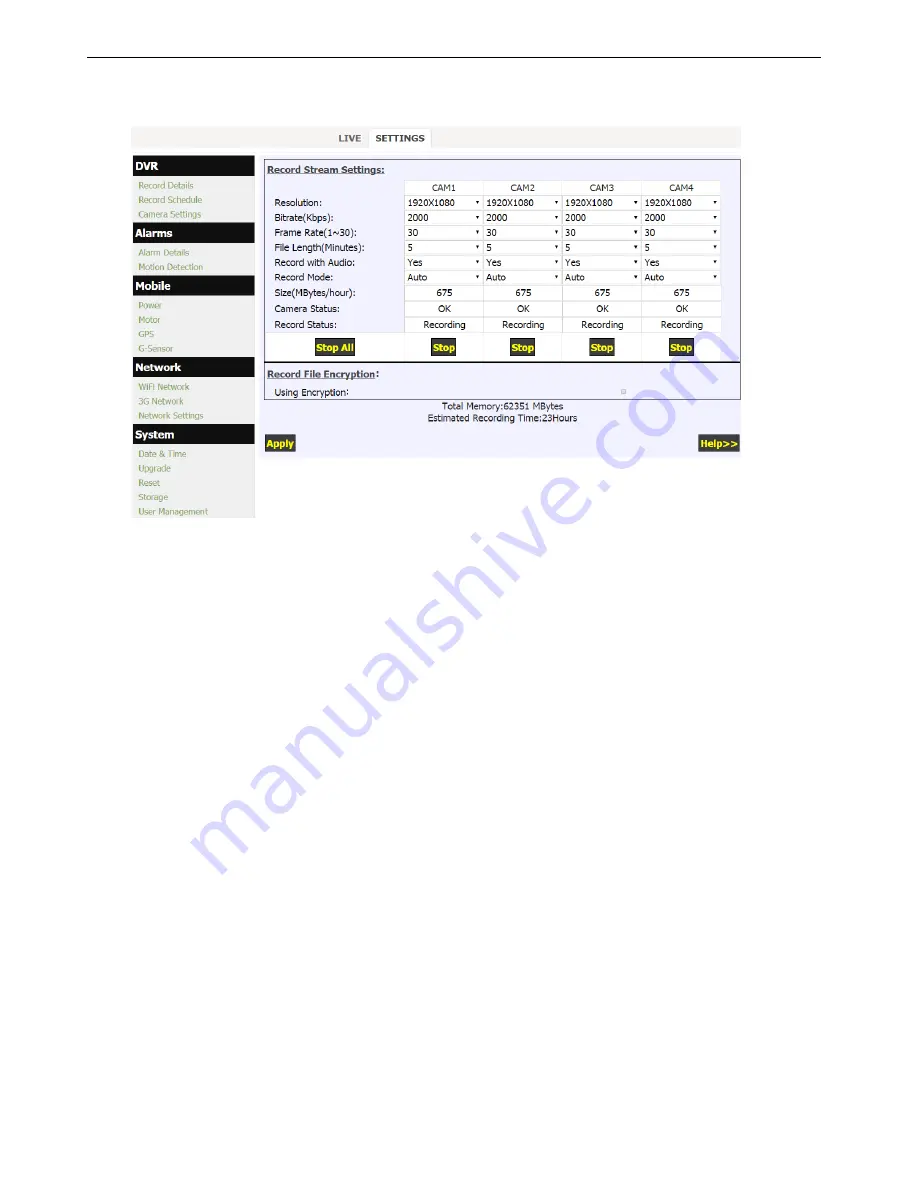
Click “Record Details” in the “DVR” menu to set up your recording. 


1.


Each  camera  supports  up  to  1080p30,  bitrate  varies  from  100Kbps  to  8000Kbps.  Default  setting  is 
1080p30 with bitrate of 3000Kbps. 1200Kbps is recommended for 720p25. DVR uses inteligent bitrate 
control to save media space when doing H.264 image compression. If no obvious moving in scope, the 
bitrate  will  be  reduced  to  50%(75%  for  1080p)  of  the  set  value  automatically.  For  example,  if  one 
camera is set to 720p25 at 1200Kbps, the actual running bitrate could be 600Kbps when no obvious 
movement. 

2.


Three  levels  of  resolution  supported  for  record:  1080p(1920x1080),  720p(1280x720)  and 
540p(960x540). If you want record more time with same SD card, you can select 720p or 540p for 
recording, use lower frame rate and lower bitrate with acceptable video quality. 

3.


SD card with speed of Class 10 is recommended for high bitrate setting. 

4.


Estimated recording time with the storage media being used will be shown up under the configuration 
box. The DVR allows for the customized settings for resolution, bitrate and frame rate on each individual 
camera. Note: The estimated recording time depends on the complexity and strength of movement. 

5.


The file length can be optional from 1 min to 4 hours. The size for a single file should not be over 2GB 
with limitation of FAT32. That means the file size will be limited as 2GB or less to avoid file system error, 
even it does not reach the set record time (when high bitrate and/or long file length is set). 

6.


Support 3 record modes: Manual/Auto/Off. Default is Auto. 

                  Manual: Send commands from the page, ie. Mouse click on Start button. 
                  Auto: DVR will start recording automatically after it is turned on. 
                  Off: Any camera set with "Off", it will not start to record anyway. 

7.


Support 3 record modes: Manual/Auto/Off. Default is Auto. 

8.


Click  Start/Stop  to  start  or  stop  record  on  each  individual  camera.  Click  "Apply"  to  have  the  setting 
change(s) take effect. choose ”RECORD” to enter its sub-menu; 

9.


The record file can be encrypted. You may just check the ”Using Encryption” to enable this feature. The 
encrypted file can only be played-back on AVPlayer provided by the manufacturer.   


Содержание HDVR004

Страница 1: ...ank you for using our High Definition SD Card Video Recorder This manual is applicable for HDVR004 HDVR004GW Please read this User s Manual carefully to ensure that you can use the device correctly an...

Страница 2: ...repair when needed 12 The device can only be installed horizontally Installed vertically or out of the horizontal could hurt person or damage the device or and its parts Warning This device is NOT of...

Страница 3: ...12 4 1 DOWNLOAD AND INSTALL THE VLC PLAYER INTO YOUR COMPUTER 12 4 2 CONNECT THE HDVR WITH NETWORK 12 4 3 USE A WEB BROWSER TO ACCESS DVR FOR LIVE VIEW OR SETTING 12 5 BASIC OPERATION AND MENU SYSTEM...

Страница 4: ...asy connection and installation Product Main Features Embedded operating system assuring reliability and system integrity Records up to four channels of full motion color video with corresponding audi...

Страница 5: ...c Over speed alarm and trigger recording with separated files G Sensor X Y Z axis accelerometer Recorded G Sensor Values can provide reference of data analyzing when accidence happened Combined Record...

Страница 6: ...When all of 4 channels are recording Blinking Blinking every 2 seconds LED indicator off times indicate the missing number of cameras channels For example if it blinks 3 times per time there are 3 cam...

Страница 7: ...ut AV input 1 including audio input 1 video input 1 and power output for camera 1 AV input 2 including audio input 1 video input 1 and power output for camera 2 AV input 3 including audio input 1 vide...

Страница 8: ...f the tamper proof case in the right place inside the vehicle 2 Put the DVR system inside the bottom cover and load a SD Card NOTE The lock jumper of SD Card should be in OFF position Kingston Class 1...

Страница 9: ...DVR The DVR may be damaged if the voltage comes too high And the DVR may not work if the voltage comes too low 3 Power of the DVR should be supplied by the car battery 4 Power consumption of the DVR...

Страница 10: ...10 3 3 Camera Connection Connect the camera with HDVR 3 4 Sensor Harness Connection GPS Connection Option...

Страница 11: ...11 3 5 Event Button and Cable Connection Option...

Страница 12: ...C or notebook to use dynamic IP address the HDVR s AP will assign a new IP address for your notebook 2 Connect the DVR via Wifi If you use notebook with WiFi you can scan and find an AP with name of H...

Страница 13: ...using FAT32 file system or format it on the DVR system itself by following steps given below 3 Insert the SD Card into the SD Card slot on front panel of the DVR system 4 Click SETTINGS and choose Sto...

Страница 14: ...p under the configuration box The DVR allows for the customized settings for resolution bitrate and frame rate on each individual camera Note The estimated recording time depends on the complexity and...

Страница 15: ...udio volume and other settings 2 Max 12 characters are limited for each camera title 3 Camera image can be flipped in direction of horizontal or vertical 4 When Auto Black and White is enabled it woul...

Страница 16: ...ow level active 3 Event button can be used to start stop recording or trigger an alarm recording 4 Combined Recording can be triggered when any alarm happens 5 The image burn in characters can be edit...

Страница 17: ...5 6 Setup power Click Power in the Mobile menu to setup the power supply 1 Default ignition level is HIGH while LOW for few cars with main switch on negative pole 2 Power Off Delay is used to set how...

Страница 18: ...enu to setup vehicle parameters 1 Speed obtains from GPS if existing 2 The item Speed Limit is used to set the speed alarm threshold 3 Combined Recording can be triggered when over speed 4 The image b...

Страница 19: ...GPRMC frames GPS searching in processing or GPS signal is weak or lost 2 GPS OSD gives the option if longitude latitude data to be burned in video image 3 Sync with GPS Time gives the option to synchr...

Страница 20: ...nitial values should be set to the X Y Z axis values when the vehicle is still and DVR is installed on desired position 4 Alarm Threshold can be set to the absolute differential value between initial...

Страница 21: ...cord Click Record Schedule in the DVR menu to setup schedule record 1 The record schedule allows for 3 time plans per day 2 Each camera can be scheduled individual or click All to apply the same recor...

Страница 22: ...h the Country Region Encryption mode should be selected when a WiFi password needed II Client Mode WiFi Client can be turned ON or Off with checkbox Use Wireless Scan to show the available remote WiFi...

Страница 23: ...without service SIM card error or no RF signal 3G CONNECTED 3G module works properly 2 Make sure that your SIM card is correctly inserted Keep the side with metal pads adown 3 Intelligent devices PC...

Страница 24: ...M card When inserting or changing a new SIM card the DVR needs to be rebooted 5 13 Set up date and time Click Date Time in the System menu to setup date and time 1 Manual Setting and Sync with PC Time...

Страница 25: ...r Cameras 1 System Version includes DVR Kernel Version DVR App Version MCU FW version Web Menu version Camera FW version 2 Upgrade file should be ended with tar 3 After Upgrade completed web will noti...

Страница 26: ...setting or reset to default WiFi Setting You can also reboot the HDVR in this menu 5 16 User Management Click User Management in the System menu to set the user authority for your HDVR Admin has all a...

Страница 27: ...rotocolo TCP IP Communication 3G EDGE GPRS CDMA Only for HDVR004GW Alarm Sensor Inputs 3 Alarm input 1 speed 1 ignition 1 Panic button G Sensor Outputs 1 Beeper Alarm LED Email Multi mode Activation b...

Страница 28: ...nd longitude vehicle speed and vehicle ID plate and name or channel number Playback Speed Speed forward 1x 16x 7 List of Standard Accessories Item Description Quantity 1 HD Video Recorder 1 pc 2 Tampe...

Страница 29: ...potential analysis diagram against cars with negative switch control 4 Q Respectively what s the voltage reference range of the high and low level in the DVR A The voltage range of low level is DC 0V...

Страница 30: ...on the panel of the DVR A Please reference the description in 2 1 11 Q what kind of player software should use to play back video slots in SD card on the PC Why some of them don t play normally A The...

Страница 31: ...he mobile DVR drained the energy of the car battery 15 Q What does the indicator light mean on the wire control L25 A The indicator light on the wire control is double color light red and green See th...

Отзывы: