background image

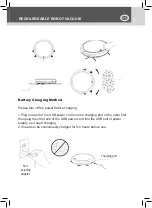
25

WIEDERAUFLADBARE SAUGROBOTER

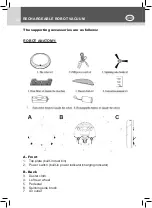
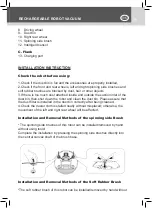
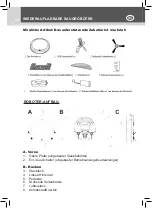
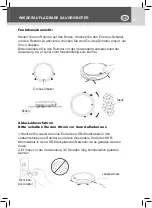
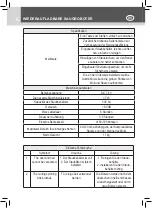
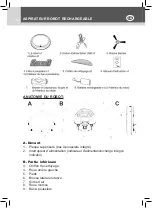
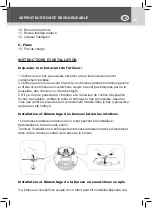
9.  Staubbehälte

10. StaubbehälteIntelligent sensor

11.  Drehende Seitenbürste

12. Intelligenter Sensor


C. Seite

13. Ladeanschluss

INSTALLATIONSANWEISUNG

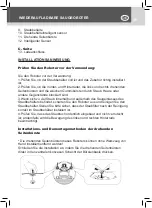
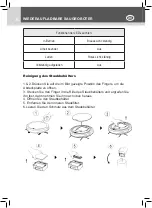
Prüfen Sie den Roboter vor der Verwendung:

Sie den Roboter vor der Verwendung:

1.Prüfen Sie, ob der Staubbehälter voll ist und das Zubehör richtig installiert 

ist,

2.Prüfen Sie, ob die Vorder- und Hinterräder, die links und rechts drehenden 

Seitenbürsten und die weichen Gummibürsten durch Staub, Haare oder 

andere Gegenstände blockiert sind.

3.Wenn sich zu viel Staub innerhalb und außerhalb des Saugeinlasses des 

Staubbehälters befindet, schalten Sie den Roboter aus und reinigen Sie den 

Staubbehälter.Stellen Sie bitte sicher, dass der Staubfilter nach der Reinigung 

korrekt im Staubbehälter installiert ist.

4.Prüfen Sie, dass das Staubtuch ordentlich eingebaut und nicht verrutscht 

ist; andernfalls wird die Bewegung des linken und rechten Hinterrads 

beeinträchtigt.

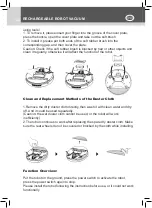
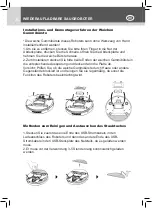
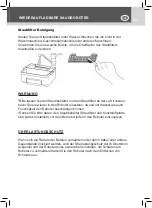
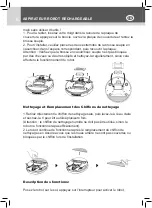
Installations- und Demontagemethoden der drehenden 

Seitenbürste 

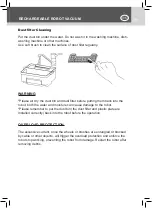
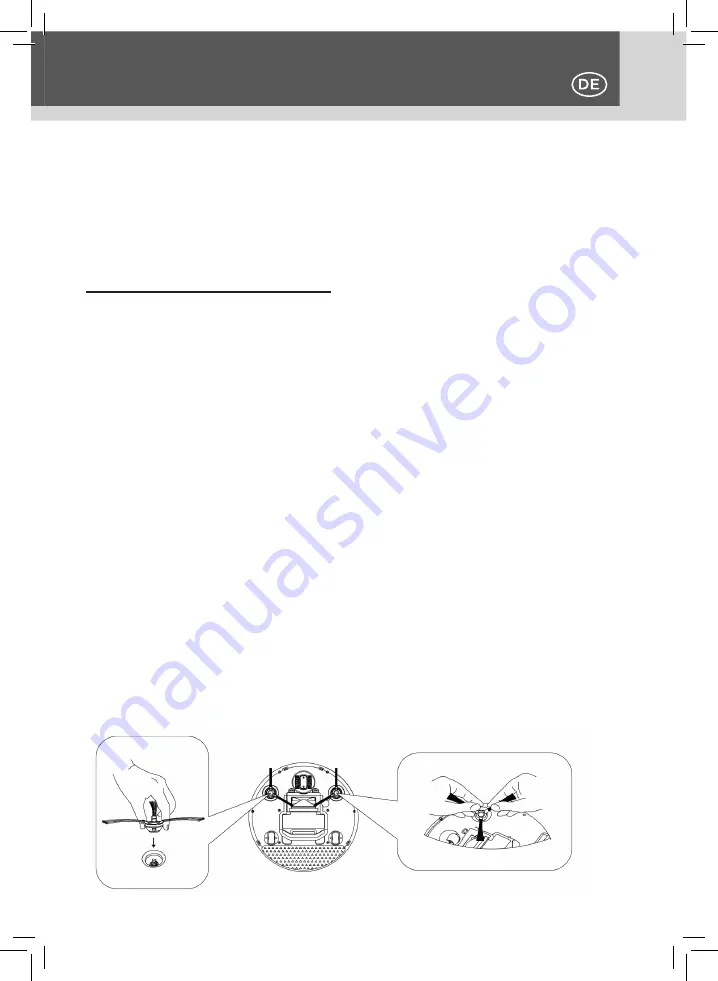
* Die drehenden Seitenbürsten dieses Roboters können ohne Werkzeug von 

Hand installiert/entfernt werden!

Schließen Sie die Installation ab, indem Sie die drehenden Seitenbürsten 

direkt in den zentralen konvexen Schacht der Bürstenbasis drücken.

Содержание DAH000016NOC

Страница 1: ...E RECHARGEABLE ROBOT VACUUM WIEDERAUFLADBARE SAUGROBOTER ASPIRATEUR ROBOT RECHARGEABLE ROBOT ASPIRADOR RECARGABLE DAH000016NOC INSTRUCTION MANUAL BEDIENUNGSANLEITUNG MANUEL D INSTRUCTION MANUAL DE INSTRUCCIONES MANUALE DI ISTRUZIONI ...

Страница 2: ...e o modificare il apparecchio In caso contrario potrebbe causare incendi scosse elettriche o lesioni personali 6 Non avvicinarsi a oggetti come fonte di calore ad esempio sigarette accendini fiammiferi o materiali infiammabili come benzina e non pulire la macchina con benzina Si prega di assicurarsi di rispettare le seguenti precauzioni di sicurezza prima dell uso AVVERTENZA La violazione delle is...

Страница 3: ...tti di scarto 12 Si prega di non utilizzare questo apparecchio per scopi diversi dalla sua funzione 13 Questo apparecchio si applica a pavimenti duri non utilizzare su pavimenti irregolari o sulle coperte morbide AVVERTENZA Assicurarsi che l ambiente di lavoro di questa macchina deve essere asciutto e senza acqua In caso contrario il apparecchio non può funzionare in modo efficiente ROBOT E ACCESS...

Страница 4: ... Vista da alto 1 Piastra superiore contenitore rifiuti incassato 2 Interruttore di alimentazione indicatore di alimentazione indicatore di ricarica integrato B Vista dal basso 3 Panno spolverino 4 Ruota posteriore sinistra 5 Telaio 6 Spazzola laterale 7 Uscita aria 8 Ruota motrice 9 Contenitore rifiuti ...

Страница 5: ...nterno e all esterno dell ingresso di aspirazione del contenitore rifiuti spegnere il robot e pulire il contenitore rifiuti Assicurarsi che il filtro antipolvere sia installato correttamente nel contenitore rifiuti dopo essere stato pulito 4 Controllare che il panno spolverino sia bloccato in modo ordinato senza essere fuori posto in caso contrario influenzerà il movimento della ruota posteriore s...

Страница 6: ...a piastra Attenzione controllare se la spazzola in gomma morbida è bloccata da capelli o altri oggetti e pulirla regolarmente altrimenti influenzerà il funzionamento del robot Metodi di pulizia e sostituzione del panno spolverino 1 Rimuovere direttamente il panno sporco per lo spolverino e poi lavarlo con acqua pulita e asciugarlo si può essere usato ripetutamente Attenzione il panno umido per lo ...

Страница 7: ...ni prima dell uso altrimenti non potrebbe funzionare correttamente Metodo di ricarica della batteria Si prega di spegnere l alimentazione prima di ricaricare 1 Collegare prima un estremità del cavo di alimentazione USB alla porta di ricarica del robot e poi collegare l altra estremità del cavo di alimentazione USB alla scanalatura USB dell alimentatore quando necessita di ricarica 2 Deve essere ri...

Страница 8: ...ompletamente spenta Pulizia del Contenitore Rifiuti 1 2 Premere la posizione indicata dal dito nell immagine per aprire la piastra superiore 3 Infilare il dito nella scanalatura del contenitore rifiuti e afferrarlo saldamente e estrarlo verso l alto 4 Aprire il contenitore rifiuti 5 Rimuovere il filtro antipolvere interno 6 Svuotare i rifiuti dal contenitore rifiuti ...

Страница 9: ...polvere prima di rimetterli nel robot sia l acqua che l umidità possono causare danni al robot Ricordarsi di rimettere il contenitore rifiuti il filtro antipolvere e la piastra di plastica sono installati correttamente nel robot prima dell operazione PROTEZIONE DA SOVRACCARICO La corrente eccessiva una volta che le ruote o le spazzole sono impigliate o bloccate da cavi o altri oggetti attiverà la ...

Страница 10: ...4V Potenza del dispositivo 7W Capacita del contenitore rifiuti 300 mL Rumore 60dB Durata di prima ricarica 8 ore Durata di ricarica 3 5 ore Durata di lavoro singolo 150 180min Area massima per lavoro singolo 90 120m2 secondo la complessità della stanza e della quantità di spazzatura Peso netto 1 1 Kg Risoluzioni dei problemi Problemi Cause Soluzioni 1 La polvere e i capelli non possono essere aspi...

Страница 11: ...ETTRONICO A FINE VITA Il simbolo del cestino barrato riportato sull apparecchio indica che il prodotto alla fine della propria vita utile dovendo essere trattato separatamente dai rifiuti domestici deve essere conferito in un centro di raccolta differenziata per apparecchiature elettriche ed elettroniche oppure riconsegnato al rivenditore al momento dell acquisto di una nuova apparecchiatura equiv...

Страница 12: ...no one shall disassemble repair or modify the product otherwise it may cause fire electric shock or personal injury 6 Do not get close to heat source objects such as cigarettes lighters matches or flammable materials such as gasoline let alone clean the machine with gasoline Please be sure to comply with the following safety precautions before use WARNING Violation of safety instructions may cause...

Страница 13: ...duct as waste follow the local instructions for disposal of waste products 12 Please do not use this product for any purpose other than its function 13 This product applies to hard floor do not use on the uneven floor and soft blanket WARNING The work environment of this machine has to be dry without any water or the machine cannot work efficiently ROBOT AND ACCESSORIES Instruction This product ap...

Страница 14: ...supporting accessories are as follows ROBOT ANATOMY A Front 1 Top plate built in dust bin 2 Power switch built in power indicator charging indicator B Back 3 Duster cloth 4 Left rear wheel 5 Pedestal 6 Spinning side brush 7 Air outlet ...

Страница 15: ...e dust bin then shut down the robot and clean the dust bin Please assure that the dust filter is installed in the dust bin correctly after being cleaned 4 Check the duster cloth is stalled neatly without misplaced otherwise the movement of the left and right rear wheel will be affected Installation and Removal Methods of the spinning side Brush The spinning side brushes of this robot can be instal...

Страница 16: ...the robot Clean and Replacement Methods of the Duster Cloth 1 Remove the dirty duster cloth directly then wash it with clean water and dry off And it could be used repeatedly Caution the wet duster cloth cannot be used or the robot will work inefficiently 2 The robot continues to work after replacing the spare dry duster cloth Make sure the rear wheels do not be covered or blocked by the cloth whi...

Страница 17: ... charging 1 Plug one end of the USB power cord into the charging port of the robot first then plug the other end of the USB power cord into the USB slot of power supply as it need charging 2 It needs to be continuously charged for 3 5 hours before use Not including adapter charging port ...

Страница 18: ...ght solid Fully Off Dust Bin Cleaning 1 2 Press the position instructed by the finger in the picture to open the cover plate 3 Put the finger into the groove of the dust bin and grab it tightly then take it out upward 4 Open the dust bin 5 Remove the inner dust filter 6 Empty the debris of the dust bin ...

Страница 19: ...ing them back into the robot both the water and moisture can cause damage to the robot Please remember to put the dust bin the dust filter and plastic plate are installed correctly back into the robot before the operation OVERLOAD PROTECTION The excessive current once the wheels or brushes are entangled or blocked by cable or other objects will trigger the overload protection and enforce the robot...

Страница 20: ... 4V The whole machine power 7W Capacity of the Dust Bin 300 mL Noise 60dB First Charging Duration 8 ore Charging Duration 3 5 ore Single Working Time 150 180min Maximum Area for Single Sweep 90 120m2 depending on the complexity of the room and the amount of garbage Net Weight 1 1 Kg Simple Troubleshooting Symptom Cause Solution 1 The dust and hair cannot be vacuumed 1 The dust bin is full 2 The du...

Страница 21: ...ight rear wheels cannot move hinde red by the duster cloth which is installed incorrectly 1 Wipe the floor dry Air dry the duster cloth or replace it with a dry one 2 Please clean up the other objects 3 Please follow the instruction to reinstall the duster cloth correctly INFORMATION FOR USERS OF DOMESTIC APPLIANCES This marking indicates that this product should not be disposed with other househo...

Страница 22: ...nn 5 Außer dem von der Firma benannten Wartungstechniker darf niemand das Produkt zerlegen reparieren oder modifizieren andernfalls kann es zu Bränden Stromschlägen oder Verletzungen kommen 6 Kommen Sie nicht in die Nähe von wärmeerzeugenden Gegenständen wie Zigaretten Feuerzeugen Streichhölzern oder brennbaren Materialien z B Benzin und ganz bestimmt das Gerät nicht mit Benzin reinigen Bitte beac...

Страница 23: ... oder Babys auf um versehentliche Verletzungen zu vermeiden 11 Wenn Sie das Produkt als Abfall entsorgen beachten Sie die örtlichen Vorschriften für die Entsorgung von Abfallprodukten 12 Bitte verwenden Sie dieses Produkt nicht für einen anderen Zweck als seine Funktion 13 Dieses Produkt arbeitet auf harten Böden verwenden Sie es nicht auf unebenen Böden und weichen Decken WARNUNG Die Arbeitsumgeb...

Страница 24: ...zende Zubehör ist wie folgt ROBOTER AUFBAU A Vorne 1 Obere Platte eingebauter Staubbehälter 2 Ein Aus Schalter eingebauter Betriebsanzeiger Ladeanzeiger B Rücken 3 Staubtuch 4 Linkes Hinterrad 5 Pedestal 6 Drehende Seitenbürste 7 Luftauslass 8 AntriebsradDust bin ...

Страница 25: ... sich zu viel Staub innerhalb und außerhalb des Saugeinlasses des Staubbehälters befindet schalten Sie den Roboter aus und reinigen Sie den Staubbehälter Stellen Sie bitte sicher dass der Staubfilter nach der Reinigung korrekt im Staubbehälter installiert ist 4 Prüfen Sie dass das Staubtuch ordentlich eingebaut und nicht verrutscht ist andernfalls wird die Bewegung des linken und rechten Hinterrad...

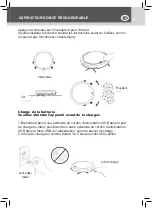
Страница 26: ...de Enden der weichen Gummibürste in die entsprechende Aussparung und decken dann die Platte ab Vorsicht Prüfen Sie ob die weiche Gummibürste durch Haare oder andere Gegenstände blockiert ist und reinigen Sie sie regelmäßig da sonst die Funktion des Roboters beeinträchtigt wird Methoden zum Reinigen und Austauschen des Staubtuches 1 Stecken Sie zuerst das eine Ende des USB Stromkabels in den Ladean...

Страница 27: ...hend der Anweisung da er sonst nicht funktionsfähig sein könnte Akku Ladeverfahren Bitte schalten Sie den Strom vor dem Aufladen aus 1 Stecken Sie zuerst das eine Ende des USB Stromkabels in den Ladeanschluss des Roboters und dann das andere Ende des USB Stromkabels in den USB Steckplatz des Netzteils da es geladen werden muss 2 Er muss vor der Verwendung 3 5 Stunden lang kontinuierlich geladen we...

Страница 28: ...us Reinigung des Staubbehälters 1 2 Drücken Sie auf die im Bild gezeigte Position des Fingers um die Abdeckplatte zu öffnen 3 Stecken Sie den Finger in die Rille des Staubbehälters und ergreifen Sie ihn fest dann nehmen Sie ihn nach oben heraus 4 Öffnen Sie den Staubbehälter 5 Entfernen Sie den inneren Staubfilter 6 Leeren Sie den Schmutz aus dem Staubbehälter ...

Страница 29: ... sie wieder in den Roboter einsetzen da sowohl Wasser als auch Feuchtigkeit den Roboter beschädigen können Denken Sie bitte daran den Staubbehälter Staubfilter und Kunststoffplatte sind korrekt installiert vor dem Betrieb wieder in den Roboter einzusetzen ÜBERLASTUNGSSCHUTZ Wenn sich die Räder oder Bürsten verheddern oder durch Kabel oder andere Gegenstände blockiert werden wird der Überlastungssc...

Страница 30: ... V Die gesamte Maschinenleistung 7 W Kapazität des Staubbehälters 300 ml Geräusch 60 dB Erste Ladedauer 8 Stunden Dauer der Aufladung 3 5 Stunden Einzelne Betriebszeit 150 180 Minuten Maximaler Bereich für einmaliges Kehren 90 120 m2 abhängig von der Komplexität des Raumes und der Menge des Mülls Netto Gewicht 1 1 kg Einfache Fehlersuche Symptom Ursache Lösung 1 The dust and hair cannot be vacuume...

Страница 31: ... durch das Staubtuch das falsch installiert ist 1 Wischen Sie den Boden trocken Lassen Sie das Staubtuch an der Luft trocknen oder ersetzen Sie es durch ein trockenes Tuch 2 Bitte räumen Sie die anderen Gegenstände auf 3 Bitte befolgen Sie die Anwei sung um das Staubtuch wieder richtig zu installieren INFORMATION FÜR BENUTZER VON HAUSHALTSGERÄTEN Dieses Symbol auf dem Produkt oder seiner Verpackun...

Страница 32: ...intenance désigné par la société personne ne doit démonter réparer ou modifier le produit sous peine de provoquer un incendie un choc électrique ou des blessures 6 Ne vous approchez pas d objets sources de chaleur tels que des cigarettes des briquets des allumettes ou des matériaux inflammables comme l essence et encore moins de nettoyer la machine avec de l essence Veillez à respecter les consign...

Страница 33: ...ur éviter toute blessure accidentelle 11 Lorsque vous éliminez le produit en tant que déchet suivez les instructions locales pour l élimination des déchets 12 N utilisez pas ce produit à d autres fins que sa fonction 13 Ce produit est utilisable sur un sol dur ne pas l utiliser sur un sol irrégulier ou sur une couverture souple AVERTISSEMENT L environnement de travail de cette machine doit être se...

Страница 34: ...que supérieure bac à poussière intégré 2 Interrupteur d alimentation indicateur d alimentation charge intégré indicator B Partie inférieure 3 Chiffon de nettoyage 4 Roue arrière gauche 5 Pieds 6 Brosse latérale rotative 7 Sortie d air 8 Roue motrice 9 Bac à poussière ...

Страница 35: ... S il y a trop de poussière à l intérieur et à l extérieur de l orifice d aspiration du bac à poussière arrêtez le robot et nettoyez le bac à poussière Assurez vous que le filtre à poussière est correctement installé dans le bac à poussière après avoir été nettoyé Installation et Démontage des brosses latérales rotatives Les brosses latérales rotatives de ce robot peuvent être installées désinstal...

Страница 36: ...jets et nettoyez la régulièrement sinon cela affectera le fonctionnement du robot Nettoyage et Remplacement des Chiffons de nettoyage 1 Retirez directement le chiffon de nettoyage sale puis lavez le à l eau claire et séchez le Il peut être utilisé plusieurs fois Attention le chiffon de nettoyage humide ne doit pas être utilisé sinon le robot ne fonctionnera pas efficacement 2 Le robot continue de ...

Страница 37: ...ge de la batterie Veuillez éteindre l appareil avant de le charger 1 Branchez d abord une extrémité du cordon d alimentation USB dans le port de charge du robot puis branchez l autre extrémité du cordon d alimentation USB dans la fente USB de l alimentation selon le besoin de charge 2 Il doit être chargé en continu durant 3 à 5 heures avant d être utilisé sans adap tateur Interrupteur Sol Poussièr...

Страница 38: ...harged Éteint Nettoyage des bacs à poussière 1 2 Appuyez sur la position indiquée avec le doigt comme sur l image pour ouvrir la plaque de recouvrement 3 Mettez le doigt dans la rainure de la poubelle et saisissez la fermement puis retirez la par le haut 4 Ouvrez le bac à poussière 5 Retirez le filtre à poussière intérieur 6 Videz les débris du bac à poussière ...

Страница 39: ...e à poussière avant de les remettre dans le robot l eau et l humidité pouvant endommager le robot N oubliez pas de remettre le bac à poussière le filtre à poussière et la plaque en plastique correctement installés dans le robot avant l opération PROTECTION CONTRE LA SURCHARGE Le courant excessif lorsque les roues ou les brosses sont enchevêtrées ou bloquées par des câbles ou d autres objets déclen...

Страница 40: ...les grosses particules de déchets et les cheveux Paramètre de la machine Tension de fonctionnement DC 7 4V Puissance de l ensemble de la machine 7W Capacité du bac à poussière 300 mL Bruit 60dB Durée de la première charge 8 heures Durée de charge 3 5 heures Autonomie de travail 150 180min Surface maximale pour un seul balayage 90 120m2 selon la complexité de la pièce et la quantité de déchets Poid...

Страница 41: ...e ne peuvent pas bouger gênées par le chiffon de nettoyage mal installé 1 Essuyez le sol Séchez le chiffon de nettoyage à l air libre ou remplacez le par un chiffon sec 2 Nettoyez les autres objets 3 Suivez les instructions pour réinstaller correctement le chiffon de nettoyage INFORMATION POUR LES UTILISATEURS D APPAREILS DOMESTIQUES Ce symbole sur le produit ou dans son emballage indique que ce p...

Страница 42: ...icos de mantenimiento designados por la empresa nadie podrá desmontar reparar o modificar el robot limpiador de lo contrario podría causar incendio descarga eléctrica o lesiones personales 6 Mantenga el robot limpiador alejado de las fuentes de calor por ejemplo cigarrillos encendedores fósforos o materiales inflamables como gasolina y nunca limpie el robot limpiador con gasolina Asegúrese de cump...

Страница 43: ...mpiador alejado de los niños o bebés para evitar lesiones accidentales 11 Al desechar el robot limpiador siga las instrucciones locales para desechar los productos de aparatos eléctricos 12 No utilice este robot limpiador para ningún otro propósito que no sea su función diseñada 13 Este robot limpiador se aplica a los pisos duros no lo utilice en los pisos irregulares y mantas suaves ADVERTENCIA S...

Страница 44: ... ROBOT A Parte frontal 1 Placa superior depósito de polvo incorporado 2 Interruptor de encendido indicador de encendido indicador de carga incorporado B Parte inferior 3 Paño de plumero 4 Rueda trasera izquierda 5 Pedestal 6 Cepillo lateral giratorio 7 Salida de aire 8 Rueda de conducción 9 Depósito de polvo ...

Страница 45: ...o dentro y fuera de la entrada de succión del depósito de polvo apague el robot limpiador y limpie el depósito de polvo bien Asegúrese de que el filtro de polvo esté instalado de manera correcta en el depósito de polvo después de limpiarlo Métodos para instalar y extraer los cepillos laterales giratorios Los cepillos laterales giratorios de este robot limpiador se pueden instalar extraer con manos...

Страница 46: ... por pelo u otros objetos límpielo con regularidad de lo contrario afectará la función del robot limpiador Métodos para limpiar y reemplazar el paño de plumero 1 Retire el paño de plumero sucio directamente entonces lávelo con agua limpia y déjelo que se seque naturalmente Puede utilizarlo repetidamente Precaución No se puede utilizar el paño cuando está húmedo de lo contrario el robot limpiador n...

Страница 47: ...zarlo de lo contrario no podría funcionar normalmente Método para cargar la batería Apague la alimentación antes de cargarla 1 En primer lugar conecte un extremo del cable de alimentación USB al puerto de carga del robot limpiador y conecte el otro extremo a la ranura USB de la fuente de alimentación si la batería se necesita cargar 2 Debe cargar la batería continuamente durante 3 5 horas antes de...

Страница 48: ... Mantenimiento Limpieza del depósito de polvo 1 2 Presione la posición indicada con un dedo como lo que se muestra en la imagen para abrir la placa de cubierta 3 Coloque su dedo en la ranura del depósito de polvo agárrelo con fuerza y sáquelo hacia arriba 4 Abra el depósito de polvo 5 Retire el filtro de polvo interior 6 Limpie los escombros del depósito de polvo ...

Страница 49: ...or de lo contrario tanto el agua como la humedad pueden causar daños al robot limpiador Recuerde volver a colocar el depósito de polvo el filtro de polvo y la placa de plástico deben estar instalados de manera correcta en el robot limpiador antes de operarlo PROTECCIÓN DE SOBRECARGA En caso de la corriente excesiva o una vez que las ruedas o los cepillos se enredan o se obstruyen con cables u otro...

Страница 50: ...a del robot 7W Capacidad del depósito de polvo 300 mL Ruido 60dB Duración de la primera carga 8 heures Duración de carga 3 5 heures Tiempo de funcionamiento único 150 180min Surface maximale pour un seul balayage 90 120m2 depende de la complejidad de la habitación y la cantidad de basura Peso neto 1 1 Kg Solución de problemas simple Síntoma Causa Solución 1 No puede aspirar el polvo y el pelo 1 El...

Страница 51: ... manera incorrecta 1 Seque el piso con un paño Deje que el paño de plumero se seque naturalmente o reem plácelo por uno seco 2 Limpie los otros objetos extraños 3 Siga todas las instrucciones para volver a instalar el paño de plumero de manera correcta INFORMACIÓN PARA LOS USUARIOS DE PARATOS DOMÉSTICOS Este símbolo en el producto o en su embalaje indica que este producto no debe tratarse como bas...

Страница 52: ...nstrucciones Importato da imported by importé de importado de importiert aus KASANOVA S p A Viale Monterosa 91 20862 Arcore MB MADE IN P R C ROBOT ASPIRAPOLVERE RICARICABILE W 8 CODICE PRODOTTO DAH000016NOC CODICE FORNITORE D 501 DATI DI ALIMENTAZIONE 8 W BATTERIA AL LITIO 1800MAH 7 4V ...

Отзывы: