6
Eastwood Technical Assistance: 800.544.5118 >> [email protected]
FIG.C
FIG.C
FIG. D
FIG. D
FIG. B
FIG. B
FIG. A
FIG. A
Polarity for MIG Welding
Polarity for Flux-Cored Welding
1A
2A
2B
3B
1B
INSTALLATION
INSTALLING THE WELDING GUN
1.
Open the side door of the welder and loosen the MIG Gun Thumb Screw
(13) located on the Drive Motor.
2.
Slide the brass body of the Welding Gun in through the front of the unit
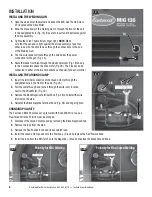
in the designated hole (Fig. 1A). Be sure to insert until it bottoms against
the drive assembly.
3.
Tighten the Torch Thumb Screw fi nger tight.
NOTE:
Make
sure that the gun end is tight against the drive assembly or gas may
either leak or not be able to pass through the connections to the end
of the Welding Gun.
4.
The two wire leads will route through the hole below the power
connection for the gun (Fig. 2A).
5.
Route the leads from Step through the plastic wire loom (Fig. 1B) and up
to the 2 connectors above the drive motor (Fig. 2B). The 2 leads can be
connected to either of the two connections as the polarity does not matter.
INSTALLING THE GROUND CLAMP
1.
Insert the terminal connection of the Ground Clamp through the
designated hole in the front of the unit. (Fig. 2A)
2.
Pull the cable through and route it through the wire loom located
next to the Drive Motor. (Fig. 1B)
3.
Remove the Black Negative Terminal Knob (Fig. 3B) and install the wire
terminal on the stud.
4.
Reinstall the Black Negative Terminal Knob (Fig. 3B) and fi nger tighten.
CHANGING POLARITY
The Eastwood MIG135 comes set up to weld with Solid MIG Wire, to use a
Flux-Cored Wire the Polarity must be changed.
1.
Disconnect the Ground Clamp Lead by removing the Black Negative Knob.
2.
Remove the lead from the stud.
3.
Remove the Red Positive Knob and its associated lead.
4.
Install the Ground Clamp Lead onto the Positive (+) Stud and replace the Red Positive Knob.
5.
Install the lead from the MIG Torch onto the Negative (-) Stud and replace the Black Ground Knob.


