background image


SDM230-LoRaWAN User Manual 

2020 EASTRON EUROPE ALL RIGHTS RESERVED. 


www.eastroneurope.co


- 21 


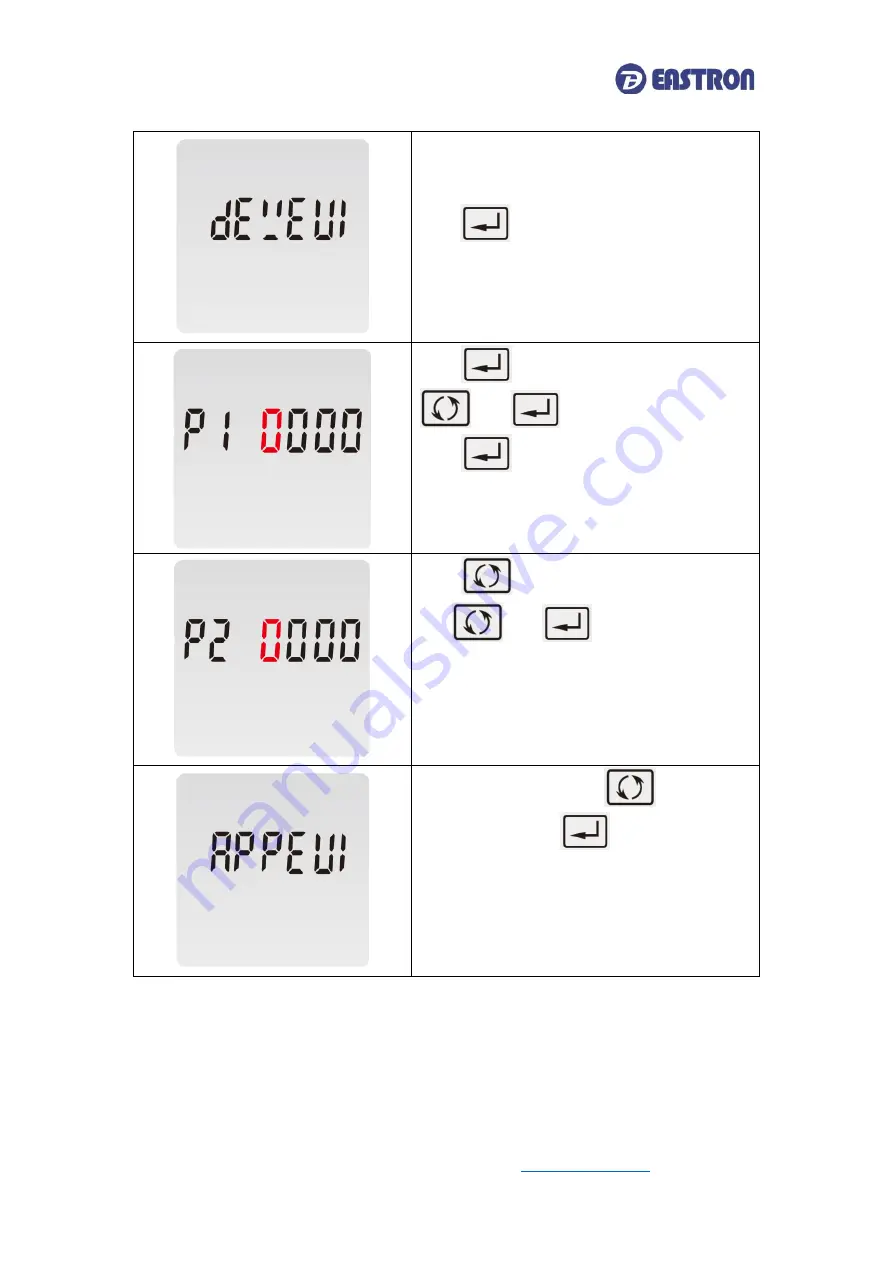
Take OTAA setting as an example: 


DevEui:  9132000001324013 
The 16 digits will be shown on 4 pages. Each page 
shows 4 digits. 

Press 


for 3s, enter into the P1 setting 

page. 


Press 


for 3s, the first digit will flash. Use 


and 


to choose the option. 

Press 


for 3s again to confirm the setting. 


Press 


to move to the P2 setting page. 

Use 


and 


to do the same 

opeation as P1. 


And then set the same on P3 and P4 


After   P4   setting,   Press 


return to the 

DevEui  page,  press 


move  to  the  next 

setting page: AppEui and Appkey. 


Use the same way to set AppEui and Appkey. 

Содержание SDM230-LoRaWAN

Страница 1: ...SDM230 LoRaWAN User Manual SDM230 LoRaWAN DIN Rail Smart Energy Meter for Long Range Wireless Communication USER MANUAL 2020 V1 0 ...

Страница 2: ...1 4 Demand Interval Time DIT 13 4 1 5 Automatic Scroll Time Interval 13 4 1 6 Backlight Time LP 14 4 1 7 Clear Demand Information 15 4 1 8 Password 16 4 1 9 Checking Meter Information 17 4 3 Setting 2 20 4 3 1 Join Information 20 4 3 2 Join Mode OTAA ABP 22 4 3 3 Re Join 22 4 3 4 Auto Upload ON OFF Upload Interval Time 23 4 3 5 Join Delay 24 4 3 6 OFF Line 25 43 7 Confirm Mode 26 5 Specifications ...

Страница 3: ...ed The unit has password protected set up screens for Changing password Demand Interval time backlight time scroll display time Reset for demand and partial energy measurements Pulse output type constant duration 1 2 Pulse outputs The unit provides two pulse outputs Both pulse outputs are passive type Pulse output 1 is configurable The pulse output can be set to generate pulses to represent total ...

Страница 4: ...kSKey AppSKey information are correctly recorded into the gateway II The Uplink and downlink frequency are same as the gateway III RX2 frequency and SF information are same as the gateway If the Join delay function is ON the meter will join the network with a few seconds delay by random 1 6 Communication LoRaWAN meter communicate based on international general purpose protocol The communication da...

Страница 5: ...ed bit is fixed as 0x01 II the data format returned by the meter after receiving the copy command Reserved Function Code The Length of Data Returned Specific Data Returned by The Meter CRC Check Codes 1byte 1byte 1byte N byte 2byte Note the reserved bit is fixed as 0x01 III Note the above commands need to be ASCII so 1byte data will have 2 characters E g 1 Suppose to read the current data of the m...

Страница 6: ...he Hex data is converted to 0x40 0xa0 0x00 and 0x00 To ensure the successful communication below information must be confirmed 1 The command is sent through Class C mode 2 The command is sent in ASCII format 2 Start Up Screens The first screen lights up all display segments and can be used as a display check The second screen indicates the firmware version left picture is for reference only ...

Страница 7: ...icates the result if the test passes After a short delay the screen will display active energy measurements 3 Measurements The buttons operate as follows Selects the measured parameters In Set up Mode this is the Up button In Set up Mode this is the Enter Left and Confirm button The display order by scroll button Total kWh Import kWh ...

Страница 8: ...SDM230 LoRaWAN User Manual 2020 EASTRON EUROPE ALL RIGHTS RESERVED www eastroneurope com 6 Export kWh Resettable total kWh Total kVArh Import kVArh ...

Страница 9: ...SDM230 LoRaWAN User Manual 2020 EASTRON EUROPE ALL RIGHTS RESERVED www eastroneurope com 7 Export kVArh Resettable total kVArh Max power demand Voltage ...

Страница 10: ...SDM230 LoRaWAN User Manual 2020 EASTRON EUROPE ALL RIGHTS RESERVED www eastroneurope com 8 Current Active Power Reactive Power Apparent Power ...

Страница 11: ...SDM230 LoRaWAN User Manual 2020 EASTRON EUROPE ALL RIGHTS RESERVED www eastroneurope com 9 Power Factor Frequency Pulse constant ID High address ...

Страница 12: ...RIGHTS RESERVED www eastroneurope co 10 ID Low address Total running time 4 Setting Up To enter set up mode pressing the button for 3 seconds until the password screen appears Display Descriptions The setting is done correctly The setting is not correct ...

Страница 13: ... 4 2 1 Pulse Output Type Pulse Output Type Default kVArh Range kVArh imp kVArh Exp kVArh kWh Exp kWh imp kWh Press for 3s the red part will flash Press to choose the required selection Press for 3s to confirm 4 2 2 Pulse Constant Use this to set the energy represented by each pulse Pulse Constant Default 1000 kWh means 1 impulse represent 1000kWh Range 1 10 100 1000 kWh ...

Страница 14: ...astroneurope co 12 Press for 3s the red part will flash Press to choose the required selection Press for 3s to confirm the setting 4 2 3 Pulse Duration Pulse Duration Default 200 Range 60 100 200 mS Press for 3s the red part will flash Press to choose the required selection ...

Страница 15: ...firm the setting 4 2 4 Demand Interval Time DIT The screen will show the currently selected integration time Default 60 Range 60 30 15 10 5 OFF Press for 3s the current demand interval time will flash Press to choose the required selection Press for 3s to confirm the setting 4 2 5 Automatic Scroll Time Interval ...

Страница 16: ... Default 0 S Option 0 30S Press for 3s the current system type will flash Press to choose the required setting Press for 3s to confirm 4 2 6 Backlight Time LP The screen will show the currently selected backlight time Default 60 minutes Range 120 60 30 20 10 5 OFF If it is seated as 5 the backlit will be off in 5 minutes ...

Страница 17: ...ight time will flash Press to choose the required selection Press for 3s to confirm 4 2 7 Clear Demand Information This option is to reset the demand and resettable kWh kVArh information From the Set up menu use buttons to select the clear option Press for 3s The CLR will flash Press again for 3s to confirm the resetting ...

Страница 18: ... eneter into the kWh kVArh reset page Press for 3s The CLR will flash Press again for 3s to confirm the resetting 4 2 8 Password The screen shows the current password Default 1000 Range 0001 9999 Press for 3s the current digit will flash Press to choose the required digit press to move to the next digit ...

Страница 19: ...on This function allows to check meter setting information also some of below information can be set through another password refer to section 4 3 1 Join Information 1 Activation Way OTAA DevEui end device identifier 16 digits 1 1 Activation Way ABP DevAddr End device address 8 digits 2 Activation Way OTAA AppEui application identifier 16 digits ...

Страница 20: ...roneurope co 18 2 1 Activation Way ABP NwkSKey Network session key 32 digits 3 Activation Way OTAA AppKey Application key 32 digits 3 1 Activation Way ABP AppSKey Application session key 32 digits 2 Join Status 1 JOIN OK Means the meter is connected to the gateway successfully ...

Страница 21: ...L Means the meter is failed to connect to the gateway Meanwhile the display will show EER1 3 Join Mode 1 JOIN MOdE OTAA 1 2 JOIN MOdE Abp 4 AUTO When AUTO function is ON the meter will send a command to gateway automatically to check the connection status with gateway Interval time is configurable 1 AUTO ...

Страница 22: ...utes 5 Meter ID 1 Meter ID Serial Number 8 digits 4 3 Setting 2 Input Password 2308 press and together for 3s to enter the setting up page The first page will show join status between the meter and gateway Use to choose the options required Below information can be adjusted through password 2308 4 3 1 Join Information Join information including DevEui AppEui Appkey under OTAA mode and DevAddr NwkS...

Страница 23: ...s Press for 3s enter into the P1 setting page Press for 3s the first digit will flash Use and to choose the option Press for 3s again to confirm the setting Press to move to the P2 setting page Use and to do the same opeation as P1 And then set the same on P3 and P4 After P4 setting Press return to the DevEui page press move to the next setting page AppEui and Appkey Use the same way to set AppEui...

Страница 24: ...ww eastroneurope co 22 After above setting press to move to the SAVE page Long Press button to save above setting 4 3 2 Join Mode OTAA ABP Join mode Option OTAA ABP Press for 3s the current option will flash Use to choose the option Press for 3s to confirm 4 3 3 Re Join ...

Страница 25: ... the network automatically 4 3 4 Auto Upload ON OFF Upload Interval Time When Auto is ON the meter will send a command to gateway automatically This is for the gateway to check if the meter is still online Under Active upload mode the Auto function is not used From the Set up menu use buttons to select the AUTO option Press for 3s enter to the setting page UP LOAd OFF Range ON OFF Press for 3s the...

Страница 26: ... means the meter will send a command to gateway every 30 minutes Press for 3s the current option will flash Use to choose the option Press for 3s to confirm 4 3 5 Join Delay When Join delay function is ON the meter will join the LoRaWAN network with a few seconds delay after booting When Join delay function is OFF the meter will join the LoRaWAN network once the power is on ...

Страница 27: ...ed to check the connection status between meter and the netwrok gateway To check the connections the network will send data to the end device at intervals If over a period the meter doesn t receive data from gateway the meter will be considered OFF line and it will re join the network OFF Line Option 0 30 60 90 120 150 180 210 240 minutes Default 60 minutes 60 minutes means from the last message r...

Страница 28: ... to a value bigger than the active upload interval time 4 3 7 Confirm Mode When the Comfirm mode is ON the meter will request the LoRaWAN network to confirm the reception of its message If there is no message received it means the network has not received the uplink The Meter will send uplink again upon to 3 times From the Set up menu use buttons to select the Confirm mode option Press for 3s the ...

Страница 29: ... 5 Power 0 01 Power Factor 0 01 Data Update Rate 1 second nominal Input Voltage Un 230 V L N Measured Voltage with Over range 176 to 276 Vac L L Impedance 1M Ω Input Current Measured current with Over range 0 5 10 100 A Withstand 30 Imax for 0 1 Seconds Impedance 1M Ω Frequency Range 45 65Hz Max reading 99999 99 kWh kVArh Mechanical Characteristics Weight 250g IP Degree of Protection IEC 60529 IP5...

Страница 30: ...nance is needed As appropriate for service conditions isolate electrical power inspect the unit and remove any dust or other foreign material present Periodically check all connections for freedom from corrosion and screw tightness particularly if vibration is present The front of the case should be wiped with a dry cloth only Use minimal pressure especially over the viewing window area If necessa...

Страница 31: ...ents however in extreme circumstances it may be necessary to temporarily disconnect the auxiliary supply for a period of greater than 10 seconds to restore correct operation Screened communication leads are recommended and may be required These and other connecting leads may require the fitting of RF suppression components such as ferrite absorbers line filters etc if RF fields cause problems It i...

Страница 32: ...used for protection and safety under fault conditions Never open circuit the secondary winding of an energized current transformer This product should only be operated with CT secondary connections Earthed If this equipment is used in a manner not specified by the manufacturer protection provided by the equipment may be impaired 7 3 Dimensions 7 4 Wiring Diagram ...

Отзывы: