EASTCOLIGHT 9920 Скачать руководство пользователя страница 27


The longer the focal length of the eyepiece, the less the magnifying power of the 
telescope; the shorter the focal length, the greater the power.  So when you 
select an eye lens to insert into the diagonal prism, you're really choosing what 
magnifying power you wish to use for observation. 


Using the digital camera module as a PC camera: 

 
1. 

Screw the objective lens unit back to the digital eyepiece module if it has 
been removed for telescope viewing. Care should be taken not to leave 
fingerprints or dust on the lens and the sensor of the camera. 

 
2. 

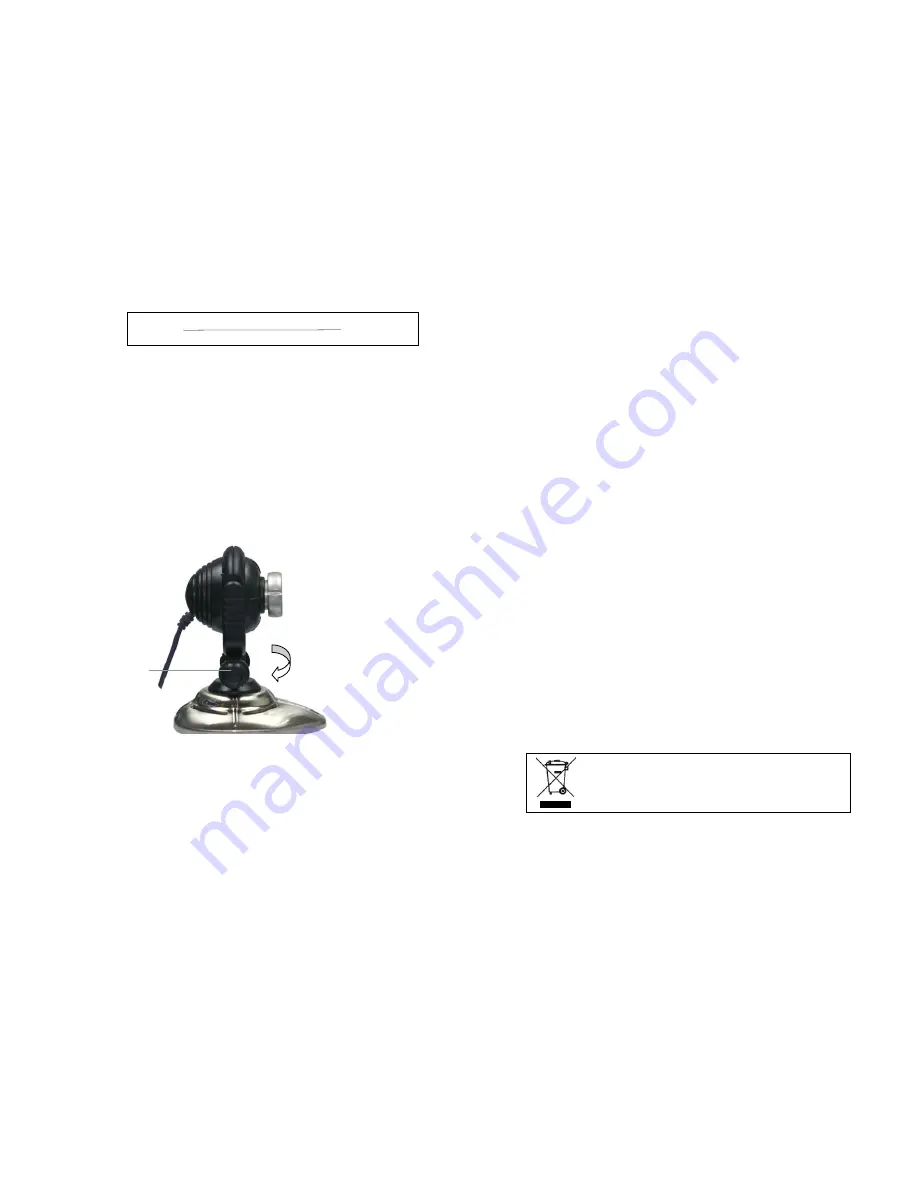
Place the camera unit on the stand as shown below. 


Figure 6 

 
3. 

Connect the camera module to the USB port of the computer 

4. 

Start “PhotoImpression” or other Imaging applications from the Windows 
Start menu. 

5. 

Adjust the focus by rotating the lens until a clear image is displayed. 

6. 

You can take still pictures and save them in the computer using the same 
procedure as described in the section “Using the Telescope in Digital Mode”. 

7. 

To use the camera module as a web camera for video conference, you need 
to install applications like “Netmeeting” or “MSN Messenger”, which can be 

downloaded from Microsoft’s web site. Please refer to the corresponding 
application manual. 


Handling note: 


The image sensor inside the digital eyepiece is a delicate integrated circuit and 
must be handled carefully. When you remove the lens from the camera, dust may 
fall on the sensor. Only use a blower to clean the dust. Never touch the sensor. 


Technical Specifications: 


Image Sensor: 

1/4.5 inch color CMOS (310k effective pixels) 

Color: 

24 bit RGB 

Interface: 

USB 2.0 (backward compatible with version 1.1) 

Video Preview: 

30fps @320x240 pixels (QVGA) 


30fps @640x480 pixels (VGA) 

Video Control: 

PC software provides control for brightness, contrast, 
hue, saturation, sharpness, gamma, 50/60Hz flicker 
filtering 

Video Capture: 

30fps @320x240 pixels (QVGA) 


30fps @640x480 pixels (VGA) 

Still Capture: 

30fps @320x240 pixels (QVGA) 


30fps @640x480 pixels (VGA) 


Objective Diameter 

50 mm (1.97”) 

Focal Length 

600 mm 

Eyepieces 

20mm, 12.5mm, 4mm 

Tripod 90cm 

(36”) 


IMPORTANT: Keep these instructions. DO NOT DISCARD.


             600mm (focal length of objectives lens) 

                                20

mm (focal length of eyepiece)


Example:


= 30X (power)


Tilt Adjustment
Knob 

Rotate to Pan Left 

or Right


10

If at any time in the future you should need to dispose of this 

product please note that Waste electrical products should not be 
disposed of with household waste. Please recycle where facilities
exist. Check with your Local Authority or retailer for recycling 
advice.(Waste Electrical and Electronic Equipment Directive) 

Содержание 9920

Страница 1: ...Select by clicking the manual to view 9920 Manual 9940 9950 Manual 3069 30699 Manual...

Страница 2: ...ight 2004 Eastcolight Hong Kong Ltd All rights reserved WARNING THIS TELESCOPE SET IS APPROPRIATE FOR CHILDREN OVER 8 YEARS OLD OTHERWISE SUPERVISION OF AN ADULT IS REQUIRED CAUTION DO NOT VIEW SUN TH...

Страница 3: ...o step 4 However you can install driver if you really want to For Windows 2000 users you must install driver first Connect the telescope s USB plug to the USB port of the computer Install the telescop...

Страница 4: ...omputer Install the telescope driver by clicking Install Driver Follow the on screen instructions to complete the installation 5 Install ArcSoft Camera Suite by clicking Install PhotoImpression and In...

Страница 5: ...diagonal mirror lever to the horizontal position 3 Figure 4 4 Make sure the digital eyepiece is connected to the USB port of the computer 5 Start PhotoImpression program from the Windows Start menu T...

Страница 6: ...lick the Live button 5 8 Set the image size to 640x480 in the properties window by clicking the Format button smaller image size e g 352x288 is recommended for slower computers 9 If there is flickerin...

Страница 7: ...top You can select different powers by rotating the eyepiece turret until your hear a click figure 5 Figure 5 Figure 5 2 Glance through the main telescope s eyepiece for your object Note You may have...

Страница 8: ...ce you need to install applications like Netmeeting or MSN Messenger which can be downloaded from Microsoft s web site Please refer to the corresponding application manual Handling note The image sens...

Страница 9: ...INSTRUCTION MANUAL 4 IN 1 PROFESSIONAL DIGITAL TELESCOPE Copyright 2005 Eastcolight Hong Kong Ltd All rights reserved M101...

Страница 10: ...can jump to step 4 However you can install driver if you really want to For Windows 2000 users you must install driver first Connect the telescope s USB plug to the USB port of the computer Install th...

Страница 11: ...the computer Install the telescope driver by clicking Install Driver Follow the on screen instructions to complete the installation 5 Install ArcSoft Camera Suite by clicking Install PhotoImpression a...

Страница 12: ...e digital eyepiece to the telescope as shown in figure 4 Figure 4 4 Make sure the digital eyepiece is connected to the USB port of the computer 5 Start PhotoImpression program from the Windows Start m...

Страница 13: ...lick the Live button 8 Set the image size to 640x480 in the properties window by clicking the Format button smaller image size e g 352x288 is recommended for slower computers 9 If there is flickering...

Страница 14: ...ntrol Unit For model 9940 9950 only The Remote control unit allows the user to control the focusing of the telescope without leaving the computer There are four control keys 1 Focus Forward 2 Focus Fo...

Страница 15: ...to alter the angle of the telescope slightly The object will most likely seem to be blurry at this stage but that is normal You are just trying to get the object in the viewing field of your telescope...

Страница 16: ...ke still pictures and save them in the computer using the same procedure as described in the section Using the Telescope in Digital Mode 7 To use the camera module as a web camera for video conference...

Страница 17: ...are to be inserted with the correct polarity 12 Do not dispose of batteries in fire batteries may explode or leak 13 Batteries may explode or leak if misused Technical Specifications Image Sensor 1 4...

Страница 18: ...utside air into a warm room This will make the objective lens to be covered with condensed moisture which must be removed at once To do this place the objective lens at a safe distance from heat sourc...

Страница 19: ...w insert Eyepiece 6 into Diagonal Mirror STEP 7 Place the telescope tube assembly and the Yoke onto the tripod mount and tighten from the underside with the small locking knob provided Figure 2c Inser...

Страница 20: ...ylight hours 1 Install the lowest power eye lens into the diagonal mirror Pick out an easily recognized stationary object no closer than a thousand yards away Rotate your telescope along its horizonta...

Страница 21: ...INSTRUCTION MANUAL NEW GENERATION ASTRONOMICAL TERRESTRIAL TELESCOPE Copyright 2005 Eastcolight Hong Kong Ltd All rights reserved M100...

Страница 22: ...can jump to step 4 However you can install driver if you really want to For Windows 2000 users you must install driver first Connect the telescope s USB plug to the USB port of the computer Install t...

Страница 23: ...stall driver first Connect the telescope s USB plug to the USB port of the computer Install the telescope driver by clicking Install Driver Follow the on screen instructions to complete the installati...

Страница 24: ...as shown in figure 4 Figure 4 4 Make sure the digital eyepiece is connected to the USB port of the computer 5 Start PhotoImpression program from the Windows Start menu The application will start with...

Страница 25: ...lick the Live button 8 Set the image size to 640x480 in the properties window by clicking the Format button smaller image size e g 352x288 is recommended for slower computers 9 If there is flickering...

Страница 26: ...ope s eyepiece for your object Note You may have to alter the angle of the telescope slightly The object will most likely seem to be blurry at this stage but that is normal You are just trying to get...

Страница 27: ...o the corresponding application manual Handling note The image sensor inside the digital eyepiece is a delicate integrated circuit and must be handled carefully When you remove the lens from the camer...

Страница 28: ...wiped off after the lenses are completely dry Helpful Hints For Setting Up the Telescope STEP 1 Unpack the tripod legs 18 from the box STEP 2 Stand the tripod up vertically and spread the tripod legs...

Страница 29: ...ng Eyepiece 19 can also be used as a 21X Microscope by placing the objective end the end with the transparent tube flat on an object and looking through the Eyepiece How To Use the Telescope Tele Scie...

Страница 30: ...ll on focus If it moved then readjust your telescope and repeat the alignment step for the finderscope Power Strength Selecting The Eye Lens Power means the ability of telescope to increase an image o...

Отзывы: