ASSEMBLY
UNPACKING
This product requires assembly.
Carefully remove the product and any accessories from the box. Make
sure that all items listed in the packing list are included.
Inspect the product carefully to make sure no breakage or damage
occurred during shipping.
Do not discard the packing material until you have carefully inspected
and satisfactorily operated the product .
If any parts are damaged or missing, please call 1.800.313.5111 for
assistance.
PACKING LIST
- Blower
- Blower Tubes
- Operator’s manual
WARNING: If any parts are damaged or missing do not operate this
product until the parts are replaced .Failure to heed this warning could
result in serious personal injury.
WARNING: Do not attempt to modify this product or create accessories
not recommended for use with this product .Any such alteration or modi-
fication is misuse and could result in a hazardous condition leading to
possible serious personal injury.
WARNING: Do not connect to power supply until assembly is complete .
Failure to comply could result in accidental starting and possible serious
personal injury .
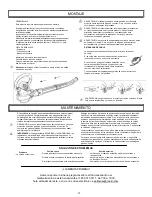
W
arning:
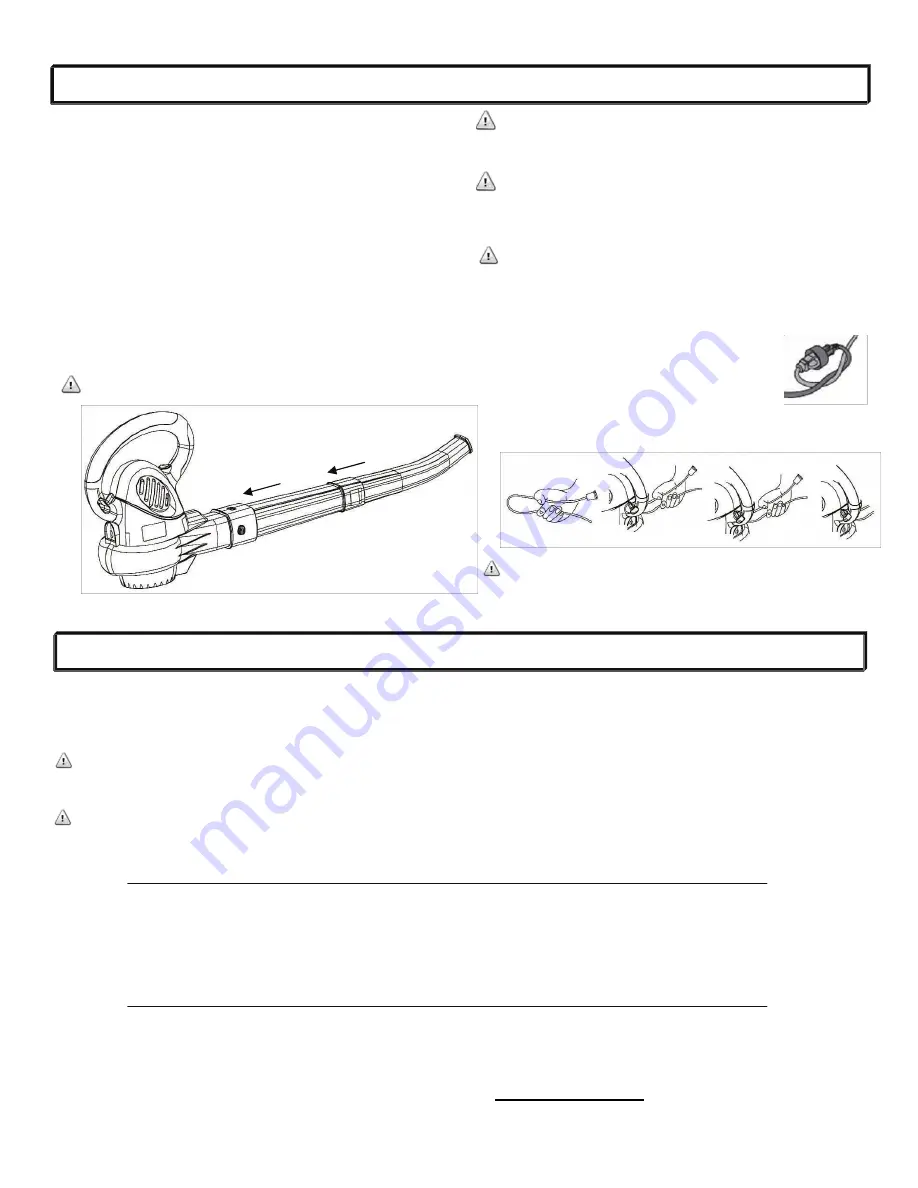
Don’t operate the blower before securing the blower tube
to the air outlet with the screw.
Assembling the tubes to the motor housing:
Connect the two blower tubes together.
Fit the larger diameter end of blower tubes onto the air outlet of the
motor housing.
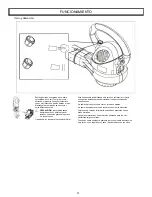
CORD RETAINER
A cord retainer is incorporated into the rear of the power head.
If using more than one extension cord, first tie the two
cords in a knot as shown.
Then, double the extension cord several inches from
the end and hook the loop formed by doubling the cord
over the retainer post as shown.
Gently tug on the cord to insure that it is firmly retained in the unit’s handle.
Possible Cause
- Extension cord not connected to the plug
- Cord not connected to power source
- Switch not in “ON” position
Possible Solution
- Check extension cord is fully connected to tool
- Check extension cord is fully connected to a live receptacle
- Check that switch is in the “ON” position
Problem
-
Unit does not run
TROUBLESHOOTING
If you drop the unit, carefully inspect it for damage. If the housing is
cracked or handles broken or if you see any other condition that may
affect the unit’s operation, contact your local Authorized Service Center
for repairs before putting it back into use.
Fertilizers and other garden chemicals contain agents which greatly accelerate
the corrosion of metals Do not store the tool on or adjacent to fertilizers or
chemicals.
Make sure the cord is detached from the unit, then use only mild soap and a
damp cloth to clean the tool. Never let any liquid get inside the tool; never
immerse any part of the tool into a liquid.
IMPORTANT
: To assure product SAFETY and RELIABILITY, repairs,
maintenance and adjustment should be performed by an authorized
service center or other qualified service organization, always using
identical replacement parts.
CAUTION: Do not at any time let brake fluids, gasoline, petroleum based
products, penetrating oils, etc., come in contact with plastic parts. They
contain chemicals that can damage, weaken or destroy plastic.
Clean out any clippings which may have accumulated in the unit. When used
properly with dry leaves the fan chamber of your unit should remain clean. If
damp earth and debris are ingested some of the particles may build up on the
inside of the fan chamber. If this happens the performance of the unit will
decrease. This area can be cleaned out by gently wiping out with a damp rag
after disconnecting from the power source. Your unit should be stored in a dry
place.
MAINTENANCE
WARNING: Make sure the plug is fully seated. A loose plug could lead to
overheating and cause a fire.
Call us first with questions about operating or maintaining this
tool at 1.800.313.5111 between 7:30 a.m. – 4:30 p.m. Eastern
Standard Time, or send emails to [email protected].
CALL US FIRST !!
3


