background image

26

TROUBLESHOOTING

If your unit is not working, or if you need technical help, please use the
following troubleshooting section before contacting the factory customer
service department. It may save you the trouble of returning your unit.

Unit won’t turn on:
1. Check the power cable’s connection at the unit. Also check the wiring.

2. Make certain the power cable is wired properly. The red wire connects

to the positive battery terminal, black to negative or ground.

3. Check the fuse.

4. Measure the battery voltage at the unit’s power connector. It should be

at least 11 volts. If it isn’t, the wiring to the unit is defective, the battery
terminals or wiring on the terminals are corroded, or the battery needs
charging.

Unit freezes, locks up, or operates erratically:
1. Electrical noise from the boat’s motor, trolling motor, or an accessory

may be interfering with the sonar unit. Rerouting the power and
transducer cables away from other electrical wiring on the boat may
help. Route the sonar unit’s power cable directly to the battery instead
of through a fuse block or ignition switch

2. Inspect the transducer cable for breaks, cuts, or pinched wires.

3. Check both the transducer and power connectors. Make certain both

are securely plugged in to the unit.

Weak bottom echo, digital readings erratic, or no fish signals:
1. Make certain transducer is pointing straight down. Clean the face of the

transducer. Oil, dirt, and fuel can cause a film to form on the transducer,
reducing its effectiveness. If the transducer is mounted inside the hull,
be sure it is shooting through only one layer of fiberglass and that it is
securely bonded to the hull. Do NOT use RTV silicone rubber adhesive
or Marinetex

2. Electrical noise from the boat’s motor can interfere with the sonar. This

causes the sonar to automatically increase its Discrimination or noise
rejection feature. This can cause the unit to eliminate weaker signals
such as fish or even structure from the display.

Содержание Accura 240

Страница 1: ...ALLA ALLA ALLATION AND OPERA TION AND OPERA TION AND OPERA TION AND OPERA TION AND OPERATION TION TION TION TION INSTR INSTR INSTR INSTR INSTRUCTIONS UCTIONS UCTIONS UCTIONS UCTIONS Accura 240 Accura 240 Accura 240 Accura 240 Accura 240 ...

Страница 2: ...Y ZOOM BAR 17 DISPLAY ZONE BAR 17 DIGITAL SONAR 17 ALARMS 18 DEPTH ALARMS 18 ZONE ALARM 19 FISH ALARM 19 ADJUST CHART SURFACE CLARITY 20 ADVANCED SIGNAL PROCESSING ASP 20 SYSTEM SETUP 21 AUDIO DISPLAY 21 SYSTEM INFORMATION 22 UNITS OF MEASURE 22 RESET DISTANCE LOG 22 TEMPERATURE GRAPH 22 SIMULATOR 23 PRESET OPTIONS 23 KEEL OFFSET 23 CALIBRATE SPEED 24 WINDOWS SUMMARY 25 TROUBLESHOOTING 26 WARRANTY...

Страница 3: ...orage in temperatures higher or lower than specified will damage the liquid crystal display in your unit This type of damage is not covered by the warranty For more information contact the factory s Customer Service Department or your local service center INSTALLATION MOUNTING Install the Accura 240 in any convenient location provided there is clearance behind the unit when it is tilted for the be...

Страница 4: ...ple if you have to extend the power cable to the battery or power buss attach one end of the fuse holder directly to the battery or power buss This will protect both the unit and the power cable in the event of a short The Accura 240 requires a 3 amp fuse IMPORTANT Do not use this product without a 3 amp fuse wired into the power cable Failure to use a 3 amp fuse will void your warranty If you re ...

Страница 5: ...e labeled Water T 2 or Temp 2 and T 3 or Temp 3 If you want two ormore temperaturereadings you llneedtousethepropersensors For example you can t use two T 3 sensors The sensors that will fit the Accura 240 are TS 1BK One sensor for Water temperature display TS 2BK One sensor for T 2 temperature display TS 3BK One sensor for T 3 temperature display TS 12BK Two sensors for Water and T 2 temperature ...

Страница 6: ...e speed sensor ST TBK TS 2BK TS 3BK 3 temp sensors and one speed sensor TS 1BK 1 temperature sensor TS 12BK 2 temperature sensors or TS 1BK TS 2BK 2 temperature sensors TS 12BK TS 3BK 3 temperature sensors or TS 1BK TS 2BK TS 3BK 3 temperature sensors Two Temperature Sensors Water and T 2 TS 12 BK Accura 240 POWER CABLE Here s some sample wiring diagrams ...

Страница 7: ...5 Three Temperature Sensors Water T 2 and T 3 Three Temperature Sensors plus Speed Water T 2 T 3 and Speed TS 12 BK TS 3 BK ST TBK TS 2 BK TS 3 BK Accura 240 POWER CABLE Accura 240 POWER CABLE ...

Страница 8: ... the unit between different sonar modes MENU Press this key to show the menus and gain access to most functions ARROW KEYS These keys are used to make menu selections and to move objects on the screen ZOUT ZIN These keys let you zoom the screen in and out to see detail ALARM Press this key to activate any of the sonar alarms PWR This key turns the Accura 240 and it s lights on and off ENT EXIT The...

Страница 9: ...art split chart full chart andwindowgroups Toselecta differentmode simplypresstheMODE key Ascreensimilartotheoneatright appears Press the up or down arrow key to select the desired mode then press EXIT key to erase the modes menu A summary of the modes starts on the next page OPERATION POWER LIGHTS To turn the Accura 240 on simply press the PWR key A screen similar to the one at right appears The ...

Страница 10: ...ght side of the screen The left side shows an enlarged version of the right side The zoom range shows at the bottom of the screen In this ex ample the zoom range is 2X or two timestherightside sview Bypressing the ZOUT and ZIN keys you can change the left side s zoom from 2X to 4X and back FASTRAK This feature converts all echoes to short horizontal lines on the display s far right side The graph ...

Страница 11: ...tance travelled To use the windows feature first press the MODE key A screen similar to the one shown at right appears Highlight the Group menu at the bottom of the screen Nowpresstheleftorrightarrow keys tosequencethroughtheavailable groups When the desired group ap pears press the EXIT key to erase the modes menu Digital Chart The digital chart shows the chart on the right side of the screen The...

Страница 12: ... level excludes much of the bottom information fish signals and othertargetinformation Highsensitiv itylevelsenablesyoutoseethisdetail but it can also clutter the screen with manyundesiredsignals Typically the best sensitivity level shows a good solid bottom signal with Grayline and some surface clutter When the Accura 240 is in the Auto matic mode the sensitivity is auto matically adjusted to kee...

Страница 13: ...erase the menu press the EXIT key RANGE Automatic When turned on for the first time the Accura 240 automatically places the bottom signal in the lower half of the screen This is called Auto Ranging and is part of the automatic function Typically therangecannotbechanged manuallywhiletheunitisinautomatic as shown at right However depend ing upon the bottom depth and the current range you can change ...

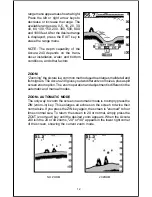
Страница 14: ...fishsignals TheAccura240givesyoutwodifferentzoomsizes plusasplit screenzoomoption Thezoom operation and adjustmentisdifferentin the automatic and manual modes ZOOM AUTOMATIC MODE The only way to zoom the screen in automatic mode is to simply press the ZIN zoom in key This enlarges all echoes on the screen to twice their normal size If you press the ZIN key again the screen is zoomed to four times ...

Страница 15: ...XIT key This also erases the zoom bar and move zoom menu GRAYLINE GRAYLINE lets you distinguish between strong and weak echoes It paints gray on targets that are stronger than a preset value This allows you to tell the difference between a hard and soft bottom For example a soft muddy or weedy bottom returns a weaker signal which is shown with a narrow or no gray line A hard bottom returns a stron...

Страница 16: ...t pressing the menu key then pressing the up or down arrow keys until the CHT SPD chart speed menu appears as shown below left Increase the chart speed by pressing the right arrow key or decrease it by pressing the left arrow key The percentage of chart speed in use changes as the arrow keys are pressed The bar chart also gives a graphical indication of the chart speed You can see the change on th...

Страница 17: ... ID symbols on the screen when actually there are no fish Practice with the unit in both the Fish ID mode and without to become more familiar with the Fish ID feature When the Accura 240 is turned on the Fish ID feature is automatically turned on also ToturntheFishIDfeatureoff press the menu key then press the arrow keys until the FISH ID menu appears Press the left arrow key to turn the fish ID f...

Страница 18: ...ler numbers or turn it off completely usingthe ShowDigital menuatthetopof this screen You can also turn the temperature speedometer distance log zoom bar zone alarm bar or cursor on or off using this menu See below for more information on these items CHART CURSOR The Accura 240 has a chart cursor that allows you to pinpoint a target s depth Thecursorissimplyahorizontallinethatextendsacrossthedispl...

Страница 19: ...s the right arrow key Now press the EXIT key A screen similar to the one at right ap pears To turn the zone bar off repeat the above steps See the Alarms section for more information on the zone alarm DIGITAL SONAR When the Accura 240 is first turned on the digital depth display is located at the top left corner of the screen This display comes from a separate digital sonar built into the unit It ...

Страница 20: ...e bottom signal is less than ten feet It will continue to sound until the bottom goes deeper than 10 feet The deep alarm works just the opposite It sounds a warning tone if the bottom depth goes deeper than the alarm s setting Both depth alarms work only off the digital bottom depth signals No other targets will trip these alarms If you turn the digital off the depth alarms will be inoperative The...

Страница 21: ...shown on the right side of the screen To turn the zone alarm on highlightthe ZoneAlarm labelonthe alarms menu then press the right ar row key To adjust the zone alarm highlight the Zone Adjust label then press the right arrow key A screen similar to the one at right appears Toadjustthetopofthezonebarhigher or lower press the up or down arrow keyswhiletheupanddownarrowsare surrounding the Upper Zon...

Страница 22: ...on a 0 60 foot range with maximum SCC surface clutter will be reduced down to 45 feet There are three levels of SCC avail able on the Accura 240 low medium and high When it s turned on for the first time the SCC level is low To change it press the MENU key then press the up or down arrow keys until the Surface Clarity menu appears Now use the left or right arrow keys to change it When you re finis...

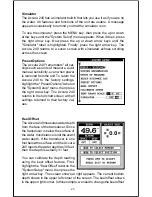
Страница 23: ...ht arrow keys to change it When you re finished press the EXIT key to erase the ASP menu SYSTEM SETUP The following features are available through the System Setup menu To access this menu press the MENU key then press the up or down arrow keys until the System Setup menu appears Press the right arrow key The screen shown at right appears Audio Display You can adjust the display s contrast and tur...

Страница 24: ...t or left arrow key to change it To erase this screen press the EXIT key Reset Distance Log If you have a speed sensor attached to the Accura 240 the unit starts counting the distance you ve travelled each time you turn it on You can reset this distance to zero by turning the unit off and on again however it s easier to highlight the Reset Distance Log label on the System Setup menu then press the...

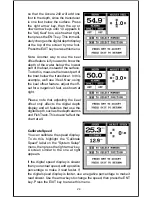
Страница 25: ...moved from the unit To return the Accura 240 to the factory settings highlight the Preset Options label on the System Setup menu then press the right arrow key The Accura 240 returns to the full chart screen with all settings returned to their factory val ues Keel Offset TheAccura240measureswaterdepth from the face of the transducer Since the transducer is below the surface of thewater thisdistanc...

Страница 26: ...feet Now using the keel offset feature adjust the off set for a negative 3 feet as shown at right Please note that adjusting the keel offset only affects the digital depth display and all features that use the digitaldepth suchasthedepthalarms and FishTrack This doesn t affect the chart at all Calibrate Speed You can calibrate the speed display To do this highlight the Calibrate Speed label on the...

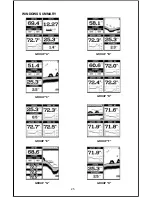
Страница 27: ...25 WINDOWS SUMMARY GROUP F GROUP H GROUP D GROUP A GROUP E GROUP G GROUP C GROUP B ...

Страница 28: ... unit Rerouting the power and transducer cables away from other electrical wiring on the boat may help Route the sonar unit s power cable directly to the battery instead of through a fuse block or ignition switch 2 Inspect the transducer cable for breaks cuts or pinched wires 3 Check both the transducer and power connectors Make certain both are securely plugged in to the unit Weak bottom echo dig...

Страница 29: ...ere with the sonar This causes the sonar to automatically increase its Discrimination or noise rejection feature This can cause the unit to eliminate weaker signals such as fish or even structure from the display Try using resistor spark plugs or routing the sonar unit s power and transducer cables away from other electrical wiring on the boat No fish arches when the Fish ID feature is off 1 Make ...

Страница 30: ...rference VHF radio antenna cables radiate noise when transmitting so be certain to keep the sonar s wires away from it You may need to route the sonar unit s power cable directly to the battery to isolate it from other wiring on the boat If no noise displays on the sonar unit from electrical equipment then make certain everything except the sonar unit is turned off then start the engine Increase t...

Страница 31: ...nd for the product THIS REPAIR REPLACEMENT OR REFUND AS JUST DESCRIBED IS THE EXCLUSIVE REMEDY AVAILABLE TO YOU AGAINST US FOR ANY DEFECT MALFUNCTION OR NON CONFORMITY CONCERN ING THE PRODUCT OR FOR ANY LOSS OR DAMAGE RESULTING FROM ANY OTHER CAUSE WHATSOEVER WE WILL NOT UNDER ANY CIRCUMSTANCES BE LIABLE TO ANYONE FOR ANY SPECIAL CONSEQUENTIAL INCIDENTAL OR OTHER INDIRECT DAMAGE OF ANY KIND Some s...

Страница 32: ...30 Notes ...
Страница 33: ...905 629 3118 WARRANTY REPAIR WILL BE HONORED ONLY IN THE COUNTRY UNIT WAS PURCHASED Please follow the shipping instructions shown below on this page if you have to mail your unit to the dealer For proper testing repair and service send a brief note with the product describing the problem Be sure to include your name return shipping address and a daytime telephone number How to Obtain Service Inter...

Страница 34: ...inal warranty Eagle has a flat rate repair policy that covers your unit and accessories packed with the unit at the factory There is a 180 day warrantyonallnon warrantyrepairsfromthefactory whichissimilartothe original warranty but is for 180 days rather than one year For further details please call us at the above number Accessory Ordering Information To order accessories such as power cables or ...

Отзывы:

Похожие инструкции для Accura 240