background image


DV219/229    |    ENGLISH    USER    MANUAL 


INTRODUCTION 


Thank you for purchasing DV219 which has the unique, ultra-small and delicate design. 

It can be used in many recording situations.  DV219 rings more convenience, safety and 

funs to your daily life.   


Approval Information:   

All  our  products  meet  the  requirements  of  approval  FCC  or  CE,  and  are  granted  the 

FCC or CE certification. They are authorized to bear FCC or CE mark.   


FCC:   

This product has been tested and found to comply with the limits for a Class B digital 

device,  pursuant  to  Part  15  of  the  FCC  rules.  These  limits  are  designed  to  provide 

reasonable protection against harmful interference in a residential installation.   


CE:   

This  product  complies  with  standards  including  Low  Voltage  Device  Directive 

73/23/EEC; EMC Directive 89/336/EEC and R&TTE Directive1999/5/EC. It passed the 

subject tests by the authority concerned and is authorized to bear CE mark. 


OVERVIEW   

Along  with  the  improvement  of  people’s  living  standard  and  the  development  of 

picture compression and memory technology, the digital video memory has been a part of 

our  daily  life.  DV219  a  high-tech  product,  just  meets  a  plenty  of  needs  of  people  and 

market. It possesses a  series of advanced functions including  digital  photography, voice 

memory, sound trigger recording, high speed USB data transferring and USB charging.   


EU Environmental Protection   

Waste electrical products should not be disposed of with   
household waste. Please recycle where facilities exist.   
Check with your Local Authority or retailer for recycling   
advice. 


Содержание DV219

Страница 1: ...DV219 229 ENGLISH USER MANUAL 1 USER MANUAL Please read this user manual carefully and thoroughly before any attemptto Install and operate this product and retain it for your future reference...

Страница 2: ...ipment 8 13 Battery installation 8 Connect with the camera 9 Start recording 10 Connect with TV 11 Connect with computer 12 13 Function Modes 14 39 Booting picture 14 Record interface 14 Voice recordi...

Страница 3: ...E This product complies with standards including Low Voltage Device Directive 73 23 EEC EMC Directive 89 336 EEC and R TTE Directive1999 5 EC It passed the subject tests by the authority concerned and...

Страница 4: ...data compatibility Playback of moving images recorded with your recorder on other equipment and playback of moving images recorded or edited with other equipment on your recorded are not guaranteed D...

Страница 5: ...ne 13 Remote control match key 3 AV Output 14 USB port 4 Playing mode switch 15 LCD Screen 5 Recording mode switch 6 Backward key Volume up key hold key 7 Record Play paus confirm key 8 Forward Volume...

Страница 6: ...ntact point 17 Battery holder Remote control Start recording Stop recording Remote control only can works when main DVR is power on Available distance is about 30 meters without block outside Availabl...

Страница 7: ...icator of the power charger and DVR will turn off green indicator turn on at the same time Make sure the battery and power charge working as long as possible The electronic release can not surpass a w...

Страница 8: ...cture shows Put the tags side upward let the 4 battery contact points aligned with points on battery holder Close the cover Battery using time information form Capability Charging time Standby time Pl...

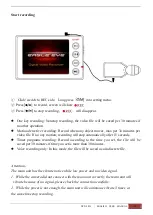
Страница 9: ...n the DVR 2 Glide switch to REC side the screen will show the pictures you catch Picture2 1 Connect the RCA of AV line with other display device and the other side connect with AV IN port on main mach...

Страница 10: ...stop automatically after 15 seconds Timer programs recording Record according to the time you set the file will be saved per 30 minutes if time you set is more than 30 minutes Voice recording only In...

Страница 11: ...signal line 2 Power on main unit glide switch to play side Use and to select files and to play The default signal output mode is PAL if the system in your local place is NTSC please enter setting men...

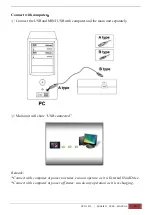
Страница 12: ...SB and MINI USB with computer and the main unit separately Main unit will show USB connected Remark Connect with computer at power on states can not operate as it is External Hard Drive Connect with c...

Страница 13: ...files in the folders and play it by the default media player in your computer Attention Connect the main unit with PC under power off state it is power charge mode red indicator flash at the same time...

Страница 14: ...s Booting picture Record interface Recording Mode Recording symbol Battery capacity Current time Current time Video files Picture quality of recording Record time Record content Card icon if memory ca...

Страница 15: ...oice recording mode Select the audio source and press confirm then the screen will display the rest time of storage Select the audio source and press confirm then the screen will display the rest time...

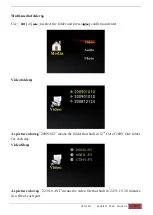
Страница 16: ...the folder and press confirm and enter Video folder As picture above 20091012 means the folder that built in 12th Oct of 2009 One folder for each day Video files As picture above 223118 AVI means the...

Страница 17: ...SER MANUAL 17 Video play Use and select the video for playing and press start play or pause Use and select forward backward mode and press to play or pause Notice Here has 4 speed level of forward and...

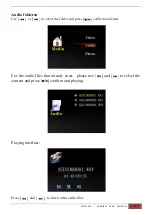
Страница 18: ...Audio folders Use or to select the folder and press confirm and enter For the audio files that already exist please use and to select the content and press confirm and playing Playing interface Press...

Страница 19: ...V219 229 ENGLISH USER MANUAL 19 Picture folders Press and to choose picture folders press to enter Picture shows Press and to view other pictures Remark Picture format is JPG and resolution is 640 480...

Страница 20: ...RENT Press to confirm or select Cancel to quite operation Use and to select YES or NO Use to confirm delete or quit ALL Delete all data CURRENT Delete the file which be selected CANCEL Cancel the dele...

Страница 21: ...e setting function by the knob use and to select the content you need Record setting Use and to select REC setting menu press confirm and enter RECORDING MODE Press enter Recording Mode use and to sel...

Страница 22: ...DV219 229 ENGLISH USER MANUAL 22 RESOLUTION Use and to select Resolution Press to confirm and enter Use and to select the suitable resolution press confirm and quit...

Страница 23: ...resolution press confirm and quit Storage memory information form Quality Resolution High Medium Low Battery time 720x576 45MB 36MB 20MB Approx 1 hour and 40 minutes 720x480 43MB 33MB 18MB Approx 1 h...

Страница 24: ...ideo Use and to select the internal or external Microphone Press to confirm and quit Press start recording Notice The standard Button Camera without Microphone you need to select internal microphone s...

Страница 25: ...AY Use and to select Time Display menu and press confirm and enter Use and to select Yes display time or No according to your need Press confirm and quit Remark The video stamp shows current time and...

Страница 26: ...c Cover menu and press confirm and enter Use and to select Yes Automatic Cover or No according to your need Automatic cover function While open the function the system will delete the earliest files a...

Страница 27: ...DV219 229 ENGLISH USER MANUAL 27 Select Memory Use and to select Storage menu Press confirm and enter Use and to select Memory or Micro SD menu press confirm and quit...

Страница 28: ...ime and Date setting Use and to select Date Time setting Press confirm and enter Date display form setting Use and to select Date Format menu and press confirm and enter Use and to select the suitable...

Страница 29: ...u press confirm and enter Use to select the setting content use and to do the setting then press ESC save the setting and quit Time setting Use and to select Time Setting Menu press confirm and enter...

Страница 30: ...t language menu then press confirm and enter Use and to select the suitable language then press save and quit Video output Use and to select Video Output menu then press confirm and enter Use and to s...

Страница 31: ...irm and enter The default setting is Never power off automatically please use and change the time according to your need 5Mins means power off automatically after 5 minutes 10Mins means power off auto...

Страница 32: ...t setting is Never LCD off press use and to select the suitable time according to your need 1Mins means LCD off after 1 minute 5Mins means LCD off after 5 minutes Press to confirm and press ESC to qui...

Страница 33: ...ANUAL 33 Vibrate notice setting Use and to select Vibrate setting then press confirm and enter Use and to select On or Off press confirm and quit Select On menu The main unit will vibrate while no vid...

Страница 34: ...H USER MANUAL 34 Key press sound setting Use and to select Key press sound menu then press confirm and enter Use and to select On or Off press confirm and quit Select Off close the sound while operati...

Страница 35: ...ss setting Use and to select Brightness menu then press confirm and enter Use and to select increase or decrease the brightness according to our need then press confirm and quit Different brightness w...

Страница 36: ...ress confirm and enter Use and to select Yes or No according to our need YES Format the default memory card After press the system will format the memory NO Without any operation and quit The data won...

Страница 37: ...rector of SD card the name usually like run elf format Then insert the SD card into the slot of main unit Enter the setting menu use and to select Factory Setting menu press To start updating Please d...

Страница 38: ...DV219 229 ENGLISH USER MANUAL 38 Factory Setting Use and to select Factory Setting Press to confirm entering Use and to select recover or not Press to confirm and quit...

Страница 39: ...DV219 229 ENGLISH USER MANUAL 39 Memory capacity information Enter the setting menu use and to select Memory info menu and then press to check Firmware version...

Страница 40: ...DV219 229 ENGLISH USER MANUAL 40 Accessories Main unit x 1 CCD camera x 1 Battery x 1 Power charger x 1 AV input cable x 1 AV output cable x 1...

Страница 41: ...DV219 229 ENGLISH USER MANUAL 41 USB cable x 1 Disc x 1 Wireless remote controller Optional x 1 Protective pack x 1 Cycle stand x 2 Manual x 1...

Страница 42: ...y compatibility Micro SD Card 256MB 16GB USB Jack High speed USB 2 0 AV In Jack 3 rings with 2 5mm AV Output Jack 3 rings with 2 5mm Language Chinese English Operation Temperature 0 C 60 C Operation H...

Страница 43: ...DV219 229 ENGLISH USER MANUAL 43 We will not inform you if there is any modification for user manual in future...

Отзывы: