background image

!

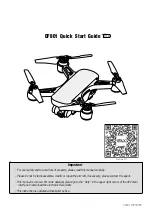
Install the remote control battery

P

ower 

S

witch

Geomagnetic

 calibration 

(Compass 

calibration)

Remote control 

power Indicator

One key return

Headless mode

One key take-off

Camera up

Camera down

Throttle 
joystick

Direction joystick

Switch

Controller function introduction

Remove the remote control battery cover, install the 4 Pcs AAA batteries(Not provided in the package) correctly according to 

the positive and negative terminals indicated by the remote control, and then re-install the battery cover.

● The remote control uses 4 “AAA” non-rechargeable batteries or “AAA” rechargeable batteries. (Not provided in the 

package) 

● Pay attention to the polarity of the battery when installing or replacing the battery. 

● Do not mix different conditions or types of batteries. 

● Used batteries should be removed in time, and discarded batteries should be thrown properly. 

● If you do not use it for a long time, please remove the battery to avoid damage to the product caused by battery 

leakage.

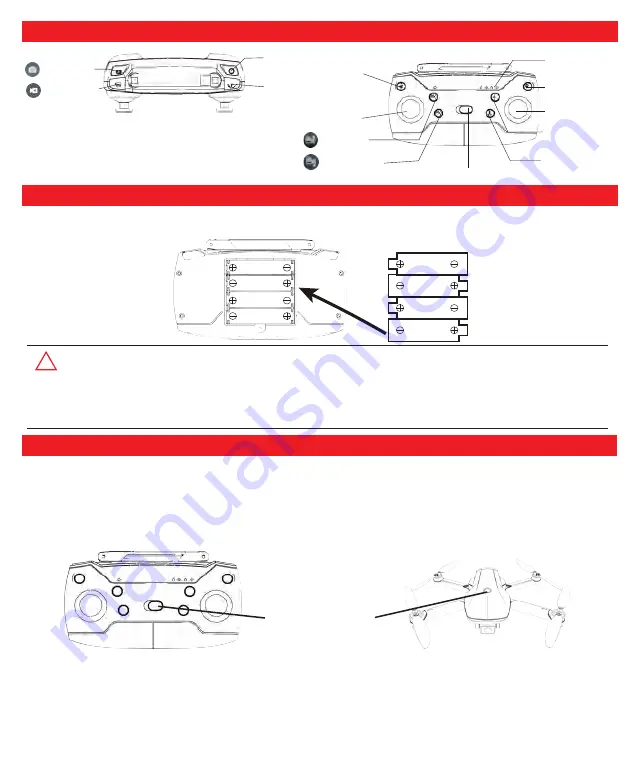
Step 1 :Insert the battery into the battery slot of the drone. Press the power button of the drone for two seconds to turn it on. 

The indicator light of the drone flashes quickly and then flashes slowly. Put the drone on the horizontal ground or glass. (Do 

not place the drone on the grass or on uneven ground to prevent the grass or sand from getting into the motor and causing 

damage to the motor.)

Step 2 :Turn on the remote control power switch, the indicator light of remote control and drone turn solid, the synchronization 

is completed.

Tips: Long press the speed control button and turn on the remote control switch at the same time.The left joystick will become 

the direction joystick, and the right joystick will become the throttle joystick. (right-hand mode)

-4-

Synchronize the drone with the remote control.

Take picture

Record video

Surround 
mode      

Speed 
adjustment

1.5V AAA

1.5V AAA

1.5V AAA

1.5V AAA

1.5V AAA

1.5V AAA

1.5V AAA

1.5V AAA

Содержание EX5

Страница 1: ......

Страница 2: ...intain in 1 2 meters Avoiding the drone hit the head face and body when flying and landing drone hit the head face and body when flying and landing Keep away from the humid environment The interior of...

Страница 3: ...f Since the blade is thin be careful to prevent accidental scratches when installing Please use the original blade provided by our factory Blade is consumable If necessary please purchase separately C...

Страница 4: ...g range when charging Please do not short circuit or squeeze the battery to avoid accident Do not place the battery in a high temperature place such as a fire or an electric heat source near the devic...

Страница 5: ...you do not use it for a long time please remove the battery to avoid damage to the product caused by battery leakage Step 1 Insert the battery into the battery slot of the drone Press the power button...

Страница 6: ...and right joysticks 45 to the lower right corner at the same time as shown in the figure below Then the front and back indicators of the drone flash quickly and the gyroscope is being calibrated Final...

Страница 7: ...11a b g n ac which is 5G band WLAN Step 2 Connect the drone with your mobile device follow the steps below Turn on the drone Go to WLAN setting in your mobile device and search the wifi name WiFi 5G4...

Страница 8: ...ture When the drone successfully recognizes the gesture it will count down 3 seconds and start taking pictures You can see the application interface countdown for 3 seconds Palm gesture trigger the dr...

Страница 9: ...backward or even turn left and right 4 Surround mode the drone circle around the remote control in the surround mode Waypoint menu Waypoint menu Draw waypoints Waypoint deletion Send to drone Waypoin...

Страница 10: ...Record video Rotate the picture Click this icon to enable the rotating picture function Meanwhile your finger slides the screen the image can be rotated if you double tap anywhere on the screen with y...

Страница 11: ...tomatically finish initializing 2 Perform the Gyro Calibration procedure 3 Download the APP and pair the drone with the mobile phone by Wifi 4 Performing the Compass Calibration procedure Waiting for...

Страница 12: ...the north When the head turns back to the previous flight direction and hover in the air push the remote control direction joystick to the left the drone will circle around you counterclockwise push t...

Страница 13: ...The one key return process is the same as the out of control return but the user can control the drone through the joystick to avoid obstacles when the drone returns near to the landing Press the one...

Страница 14: ...ying the drone Wait until the wind is at level 4 5 Breeze Compass calibration failed please recalibrate the compass 3 4 5 6 13 During the flight the camera can adjust the angle up or down press the ca...

Отзывы: