E-TON Beamer Scooter Скачать руководство пользователя страница 3

Page 2 

Table of Contents


Vehicle identification number location 


Controls, switches and feature locations 


Control feature operations 


  Engine 

stop 

switch 


 Turn 

Signal 

Switch 

  Horn 

Button 


  Head 

Light 

Control 

Switch 


  Ignition 

Switch 


Instrument Cluster 

Throttle Control 

Throttle Cable Adjustment 

Brake Systems 


Front and Rear brakes 

Front Hydraulic Brake Inspection 

Hydraulic Fluid Reservoir 

Purging the brake lines 

Rear Brake Inspection 

 Fuel 

System 


  Fuel 

tank 


  Fuel 

Cap 


Inline Fuel Filter 

 Engine 

Oil 


10 

  Oil 

Indicator 

light 

10 

  Oil 

Tank 


10 


Tires and Wheels 

10 

  Tire 

pressure 


10 

 Spark 

Plug 

11 

Spark Arrester Screen 

11 

 Air 

Filter 

11 

 Electrical 

Battery 


12 


C.V.T. Air Filter (Transmission) 


12 

Front Forks 

12 

Beamer Break-In Procedure 

13 

 Pre-Operation 

Inspection 

13 

  Starting 

procedure 

13 

  Driving 

13 

  Parking 

14 

 Specifications 


14-15 

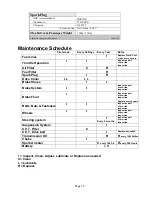
Maintenance Schedule 

16 


Wiring Diagram Viper 50 

17 

Manufacture’s Warranty 

18-19 

 Owner’s 

notes 

20 

Содержание Beamer Scooter

Страница 1: ...E TON Beamer Scooter OWNER S MANUAL...

Страница 2: ...vehicle This owner s manual will instruct you in the safe operation of the vehicle This manual contains warnings and cautions for some specific service methods which could cause personal injury and o...

Страница 3: ...tion 7 Hydraulic Fluid Reservoir 7 Purging the brake lines 8 Rear Brake Inspection 8 Fuel System 9 Fuel tank 9 Fuel Cap 9 Inline Fuel Filter 9 Engine Oil 10 Oil Indicator light 10 Oil Tank 10 Tires an...

Страница 4: ...il Tank 5 Main Parking Stand 6 Rear Turn Indicator Lamps 7 Fuel tank Cap 8 Brake Fluid Reservoir D DOT Information Plate Vehicle Identification Number VIN is located on the frame behind the foot guard...

Страница 5: ...tral position and cancel the illumination of the turning lamps Horn Button The horn button is a yellow push switch located below the turning signal lamp switch on the left hand handlebar Pressing in o...

Страница 6: ...ge which indicates the fuel level in the fuel tank When the needle reaches the red zone on the gauge you are running low on fuel and the tank should be refilled This gauge is controlled by a fuel leve...

Страница 7: ...to expose the cable adjusting system Loosen the locking nut and adjust the cable length by turning the adjusting collar Check the free travel in the throttle hand grip until you have 5 10mm free trave...

Страница 8: ...hickness is 3 0mm DO NOT RIDE A VEHICLE WITH WORN BRAKE PADS Check the rotor disc for cracks warping or color distortion Replace rotor disc at first sign of problem Check rotor disc thickness Minimum...

Страница 9: ...or requires a larger amount of effort to apply the brakes the cable may be damaged or need lubricating Visually inspect the brake cable for any signs of wear fraying kinking or corrosion Replace any w...

Страница 10: ...al must be in good condition to insure a proper seal of the cap to the tank to prevent fuel spills DO NOT allow dirt or other debris to enter the tank when refueling Replace the cap if damaged or if i...

Страница 11: ...ill the tank with high quality JASO FC grade 2 cycle injector engine oil Using lower grade oil can cause exhaust smoke and result in damage to your engine IMPORTANT NOTE Your first tank of fuel should...

Страница 12: ...hrough an air filter to clean the air prior to mixing it with fuel and oil in the carburetor During normal operation the filter accumulates dirt from the air and will need to be cleaned to maintain th...

Страница 13: ...replaced There is an inline fuse on the positive lead of the battery to protect the wiring system from over loads If your starter motor will not turn over and the battery is fully charged check the i...

Страница 14: ...per operation 11 Insure you are wearing proper clothing and protective gear such as helmet and hard soled shoes Starting Procedure The following procedure must be followed each time you start your Bea...

Страница 15: ...egain control release the braking pressure until you have regained control of the vehicle When the road surface is wet the braking distance is double that of when the road surface is dry Keep a safe d...

Страница 16: ...Suspension Front Telescopic Fork Rear Unit Swing Arm Single Shock Brakes Front Hydraulic Disc Rear Mechanical Drum Tires Front 120 90 10 Rear 130 90 10 Tire Pressure Front 18psi 1 25kg cm2 Cold Rear...

Страница 17: ...ve Chain I L I L Brake Shoes I I Brake System I I Inspect as part of pre ride inspection Brake Fluid I Inspect as part of pre ride inspection Replace every 2 years Bolts Nuts Fasteners I I Inspect as...

Страница 18: ...Page 17 Beamer Wiring Diagram...

Страница 19: ...anty program are 1 Damage caused by accidents misuse negligence improper vehicle operation 2 Any modification or alteration to any standard specifications or equipment 3 Any repairs made by an unautho...

Страница 20: ...er take a test ride to familiarize themselves with the machine and to make certain the unit is in proper operating condition The dealer is responsible for checking and performing all items on the set...

Страница 21: ...Page 20 Owner s Notes...

Страница 22: ...Page 21 Owner s Notes...

Страница 23: ...Page 22 Owner s Notes...

Страница 24: ...Page 23...

Отзывы: