2B
™
User Manual
Advanced Dual Channel Electro Stimulation
Control Unit
Issue 2.5 April 2013
Firmware issue 2.104
Страница 1: ...2B User Manual Advanced Dual Channel Electro Stimulation Control Unit Issue 2 5 April 2013 Firmware issue 2 104 ...
Страница 2: ... Level Controls 11 Joining Controls A B Mode 11 Select Button 11 Adjust Control 11 Displays 11 Adjusting Contrast 11 INPUTS AND OUTPUTS 12 Outputs 12 Inputs 12 MODES 13 Selecting a Mode 13 SYSTEM MODES 14 Backlight Control 14 Battery Level 14 Power Selection 14 Factory Reset 15 Commander 15 System Info 15 PROGRAM MODES 16 Pulse Mode 16 Continuous Mode 16 A B Split Modes 16 Wave Mode 17 Waterfall M...
Страница 3: ...DIGITAL LINK 21 Bootloader 21 GETTING MORE 21 ACCESSORIES 21 ADDITIONAL NOTES 22 Storage 22 Cleaning 22 QUICK GUIDE TO MODES 23 SPECIFICATIONS 24 PROBLEMS 25 3 ...
Страница 4: ... Products bearing the CE marking comply with the EMC Directive 89 336 EEC and the Low voltage Directive 73 23 EEC issued by the Commission of the European Community Compliance with these directives implies conformity to the following European norms in parentheses are the equivalent international standards and regulations EN 55022 CISPR 22 Electromagnetic Interference EN 55024 IEC61000 4 2 3 4 5 6 ...
Страница 5: ...As well as offering all the interesting modes like pulse tickle and squeeze the 2B will run in two different power levels L for LOW power is the default setting and is ideal for those people who are just starting out on their E Stim experience whilst the H high power setting takes the 2B unit into a whole new realm of serious power output For more details on the power system see page 14 The 2B can...
Страница 6: ...ft clockwise You should notice the blue channel A LED top right start to flash and the display changes to P u l s e 5 0 5 0 A 3 3 L B O F F The actual value shown is dependent on how much you turn the Channel A knob Now adjust the knob marked Channel B level the knob on the right clockwise You should now notice the channel B led bottom right start to flash and the display changes to P u l s e 5 0 ...
Страница 7: ... You should start to feel a slight tingling sensation from the electrode site Not powerful enough The 2B operates in two modes LOW Power and High Power See page 14 for details on how to switch your 2B box to the high power level And if you want even more power then connect our external power supply unit Experiment Only with experience will you get the most out of your 2B You will find that differe...
Страница 8: ...the body of the plug as you pull Do not pull the cable Electrode Positioning Self adhesive electro pads work well on inner thighs bottom cheeks even the penis the choice is yours The closer the pads are together the more intense the sensation but make sure the pads do not touch each other You may feel more sensation in one location than the other This is the nature of e stim and is normal Just try...
Страница 9: ...into the lower half of the case first and then the top half of the cover will clip into position Turn the unit over The unit is now ready for operation Please note we do NOT recommend the use of zinc carbon batteries due to their general poor performance In the event the EBox 2B unit is not being used for a period of time remove the battery to avoid any potential damage from battery leakage In the...
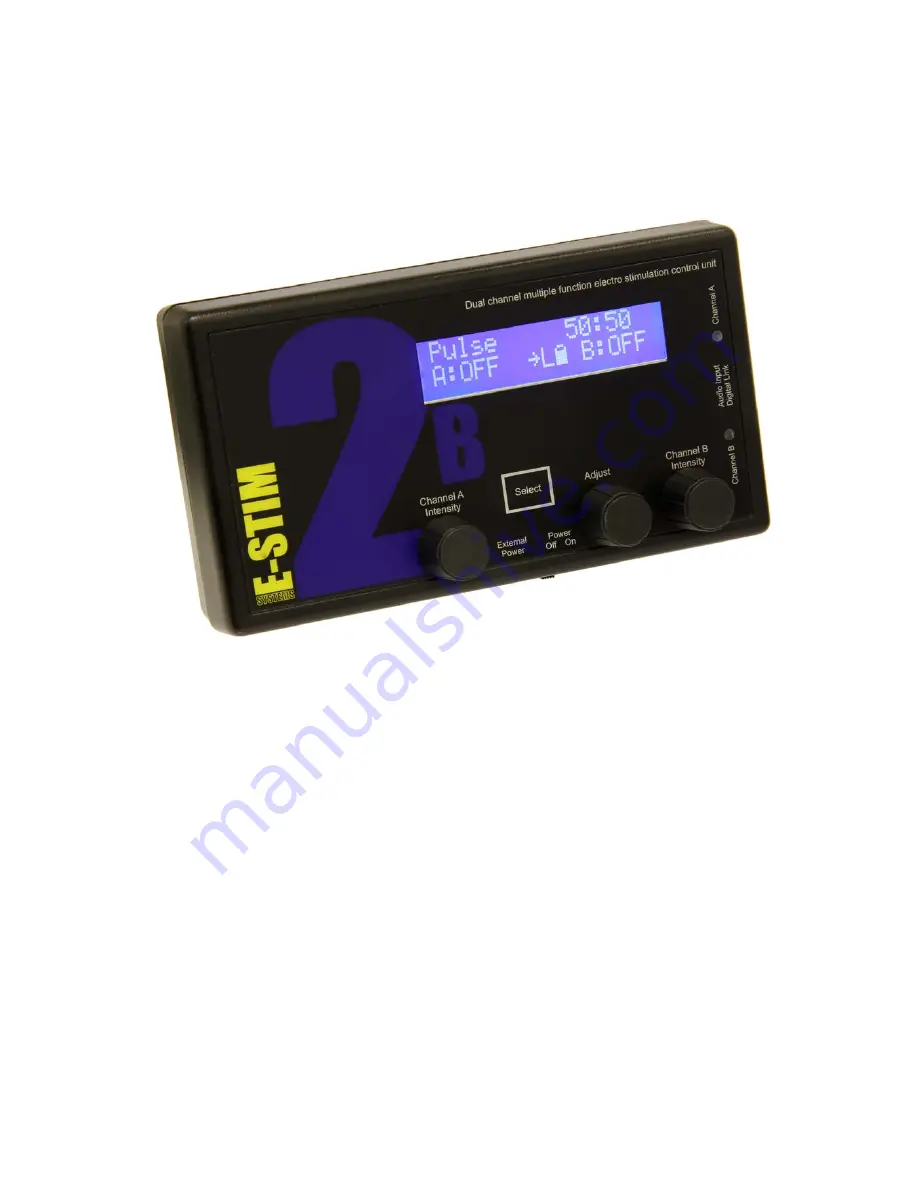
Страница 10: ...eration of the controls in combination that will allow the user to provide an effective electro stimulation session The controls are from left to right Channel A Level Select Button Adjust Control Channel B Level There is also a power slide switch on the bottom side of the unit and an LCD contrast control accessed from the rear of the unit 10 ...
Страница 11: ... channels are linked a small sign appears on the bottom row of the LCD screen Select Button The select button is used in conjunction with the Adjust control to change and adjust the settings in all the various modes including changing and selecting the modes themselves The select button responds to a light press there is no need to press too hard Adjust Control The adjust control is used in conjun...
Страница 12: ...ore inserting or removing the connector to eliminate the possibility of short circuits occurring When removing the connectors Grip the shaft of the connector not the wire and gently pull Ensure that audio devices or the digital link are only connected to the centre jack socket Connecting to either of the output jack sockets will destroy your audio unit The audio input is designed to operate with l...
Страница 13: ...se the ADJUST control to cycle through the available modes Once you have found the mode you want press the SELECT button to activate The modes are 1 Pulse 2 Bounce 3 Continuous 4 A Split 5 B Split 6 Wave 7 Waterfall 8 Squeeze 9 Milk 10 Throb 11 Thrust 12 Random 13 Step 14 Training 15 Microphone 16 Stereo 17 Tickle The following are system modes and as such they are used to change and view the syst...
Страница 14: ...attery a brand new battery should show full however the unit will continue to operate with flat batteries with a reduced output If your 2B starts to reset itself when higher power levels are selected then this is a sign the battery needs replacing The battery level display will update whenever a control is adjusted Because of the variations in battery manufacturing technology a brand new battery m...
Страница 15: ...he functions of the 2B directly from your PC For more details of Commander visit http www e stim co uk commander If Commander is active then you should see a small arrow on the screen To switch Commander on and off simply select Commander mode and use the adjust knob to select ON or OFF If Commander is switched on and you switch your 2B off Commander will still be active when the 2B is switched on...
Страница 16: ... to 100 Higher numbers indicate a faster pulse rate As with the pulse mode the second value on the display is the pulse feel this allows you to adjust the sensation of each individual pulse from soft to spiky with values from 1 to 100 Channel A is on when channel B is off and visa versa Continuous Mode C o n t i n u o u s 1 8 A M A X L B O F F Both of the outputs are on continuously The ADJUST con...
Страница 17: ... soft to spiky with values from 1 to 100 With different values for the left and right channels levels it is possibly to adjust the synchronicity of the outputs with one channel rising and dropping faster than the other Squeeze Mode S q u e e z e 8 8 6 6 A M A X L B 8 7 The pulse rate increases and then drops to nearly continuous producing a synchronised squeeze sensation Both Channel A and Channel...
Страница 18: ...o 100 Lower numbers give a much faster random pulse stream The second value is the pulse feel that allows you to adjust the sensation of each individual pulse from soft to spiky Step Mode S t e p 3 4 5 0 A 1 0 L B 7 9 Step mode is designed to step the output up in individual steps allowing the subject to get used to the current level before the output is stepped up to the next level The output ste...
Страница 19: ...value allows you to adjust the delay between level changes from 2 to 100 The second value is the pulse feel that allows you to adjust the sensation of the pulse stream from soft to spiky Lower values give a faster step Because of the delay of the programmed step any changes in output level will only occur at the next step change Tickle Mode T i c k l e 5 0 A 1 0 L B 1 0 A continuous mode that is o...
Страница 20: ...percentage of the audio drive that is passed through to the outputs The adjust control allows you to change the speed of the response of the stereo system indicated by the third value A low value gives a quick sharp response a higher values gives a smoother response You should aim for maximum movement in the bar graph If the bar graphs are full you should reduce the output volume of the device you...
Страница 21: ... brick your 2B and require a return to our workshops for an upgrade We also offer a paid for chip replacement service and a return to our workshops options for upgrades Firmware upgrades are not included as part of your lifetime guarantee Getting More If you want to find out how to get the best of out your 2B we have a dedicated E Stim Systems Forum at http www e stim net Share your ideas with oth...
Страница 22: ...be used for a period of time always remove the battery to avoid any possibility of damage being caused by battery leakage Cleaning Do NOT use solvents to clean your 2B A gentle wipe with a soft cloth should be sufficient It is not possible to sterilise the control unit 22 ...
Страница 23: ...the set limit and then decreases to zero before repeating Squeeze Pulse speed The pulse rate increased and then drops to slow Milk Pulse speed The pulse rate increased and then drops to slow Channel B is off when Channel A is on and visa versa Throb Range of Throb n a Continuous mode with variable feel rising from low to adjustment value and then dropping back to low Thrust Range of Thrust n a Con...
Страница 24: ...coders controlling individual channel level Mode selection and adjustment switch selection of power on off Output Waveform Biphasic AC Audio Inputs Stereo 33KΩ Power Supply 1 off Standard 9 Volt Alkaline PP3 or Optional E Stim Systems Power Supply Battery Life Variable dependent on load Dimensions approx 145mm x 80mm x 50mm Weight with battery 400g Supplied Accessories 2 off 3 5mm to 2mm TENS outp...
Страница 25: ...turn the unit for repair without contact us for a returns number before you dispatch For more details regarding our lifetime guarantee product registration and our full range of e stim products then visit our website at http www e stim co uk UK EU customers or our worldwide site at http www e stimsystems com Our lifetime guarantee does not affect your statuary rights SAFETY WARNING DO NOT CONNECT ...