background image


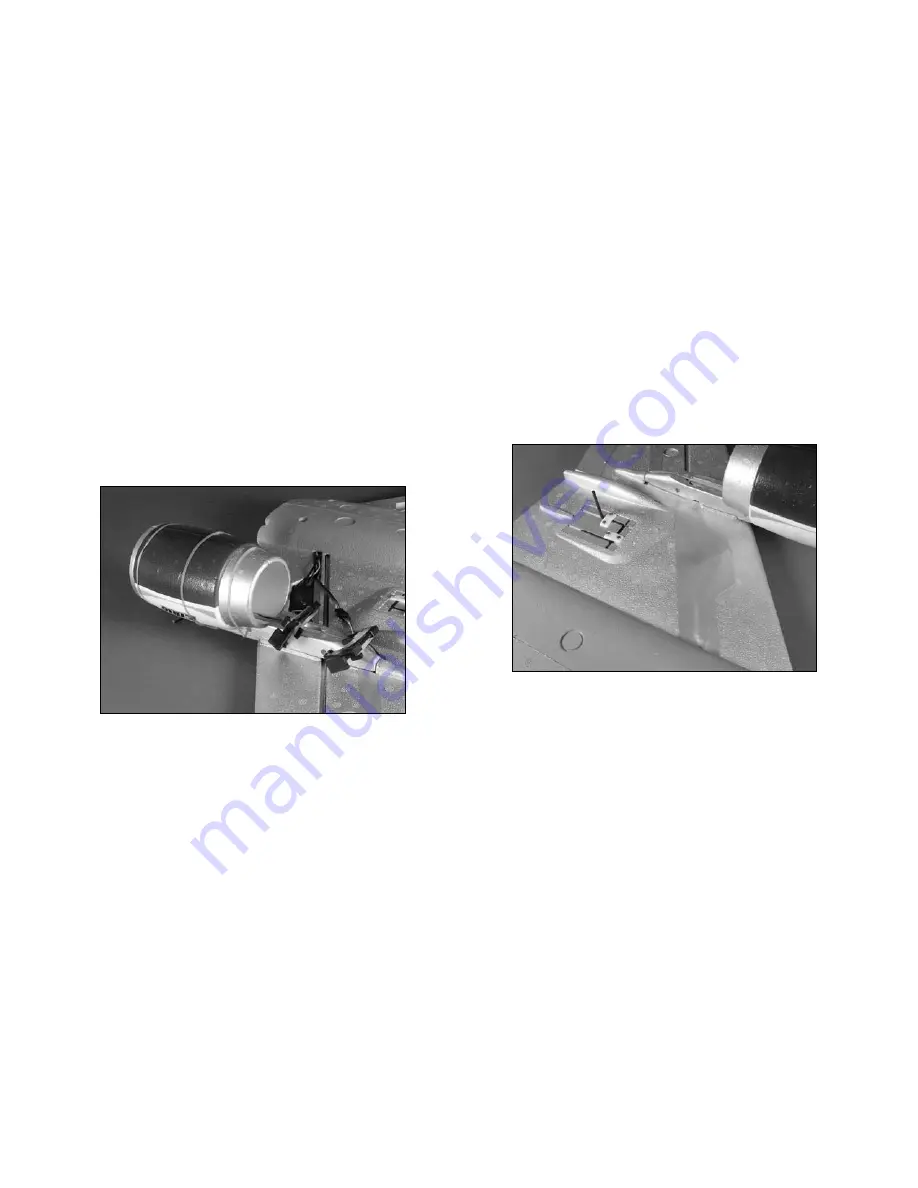
 8. Test fit the remaining foam nacelle to the 

fan. Use 30-minute epoxy to glue the foam fan 
nacelles to the fan and to the structure supporting 
the fan. Use rubber bands and clamps to hold 
the foam nacelles in position until the epoxy fully 
cures.


 9. Tuck the wires neatly into the wire channels. 

Trim the foam if necessary to fit the connection 
between the servo and servo extension. Cover the 
wires using the wiring decal.

 10. Repeat Steps 1 through 9 to install the  

second motor.

17

Содержание Super Airliner ARF

Страница 1: ...Super Airliner ARF Assembly Manual...

Страница 2: ...ons 6 Questions Assistance and Repairs 6 Table of Contents Questions or Assistance 6 Limited Warranty Limits of Liability 7 Inspection or Repairs 8 Warranty Inspection and Repairs 8 Non Warranty Repai...

Страница 3: ...ace throws in the back of the manual These are correct and you will need this amount of throw to fly this model Trying anything less will diminish your chances of success Ducted fan aircraft do not ha...

Страница 4: ...nute Epoxy HAN8000 Medium CA 30 Minute Epoxy HAN8002 Threadlock Specifications Wingspan 55 in 1400mm Length 57 in 1450mm Wing Area 505 sq in 32 5 sq dm Weight w o Battery 2 6 lb 1 2 kg Weight w Batter...

Страница 5: ...wdrivers Especially keep your hands away from the propeller Before Starting Assembly Before beginning the assembly of your Airliner remove each part from its bag for inspection Closely inspect the fus...

Страница 6: ...date of purchase Safety Precautions This is a sophisticated hobby product and not a toy It must be operated with caution and common sense and requires some basic mechanical ability Failure to operate...

Страница 7: ...tal or collateral damage Horizon Hobby Inc reserves the right to inspect any and all equipment involved in a warranty claim Repair or replacement decisions are at the sole discretion of Horizon Hobby...

Страница 8: ...ct will be repaired or replaced free of charge Repair or replacement decisions are at the sole discretion of Horizon Hobby Non Warranty Repairs Should your repair not be covered by warranty and the ex...

Страница 9: ...ck or thin CA 6 minute epoxy Side cutters Drill bit 5 64 2mm Hex wrench 1 5mm Hobby knife 1 Plug a 6 Y harness into the receiver Plug the two aileron servos into the Y harness Turn on the radio system...

Страница 10: ...ole Secure the connector using a 2mm nut Hint Use threadlock or a drop of thin CA on the nut to prevent it from loosening during flight 4 Mix a small drop of 6 minute epoxy and apply it onto the servo...

Страница 11: ...at the center of the wing Pass the extension through the hole and to the center of the wing 6 Apply the wiring decal over the servo wiring from the engine pod over the servo 7 Slide the 4 1 2 114mm p...

Страница 12: ...e the pushrod wire in the pushrod connector Hint Use thread lock or a drop of thin CA on the set screw to prevent it from loosening in flight 9 Use side cutters to remove the excess pushrod wire so it...

Страница 13: ...680mm 2 Foam motor nacelle right and left 2 Wiring decal Heat shrink tubing 1 4 6mm Required Tools and Adhesives Phillips screwdriver Flat blade screwdriver Soldering iron Solder 30 minute epoxy Rubbe...

Страница 14: ...ighten the screw in the front of the fan using a flat blade screwdriver Make sure to position the fan so it will spin freely when the motor is in operation Note You may need to enlarge the mount holes...

Страница 15: ...the 25 680mm wire for the battery onto the speed control and protect with heat shrink tubing 5 Route the lead and battery wires from the speed control through the opening made in the aileron servo ins...

Страница 16: ...the radio system to check the operation of the motor If the motor operates in the wrong direction follow the instructions to correct the problem Note Use caution around the motor while testing the di...

Страница 17: ...ting the fan Use rubber bands and clamps to hold the foam nacelles in position until the epoxy fully cures 9 Tuck the wires neatly into the wire channels Trim the foam if necessary to fit the connecti...

Страница 18: ...little maintaining the circumference of the shroud Reinstall the fan rotor assembly and run again There should be no rubbing at all during operation Landing Gear Installation Required Parts Wing Fuse...

Страница 19: ...tighten the setscrew enough to leave a mark on the landing gear strut Remove the gear and file a flat spot on the landing gear strut to prevent the wire from rotating on the wire 2 Apply a small amoun...

Страница 20: ...servo arm on the steering servo perpendicular to the servo Enlarge the outer hole of the servo arm using a 1 16 1 5mm drill bit Attach the Z bend of the steering pushrod into the hole 5 Position the s...

Страница 21: ...mounting plate Note The mounting blocks must be on the mounting plate If the block is not on the plate simply reposition the servo and mark the position for the blocks so they are both completely on...

Страница 22: ...o the mounting plate If not simply loosen the screw and setscrew so the wheels can be repositioned 9 Attach a 12 servo extension to the steering servo Slide the mounting plate into the fuselage Use a...

Страница 23: ...Drill bit 5 64 2mm Threadlock Medium CA 1 5mm hex wrench 1 Use hook and loop to attach the receiver inside the fuselage Plug a 6 Y harness into the rudder channel of the receiver Plug the steering ser...

Страница 24: ...levator servo into the fuse and then plug the servo into the receiver 3 Disconnect the clevises from the elevator horn and pull the pushrod wires partially out of the pushrod tubes Use side cutters to...

Страница 25: ...ervo arm using a 2mm nut and threadlock 5 Turn the radio system on and attach the servo arm to the elevator servo center the elevator trim and ensure the sub trim is zero 6 Slide the elevator pushrod...

Страница 26: ...pushrod tubes to the pushrod tube support Rudder Installation Required Parts Fuselage Pushrod connector assembly 2 Rudder w fin Servo Required Tools and Adhesives Ruler Drill 6 minute epoxy Drill bit...

Страница 27: ...and the bottom of the rudder to position it evenly 2 Use 6 minue epoxy to glue the rudder into the fuselage Allow the epoxy to fully cure before continuing 3 Enlarge the outer hole of the rudder servo...

Страница 28: ...round 1 4 6mm in front of the pushrod tube support 5 Slide the pushrod wire through the pushrod connector Center the rudder and rudder servo Secure the wire using a 3mm setscrew 6 Use medium CA to glu...

Страница 29: ...and loop strap Phillips screwdriver 1 Remove the cover from the battery opening Place the motor batteries into the fuselage Use a piece of hook and loop between the two batteries as well as between t...

Страница 30: ...washers Remember to plug in the aileron and speed controls before installing the screws 3 Plug the speed controls into the batteries Each battery will plug into its own individual speed control Once t...

Страница 31: ...back from the leading edge against the fuselage The Center of Gravity position has been marked on the bottom of the wing although the plane will be balanced inverted The battery packs can be moved for...

Страница 32: ...will have the opposite effect Moving it closer to center will decrease throw and away from center will increase throw Work with a combination of the two to achieve the closest or exact control throws...

Страница 33: ...r Airliner will cruise around effortlessly at 1 2 to 5 8 throttle for extended flights Touch and go s are easily accomplished at any time during the flight You will find you will need to use more stic...

Страница 34: ...fly my model unless it is identified with my name and address or AMA number on or in the model This does not apply to models while being flown indoors 6 I will not operate models with metal bladed pro...

Страница 35: ...tween 1 two or more AMA Chartered Clubs 2 AMA clubs and individual AMA members not associated with AMA Clubs or 3 two or more individual AMA members 6 For Combat distance between combat engagement lin...

Страница 36: ...8790 2006 Horizon Hobby Inc 4105 Fieldstone Road Champaign Illinois 61822 877 504 0233 www horizonhobby com www E fliteRC com...

Отзывы: