


19
E-flite Shoestring 15e ARF Assembly Manual
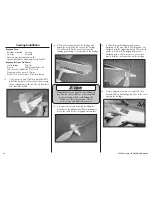
8. Use a pin vise and 5/64-inch (2mm) drill
bit to drill the two locations for the control horn
mounting screws. The locations have been pre-
drilled at the factory.
9. Secure the control horn to the rudder using two
2mm x 12mm sheet metal screws and a control
horn backplate. Tighten the screws using a #1
Phillips screwdriver.
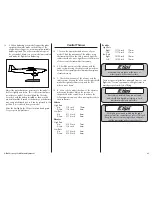
10. Use a square or straight edge to make sure
the rudder is in alignment with the fin. The clevis
attaches to the outer hole on the control horn.
Adjust the clevis as necessary so the rudder is
aligned with the fin when the rudder servo is
centered. Once aligned, use needle nose pliers to
tighten the nut against the clevis to keep it from
vibrating loose.
11. Repeat steps 3 through 10 to connect
the elevator pushrod wire. The positions and
measurements for the elevator connections are the
same as the rudder.
12. Use hook and loop tape to install the receiver in
the fuselage. Connect the rudder and elevator servo
to the receiver. Secure the remote receiver in the
fuselage using hook and loop tape.
When flying in extreme High-G racing, it may
be a good idea to use a tie-wrap (not included)
to secure the position of the receiver.