background image

QtCAM

See3CAM_80 User Manual

12-Nov-15

www.e-consystems.com

|

Subject to change without notice

Page 25 of 30

7.6.2

GPIO Controls

There is one general purpose output pin and two general purpose input pins in See3CAM_80
camera. They can be controlled by selecting the appropriate pin number from the GPI number
combo box.

7.6.2.1

General Purpose Output pin

The GPO pin’s current status is reflected in the high/low radio button when the application is
opened. The status of the output pin can be changed by clicking either one of the ‘high’ or ‘low’
radio buttons.

Содержание See3CA 80

Страница 1: ...ww e consystems com Subject to change without notice Page 1 of 30 e con Systems India Pvt Ltd RR Tower IV 7th Floor T V K Industrial Estate Guindy Chennai 600032 www e consystems com QtCAM See3CAM_80 Linux User Manual Revision 1 9 Nov 04 2015 ...

Страница 2: ...1 Ubuntu Launchpad Online 5 7 Application Features 6 7 1 Enumeration and Selection of camera device 6 7 2 Still capture 7 7 3 Video recording 8 7 4 Camera Settings 10 7 4 1 Image Quality Settings 10 7 4 2 Still Capture Settings 14 7 4 3 Video Capture Settings 17 7 5 Display Current frame rate achieved 22 7 6 Extension Settings 22 7 6 1 Focus Controls 22 7 6 2 GPIO Controls 25 7 6 3 Flash and Torch...

Страница 3: ...Ubuntu Launchpad Ubuntu 14 04 QT Application Team 1 6 29 Sep 2015 Screenshots are changed Pre Requisites are added QtCAM application menus are changed QT Application Team 1 5 05 May 2015 Application name is changed QT Application Team 1 4 09 April 2015 Review comments implemented QT Application Team 1 3 04 April 2015 Video recording and Version number screenshot updated QT Application Team 1 2 23 ...

Страница 4: ...ication QtCAM that demonstrates some of the features of this camera and can be utilized by any V4L2 application such as Skype etc 3 Scope e con provides a sample V4L2 application called QtCAM along with the See3CAM_80 camera QtCAM is V4L2 video viewer and capture software for the Linux UVC driver but is also customized to demonstrate some of the features of See3CAM_80 This document describes about...

Страница 5: ...l User Interface The application is tested in Ubuntu 12 04 LTS 32 bit and 64 bit Linux Distributions e con provides QtCAM application for the following Linux Distributions 1 Ubuntu 12 04 LTS 32 and 64 bit 2 Ubuntu 14 04 LTS 32 and 64 bit 6 Pre Requisites This section describes the high level instructions to install the See3CAM_80 on a PC 6 1 Installation of See3CAM_80 and Drivers Follow the below ...

Страница 6: ...AM application we have to run following command from the terminal sudo qtcam When application is launched home screen will look like the image below 7 Application Features The features that are supported in the current version of QtCAM are briefly described below 1 Enumeration and Selection of camera device 2 Still capture 3 Video recording 4 Camera Settings a Image Quality Settings b Still Captur...

Страница 7: ...cond instance of the QtCAM application 7 2 Still capture Application by default will begin in still capture mode If the application is in video mode click the camera icon to switch back to still capture mode The user can capture still images by clicking capture image icon available in the side bar or by clicking the preview The image will be saved in the directory path selected in the image locati...

Страница 8: ...d in the video location path The default name for recorded video file is QtCAM YY_MM_dd hh_mm_ss plus the video record extension format If the extension format is avi the filename will be QtCAM YY_MM_dd hh_mm_ss avi Once the user clicks the video record icon video recording will begin to stop recording click the stop icon which is available in the side bar During video recording user cannot change...

Страница 9: ...5 www e consystems com Subject to change without notice Page 9 of 30 Once user clicks video stop icon while recording recording will be stopped and video file will be saved in the path specified in Video Location in Video Capture Settings ...

Страница 10: ...d to configure the values the preview s property will change at that instance 7 4 1 1 Brightness Control The Brightness values can be changed from a minimum value of 4 to 4 by moving the slider and the exact changes will be reflected immediately in the preview This brightness control increases decreases the brightness of See3CAM_80 The Default value is 0 Note The brightness of the camera is increa...

Страница 11: ...tice Page 11 of 30 7 4 1 2 Contrast Control The Contrast values can be changed from a minimum value of 0 to 10 by moving the slider and the exact changes will be reflected immediately in the preview This Contrast control increases decreases the Contrast of See3CAM_80 The Default value is 5 ...

Страница 12: ...der and the exact changes will be reflected immediately in the preview This Saturation control increases the Saturation of See3CAM_80 The Default value is 3 7 4 1 4 Sharpness Control The Sharpness values can be changed from a minimum value of 1 to 5 by moving the slider and the exact changes will be reflected immediately in the preview This Sharpness control increases the Sharpness of See3CAM_80 T...

Страница 13: ...e can be selected by unchecking the check box near the white balance control The Manual White Balance values can be changed from a minimum value of 1 to 3 by moving the slider and the exact changes will be reflected immediately in the preview The Default value is 2 The Auto White Balance can be selected by selecting the check box near the white balance control ...

Страница 14: ...ardware Default This button is helpful to reset the image quality settings menu values to the hardware default state Once the user clicks the hardware default button all the control values and preview are set to the default mode 7 4 2 Still Capture Settings On selecting still capture settings the user can select color space still output size the capture image location path and image save format ty...

Страница 15: ...al 12 Nov 15 www e consystems com Subject to change without notice Page 15 of 30 7 4 2 2 Output size Four output resolution sizes are available when the device is connected in USB3 0 1 3264x2448 2 1920x1080 3 1280x720 4 640x480 ...

Страница 16: ...ange this at any point of time 7 4 2 3 Image Location The image location can be changed by clicking the folder icon or the text box A file dialog will open for the user to select the new location User has to click the open button in the file dialog to change the path The default path is System picture path home user Pictures 7 4 2 4 Image format Four image formats are available in this version 1 j...

Страница 17: ... Video Capture Settings On selecting the video capture settings the user can select their frame rate video color space preview resolution video encoder format video container Extension and the video location 7 4 3 1 Frame Rate Frame rate displayed is the maximum expected fps for the current resolution output size ...

Страница 18: ...consystems com Subject to change without notice Page 18 of 30 7 4 3 2 Color space compression Only YUYV color space is available 7 4 3 3 Output size Four output resolution sizes are available in USB3 0 1 2592x1944 2 1920x1080 3 1280x720 4 640x480 ...

Страница 19: ...review output size will be selected but the user can change this at any point of time The preview will be updated as per the selected output size USB mode Resolution YUYV USB 3 0 3264x2448 1920x1080 1280x720 640x480 11 30 30 30 USB 2 0 3264x2448 1280x720 1 5 10 7 4 3 4 Video record format Two video formats are available in this version 1 mkv 2 avi ...

Страница 20: ... consystems com Subject to change without notice Page 20 of 30 7 4 3 5 Video Encoder Format There are four video encoder formats available in this version YUY Raw MJPEG H264 VP8 The video will be recorded in any one of the selected encoder format ...

Страница 21: ...21 of 30 7 4 3 6 Video Location The video location can be changed by clicking the folder icon or the text box A file dialog will open for the user to select the new location User has to click the open button in the file dialog to change the path The default path is System video path home user Videos ...

Страница 22: ...The See3CAM_80 camera has some additional controls and features and these are not quite common controls and hence they are not included in the standard UVC controls but Listed as Extension controls The Extension settings tab is used to select these extended HID controls of See3CAM_80 It can be used to apply three focus modes read focus position control three General Purpose I O pins and select the...

Страница 23: ...uto Focus mode camera will be in Continuous Auto Focus mode If there is a change in the scene camera will start to focus based on the focus algorithm 7 6 1 2 Manual Focus Mode If user selects Manual focus mode user can specify the position of the lens in the range from 0 to 1022 User can also adjust the slide bar to select the manual focus position ...

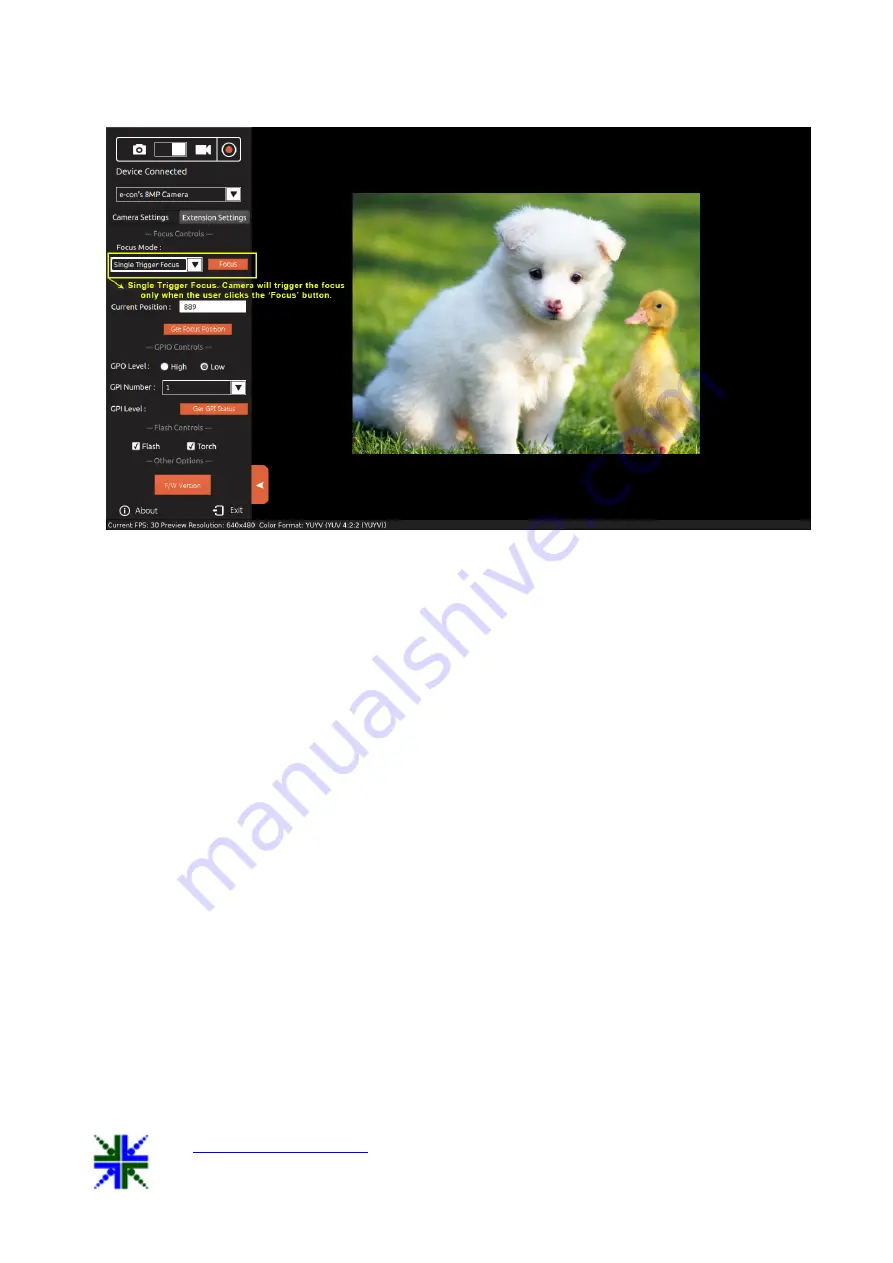
Страница 24: ... notice Page 24 of 30 User can also get back the position of the lens by clicking Get Focus Position button in the Extension settings tab 7 6 1 3 Single Trigger Focus Mode If user selects Single Trigger Focus Mode camera will trigger the focus only when the user clicks the Focus button ...

Страница 25: ...general purpose input pins in See3CAM_80 camera They can be controlled by selecting the appropriate pin number from the GPI number combo box 7 6 2 1 General Purpose Output pin The GPO pin s current status is reflected in the high low radio button when the application is opened The status of the output pin can be changed by clicking either one of the high or low radio buttons ...

Страница 26: ...om Subject to change without notice Page 26 of 30 7 6 2 2 General Purpose Input pins The input pin can be selected by choosing the pin number from the GPI number combo box The selected pin s current status is displayed either as HIGH or LOW next to GPI level ...

Страница 27: ... com Subject to change without notice Page 27 of 30 7 6 3 Flash and Torch Controls The Flash and Torch controls supported by See3CAM_80 camera are 1 Flash mode on and off 2 Torch mode on and off By default Flash and Torch modes are off in See3CAM_80 camera ...

Страница 28: ...h If Torch mode is set to on the torch LED is continuously on irrespective of external trigger Both Flash and Torch can be set to on at the same time in the application If that is the case then torch LED is continuously on and the flash LED blinks only when external trigger is pressed 7 6 4 Other Options 7 6 4 1 Firmware Version The Firmware Version button can be used to see the current firmware v...

Страница 29: ...CAM_80 User Manual 12 Nov 15 www e consystems com Subject to change without notice Page 29 of 30 8 About To know about the application name version and copyrights click the about button available in the side bar ...

Страница 30: ...x Distribution only 2 In this version Audio recording is not supported during video recording We have planned to give support for the same in near future 11 Conclusion This document provides detailed explanation on various features and options available in QtCAM application 12 Appendix 1 12 1 Keyboard Shortcuts 1 Press Key I to capture the image from keyboard 2 Use the Left arrow key and Right arr...

Отзывы: