

Quick Setup Guide I
DX-WDCMBO3 Wired Keyboard Mouse Combo
Guide d’installation rapide I
Ensemble clavier et souris avec fil DX-WDCMBO3
Guía de instalación rápida I
Combo de teclado y ratón con cable DX-WDCMBO3
Package contents
• Optical mouse
• Keyboard
•
Quick Setup Guide
System requirements
• Windows® 7, Windows Vista®, and Windows® XP
• Two available USB ports
Mouse features
Installing your mouse
To install your mouse:
•
Plug your mouse into an available USB port on your computer. The
computer automatically detects the mouse.
Cleaning your mouse and keyboard
• Wipe the mouse and keyboard with a damp, lint-free cloth.
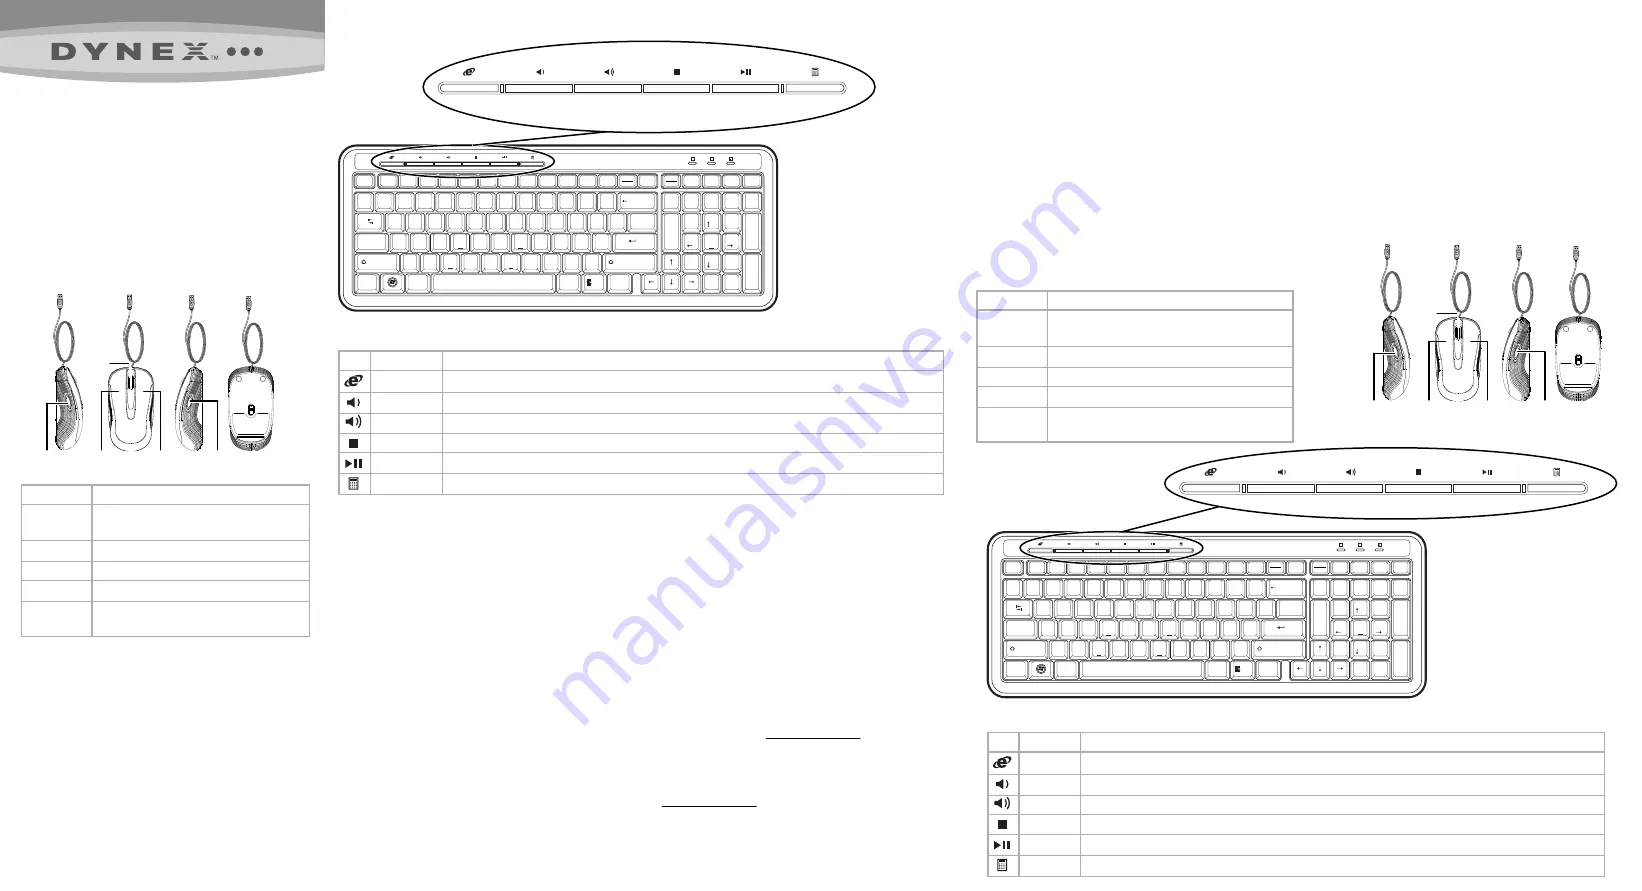
Keyboard features
Hot keys
Setting up the keyboard
• Plug the keyboard into an available USB port on your computer. Windows
automatically finds your keyboard and installs the appropriate driver.
Troubleshooting
• Make sure that your computer meets the system requirements.
• Only use the mouse on a clean, flat, non-slippery surface to ensure smooth and
accurate cursor action.
• If your computer BIOS setup has mouse options, make sure that they are set to
default settings.
FCC Part 15
This equipment has been tested and found to comply with the limits for a Class B
digital device, pursuant to Part 15 of the FCC Rules. These limits are designed to
provide reasonable protection against harmful interference in a residential
installation.
This equipment generates, uses and can radiate radio frequency energy and, if
not installed and used in accordance with the instructions, may cause harmful
interference to radio communications. However, there is no guarantee that
interference will not occur in a particular installation.
If this equipment does cause harmful interference to radio or television
reception, which can be determined by turning the equipment off and on, the
user is encouraged to try to correct the interference by one or more of the
following measure:
– Reorient or relocate the receiving antenna.
– Increase the separation between the equipment and receiver.
– Connect the equipment into an outlet on a circuit different from that to which
the receiver is connected.
– Consult the dealer or an experienced radio/TV technician for help.
Changes or modifications not expressly approved by the party responsible for
compliance could void the user’s authority to operate the equipment.
ICES-003 statement
This Class B digital apparatus complies with Canadian ICES-003;
Cet appareil numérique de la classe B est conforme à la norme NMB-003 du
Canada.
One-year limited warranty
For complete warranty, visit www.dynexproducts.com.
Contact Dynex:
For customer service call 1-800-305-2204
www.dynexproducts.com
© 2011 BBY Solutions, Inc. All Rights Reserved.
DYNEX is a trademark of BBY Solutions, Inc. Registered in some countries. All
other products and brand names are trademarks of their respective owners.
Contenu de l’emballage
• Souris optique
• Clavier
•
Guide d’installation rapide
Configuration système requise
• Windows
MD
7, Windows Vista
MD
, et Windows
MD
XP
• Deux ports USB disponibles
Caractéristiques de la souris
Fonctionnalités
du clavier
Touches de raccourci
Installation de la souris
Pour installer la souris :
•
Brancher la souris sur un port USB disponible de l’ordinateur. L’ordinateur détecte
automatiquement la souris.
Nettoyage du clavier et de la souris
• Essuyer la souris et le clavier avec un chiffon humide non-pelucheux.
Wheel
Left-side
button
Left
button
Right
button
Right-side
button
Function
Left-side
button
Left button
Wheel
Right button
Right-side
button
Description
For going back to a previously viewed item in programs
that support the “Back” command, such as Web browsers.
For left-clicking.
For scrolling.
For right-clicking.
For going to the next item in programs that support the
“Forward” command, such as Web browsers.
Molette
Bouton
latéral gauche
Bouton
gauche
Bouton
droit
Bouton
latéral droit
Fonction
Bouton latéral
gauche
Bouton gauche
Molette
Bouton droit
Bouton latéral
droit
Description
Pour revenir à la page précédente si l’application prend en charge
la commande « Page précédente », telle qu’un navigateur Web.
Pour cliquer avec le bouton gauche
Pour le défilement
Pour cliquer avec le bouton droit
Pour aller à la page suivante si l’application prend en charge la
commande « Page suivante », telle qu’un navigateur Web.
Function
Browser
Volume down
Volume up
Stop
Play/Pause
Calculator
Icon
Component
Press to start your default Web browser. If your Web browser is already open, takes the currently open tab to your home page.
Press to decrease the volume. Hold down to decrease the volume quickly.
Press to increase the volume. Hold down to increase the volume quickly.
Press to stop playing music or video.
Press to play or pause music or video. Press again to resume.
Press to open the calculator.
Esc
`
~
1
!
2
@
3
#
4
$
5
%
6
^
7
&
8
*
9
(
0
)
-
=
+
Q
W
E
R
T
Y
U
I
O
P
[
{
]
}
\
|
Break
Pause
Home
End
Up
Page
Down
Page
Back space
Tab
A
S
D
F
G
H
J
K
L
;
:
'
"
Enter
Z
X
C
V
B
N
M
,
<
.
>
/
?
Shift
Shift
Caps Lock
Insert
Num
Lock
/
*
-
7
Home
8
9
PgUp
1
End
2
3
PgDn
.
Del
0
Ins
Delete
Enter
+
5
4
6
A
1
F1
F4
F3
F2
F5
F8
F7
F6
F9
F12
F11
F10
_
Sys Rq
Prt Scr
Scroll
Lock
Ctrl
Alt
Ctrl
Alt
Fonction
Navigateur
Volume –
Arrêt
Lecture/Pause
Calculatrice
Icône
Composants
Permet de démarrer le navigateur Web par défaut. Si le navigateur Web est déjà ouvert, l’onglet déjà ouvert est redirigé vers la page d’accueil.
Permet de diminuer le volume. Appuyer et maintenir cette touche enfoncée pour diminuer le volume plus rapidement.
Permet d’augmenter le volume. Appuyer et maintenir cette touche enfoncée pour augmenter le volume plus rapidement.
Permet d'arrêter la lecture de musique ou d'une vidéo.
Permet la lecture ou l’arrêt momentané de musique ou d'une vidéo. Appuyer de nouveau sur la touche pour reprendre la lecture.
Permet d'ouvrir la calculatrice.
Esc
`
~
1
!
2
@
3
#
4
$
5
%
6
^
7
&
8
*
9
(
0
)
-
=
+
Q
W
E
R
T
Y
U
I
O
P
[
{
]
}
\
|
Break
Pause
Home
End
Up
Page
Down
Page
Back space
Tab
A
S
D
F
G
H
J
K
L
;
:
'
"
Enter
Z
X
C
V
B
N
M
,
<
.
>
/
?
Shift
Shift
Caps Lock
Insert
Num
Lock
/
*
-
7
Home
8
9
PgUp
1
End
2
3
PgDn
.
Del
0
Ins
Delete
Enter
+
5
4
6
A
1
F1
F4
F3
F2
F5
F8
F7
F6
F9
F12
F11
F10
_
Sys Rq
Prt Scr
Scroll
Lock
Ctrl
Alt
Ctrl
Alt