2
Installing the power supply
DX-520WPS
6
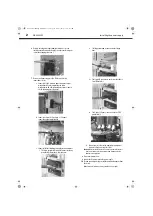
Remove the old power supply from your computer case and
install your new Dynex power supply, securing it to the computer
case with the appropriate screws.
7
Reconnect all power supply cables. Make sure that each
connection is secure.
a. Connect the 20+4-pin main power connector to your
motherboard. If your computer has an older
motherboart with a 20-pin main power socket, connect
the 20-pin main power connector.
b. Connect the 8-pin (4+4) or 4-pin +12 V power
connectors to your motherboard.
c. Connect all of the following that apply to your computer:
i.
The 4-pin peripheral device power connector to any
peripheral device with a 4-pin connector.
ii.
The floppy drive power connector to the floppy
drive.
iii. The Serial ATA connector to any devices that have a
Serial ATA interface.
iv. The 6-pin +12V power connector(s) to the PCI-E
graphic card(s).
d. Connect your case fans to the regular 4-pin peripheral
connectors if you are using these fans.
Caution
: Make sure that all connectors are securely connected. Incorrect
connections could prevent your computer from starting and could
damage some components.
8
Close your computer case.
9
Connect the AC power cord to the power supply.
10
Turn on your computer by pressing the power button on the front
of the case.
Note:
For more information, refer to your computer’s user guide.
11-0391 DX-520WPS_MAN_ENG_V1.book Page 2 Wednesday, May 11, 2011 12:30 PM


