background image

DV-7_HDRH-44-2U User’s Manual 

R201304-V10 

39 


Step 7

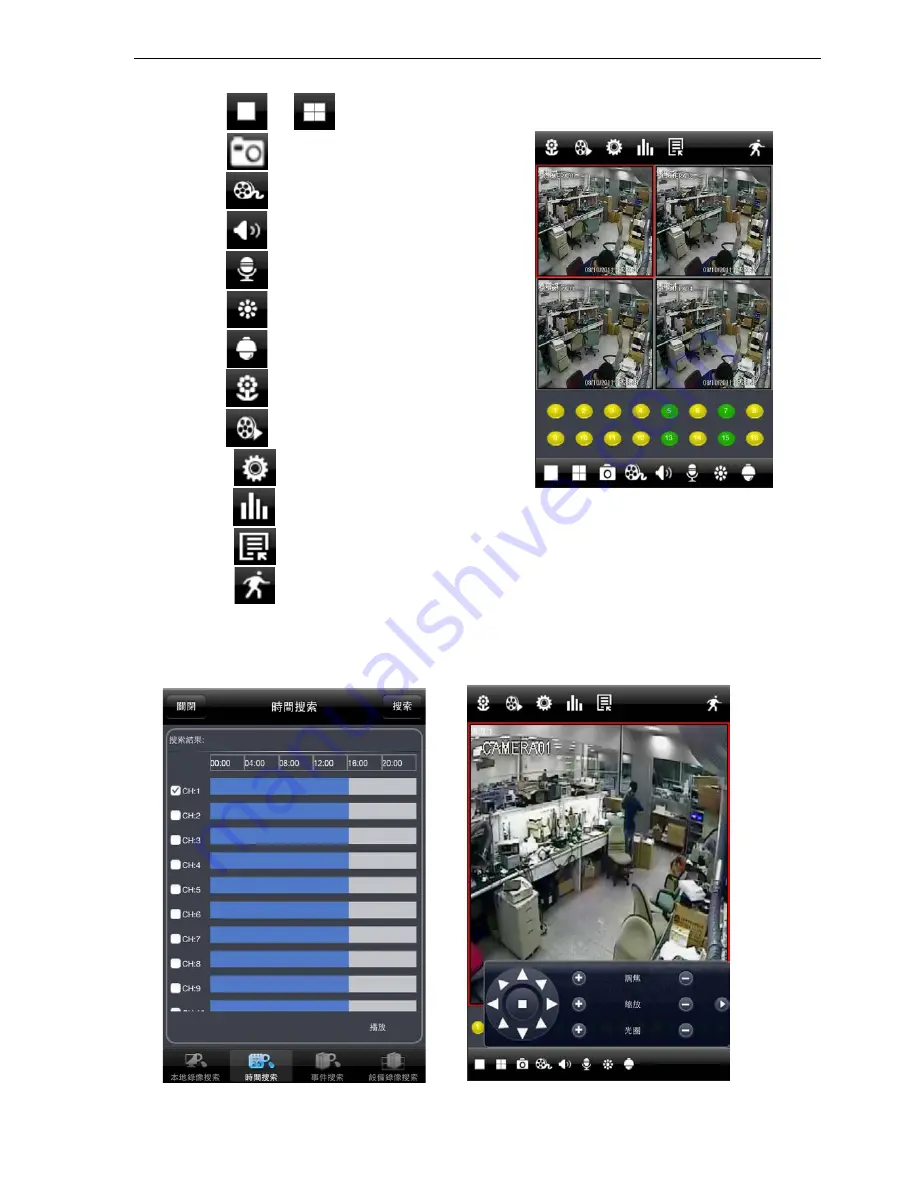
: The default quad view window will be displayed. The functions descriptions as following, 

7.

1 Click 

  or 

  to view different channel. 

7.2

 Click 

  then click “OK” to capture picture. 

7.3 

Click 

  to do local record. 

7.4

 Click 

  to get audio from DVR. 

7.5

 Click 

  to send voice to DVR 

7.6 Click 

  to do camera color adjustment. 

7.7 Click 

  to do PTZ operation. 

7.8 Click 

  to view picture. 

7.9 Click 

  to do local & remote playback. 

7.10 Click 

  to do DVR remote setting. 

7.11 Click 

  to view DVR information. 

7.12 Click 

  to edit DVR list. 

7.13 Click 

  to setup motion motion area. 


Содержание DV-7 HDRH-44-2U

Страница 1: ...DV 7_HDRH 44 2U User s Manual R201304 V10 1 HDRH 44 2U 8 CH HD Hybrid H 264 DVR 4 CH Full HD SDI 4 CH CVBS Analog User s Manual ...

Страница 2: ...DVR is to stop recording firstly and then select shut down button at the right of the menu bar to exit and finally to cut off the power This machine is indoor using equipment Do not expose the machine in rain or moist environment In case any solid or liquid get into the machine s case please cut off the power supply immediately and ask for qualified technicians to check the machine before restart ...

Страница 3: ...anager 5 4 Backup 6 Manage DVR 6 1 Check System Information 6 1 1 System Information 6 1 2 Event Information 6 1 3 Log Information 6 1 4 Network Information 6 1 5 Online Information 6 1 6 Manual Alarm 6 1 7 Disk Manager 6 1 8 Upgrade 6 1 9 Logoff 6 1 10 Shut Down 7 Remote Surveillance 7 1 Accessing DVR 7 1 1 On Lan 7 1 2 On WAN 7 2 The Remote Live Preview Interface as Below 7 3 Remote Playback Bac...

Страница 4: ...r 4 Eject Button Eject DVD 5 Digital Button 1 9 Input number 1 9 or choose camera 0 10 Input number0 10 and the above number together with other digital keys 6 Compound Button P T Z 1 Enter PTZ mode in live 2 Decrease the value in setup AUDIO 1 Control voice 2 Increase the value in setup 7 Input button Direction button Change direction to select items Multi screen Change screen display mode like1 ...

Страница 5: ...to monitor 9 USB port To connect external USB devices like USB flash USB HDD or USB mouse Recommend using for USB mouse 10 LAN Network port 11 ALARM IN Screw in connect to external sensor1 8 12 ALARM OUT Screw in 4ch relay output Connect to external alarm 13 P Z Screw in Connect to Speed Dome Y is TX Z is TX 14 K B Controller Screw in Connect to Keyboard Controller A is TX B is TX 15 E SATA Connec...

Страница 6: ...usly press 8 8 ID 0 65535 Enter 2 Make change on DVR ID Setting Go to SYSTEM MENU DEVICE ID to make change The ID must be the same on DVR For example If ID 1 Please take remote control and point to DVR then press 8 8 1 Enter Then go to SYSTEM MENU DEVICE ID change the ID 1 2 2 Mouse Control REQUIRED Connection Recommend to connect the USB mouse to the back panel Mouse functions 1 Under LIVE mode O...

Страница 7: ...without menu display please check up whether other device has menu display firstly or long press ESC key to wait for login dialog box to appear 3 1 2 Power off User can power off the device by using remote controller keyboard and mouse By remote controller Step1 press Power button the shut down window will appear click OK the unit will power off after a while Step2 disconnect the power By keyboard...

Страница 8: ...mbol in the live preview interface symbol meaning symbol meaning Green Manual record Red Alarm in trigger record Yellow Motion detection record Blue Schedule record 3 3 1 Live playback Click Play button to playback the recorded video Refer to Figure3 3 User can do concrete operation by click the buttons on screen ...

Страница 9: ...basic function Play Pause Stop frame forward fast forward fast rewind 3 Display mode 4ch 1 4 8ch 1 4 6 9 1 5 1 7 16ch 1 4 6 9 16 1 5 1 7 1 12 4 Zoom Screen digital zoom x2 5 Color Setup picture color 6 Cut Enable to select a specific part of the video and back it up on usb drive 7 Camera name Enable or disable camera name display 8 Volume Volume mute on off 9 Reduce Hide playback tool bar 10 Exit ...

Страница 10: ...configuration Show time display time in live Show wizard tick off this item there will display an opening wizard with time zone and time setup information Max network uses set the max user amount of network connection VGA resolution the resolution of live display interface range from VGA800 600 VGA1024 768 VGA1280 1024 CVBS and HDMI Note When switch between VGA CVBS and HDMI will change the menu o...

Страница 11: ... this interface user can setup camera name adjust colors brightness hue saturation and contrast Step1 enter into system configuration live configuration live refer to Fig 4 6 Fig 4 6 live configuration live Step2 tick off camera name click setting button a window will pop up as Fig 4 7 Fig 4 7 live color adjustment Step3 in this interface user can adjust brightness hue saturation and contrast in l...

Страница 12: ...picture Step5 click default button to resort default setting click apply button to save the setting click exit button to exit current interface 4 2 3 SPOT Step1 enter into system configuration live configuration SPOT refer to Fig 4 9 Fig 4 9 live configuration SPOT Step2 select split mode 1 1and channel Step3 dwell time the time interval for a certain dwell picture display switching to next dwell ...

Страница 13: ...o save the setting Delete mask area select a certain mask area click left mouse to delete that mask area click Apply button to save the setting Setup mask area Notice The mask area will not be recorded on DVR Please use this function carefully Live image mask area 4 3 Record configuration Record configuration includes five sub menus enable record bit rate time recycle record and stamp 4 3 1 Enable...

Страница 14: ...y encode and max bit stream Step3 user can setup all channels with same parameters tick off All then to do relevant setup Step4 click default button to resort default setting click apply button to save the setting click exit button to exit current interface Note if the rate value set is over high the maximum resources of the device the value will be adjusted automatically Definitions and descripti...

Страница 15: ...ation record configuration stamp refer to Fig 4 13 Fig 4 13 record configuration stamp Step2 tick off camera name time stamp click Set button user can use cursor to drag the camera name and time stamp in random positions refer to below Figures Before drag After drag Step3 user can setup all channels with same parameters tick off all then to do relevant setup Step4 click default button to resort de...

Страница 16: ...ox will pop up as Fig 4 15 user can edit week schedule Fig 4 15 schedule week schedule Click add button to add a certain day schedule click delete button to delete the selected schedule Copy user can copy the specify schedule to other dates Click OK button to save the setting click Exit button to exit current interface User can apply the schedule setting of certain channel to other or all channels...

Страница 17: ...larm configuration Alarm configuration includes five sub menus sensor motion video loss other alarm and alarm out 4 5 1 Sensor Sensor includes three sub menus basic alarm handling and schedule Basic Step1 enter into system configuration alarm configuration sensor basic refer to Fig 4 18 Fig 4 18 alarm configuration sensor basic Step2 enable sensor alarm set the alarm type according to triggered al...

Страница 18: ...elect any channel and multi channels as linked channels Click OK button to save the setting click Exit button to exit the current interface Step4 user can setup all channels with same parameters tick off all then to do relevant setup Step5 click default button to resort default setting click apply button to save the setting click exit button to exit current interface Schedule Step1 enter into syst...

Страница 19: ...ity is influenced by color and time day or night user can adjust its value according to the practical conditions click icon set the whole area as detection area click icon the set detection area will be cleared click icon user can test whether the sensitivity value and motion area are suitable accordingly refer to following picture Click icon to save the setting click icon exit current interface N...

Страница 20: ...nt interface 4 5 4 Other alarm Fig4 26 other alarm Step1 enter into system configuration other alarm refer to Fig 4 26 Step2 select a hard disk in the pull down list box when the disk capacity is lower than that value there will appear some text information on the lower right of the live image Step3 click default button to resort default setting click apply button to save the setting click exit bu...

Страница 21: ...on network Step2 HTTP port the default value is 80 If the value changed user needs to add the port number when typing IP address in IE address blank i e set HTTP port to 82 IP address http 192 168 0 25 user needs to input that address http 192 168 0 25 82 into IE browser Server port communication port There are 3 different types to connect internet please select an appropriate type to fit your net...

Страница 22: ...arameters tick off all then to do relevant setup Step4 click default button to resort default setting click apply button to save the setting click exit button to exit current interface Definitions and descriptions of network stream Parameter Meaning FPS Range from 1 30 Resolution Support CIF Quality The quality of the clients image The higher the value is the clearer the record image Six options l...

Страница 23: ... name of the registered website click TEST to test the effectively of relevant information Fig 4 32 network configuration other settings STEP2 click default button to resort default setting click apply button to save the setting click exit button to exit current interface Note The domain name server that selected by user is a banding domain name of DVR User should logon the website which provided ...

Страница 24: ...iew playback search backup log off view DVR information and change his own password 4 8 P T Z configuration P T Z configuration includes two submenus serial port and advance Serial port Step1 enter into system configuration P T Z configuration serial port refer to Fig 4 36 Fig 4 36 P T Z configuration serial port Step2 tick off Enable setup the value of address baud rate and protocol according to ...

Страница 25: ... b user can control the dome rotates up up left down right down left left down right and up right and stop rotating adjust the rotate speed and the value of zoom focus and iris of the dome c select the serial number of the preset point set the preset name Click Save button to save the settings click icon to hide the tool bar right key can remerge it click icon to exit the current interface d in th...

Страница 26: ... Exit button to exit current interface Step4 in the Advance interface click track Set button a dialog box will pop up as Fig 4 42 Fig 4 42 track set a user can control the dome rotates up up left down right down left left down right and up right and stop rotating adjust the rotate speed and the value of zoom focus and iris of the dome click Start Record button to record the move track of PTZ click...

Страница 27: ... Fig 5 2 Fig 5 2 Search configuration event search Step2 click Search button the searched event information will displayed in the event list box user can select date channel tick off Motion Sensor or All accordingly Step3 double check a certain record file to playback Note when the monitor resolution is VGA800 600 the event search interface will appear a hide button click this button the whole int...

Страница 28: ... channels click Search button the searched data will be displayed in the data backup list box Step3 checked a data file or tick off All to select all data files click Backup button a dialog box will pop up as Fig 5 5 Fig 5 5 backup information Step4 in the backup information interface user can check the relevant information of backup files storage type save file type etc click Apply button to star...

Страница 29: ...this interface user can check relevant log information according to set date refer to Fig 6 3 Fig 6 3 log information 6 1 4 Network information In this interface user can check relevant parameters of network refer to Fig 6 4 Fig 6 4 network information 6 1 5 Online information In this interface user can check the details of the current connection of online users refer to Fig 6 5 Fig 6 5 online inf...

Страница 30: ...Note all recorded files in the hard disk will be lost after formatted 6 1 8 Upgrade At present it only supports USB update Get the firmware from your vendor when there is a new firmware version and make sure it is corresponding with the DVR User can check the USB information in Disk manager 6 1 9 Logoff Click Log off icon a log off dialogue box will popup click OK button the device will log off If...

Страница 31: ...outer Step2 Enter Video to set network video parameters like resolution frame rate etc Step3 Forward IP address and port number in Virtual Server setup of the router or virtual server Close firewall Notice Forwarding block may be different in different routers and server please check your router manual If users want to utilize dynamic domain name need apply for a domain name in a DDNS server suppo...

Страница 32: ... ch at random to display the live pictures 8 channels can be selected at most Then click OK button to confirm the setting Snap pictures Click Snap icon the system will automatically capture pictures and save those pictures in the computer User should set up the save path for those picture in the Remote Preview interface Configuration Local configuration Color adjustment Drag the slide bar to adjus...

Страница 33: ...ton Click button near Focus button to have long focus Click button near Focus button to have short focus Go to the Preset Select and do auto cruise Track Auto scan Click the right mouse on the live interface a pull down menu will appear as below Fig 7 4 right key sub menu Stream this DVR supports master stream and sub stream Master stream has higher frame rate max 25FPS PAL 30 FPS NTSC for every c...

Страница 34: ...This DVR supports remote time search event search and file management By Time Search Step1 Enter into Search time search refer to Fig 7 6 Fig 7 6 time search interface Step2 click Search button The record data will be displayed in the data information list box the highlight date in the area means have record data click those data select the record channels in area Step3 User can set the data playi...

Страница 35: ...tc refer to Fig 7 7 Fig 7 7 Time search playback By Event Search Step1 Enter into Search event search refer to Fig 7 8 Fig 7 8 event search interface Step2 click the highlight date and select record channels and then tick off the event type motion and sensor click search button Step3 the events will be display in the event list box double click certain item to playback ...

Страница 36: ...ton to unlock this file Delete select an unlock file click delete button to delete this file from file list 7 3 2 Remote backup Click Backup button to enter into backup interface refers to Fig 7 10 Fig 7 10 remote backup interface Step1 select channels set the start and end time then click search button the file information will be displayed in the file list box Step2 select backup files click bro...

Страница 37: ... cannot setup this one Click Config to enter into the below interface refer to Fig 7 11 Fig 7 11 remote menu setup The sub menu lists and the options in every item are similar with those on the DVR Please refer to Chapter 3 Main Menu Setup Guide for more details Click Apply button to save above settings click default button will recover the original settings 7 5 Remote Management Remote Informatio...

Страница 38: ...p 2 Enable search function to search SuperLivePro the required programs will be displayed on the top of search box Step 3 Click SuperLivePro enter into introduce interface and click FREE it will change into INSTALL Step 4 Enter into iTunes Store password click OK will display below interface Note if it was the first time for user to operate please enter into user ID if there is no Store account us...

Страница 39: ...n click OK to capture picture 7 3 Click to do local record 7 4 Click to get audio from DVR 7 5 Click to send voice to DVR 7 6 Click to do camera color adjustment 7 7 Click to do PTZ operation 7 8 Click to view picture 7 9 Click to do local remote playback 7 10 Click to do DVR remote setting 7 11 Click to view DVR information 7 12 Click to edit DVR list 7 13 Click to setup motion motion area ...

Страница 40: ...ne On your smartphone click on the google play store icon Then press on search icon on right Type SUPERLIVEPRO with your virtual keyboard and press enter The search result will show the available applications Click on SUPERLIVEPRO a brief description of the program will be shown click on INSTALL ...

Страница 41: ...s Manual R201304 V10 41 Click on ACCEPT DOWNLOAD The program is being downloaded on your smartphone please wait The program is being installed on your smartphone The installation is finished click Open to launch the program ...

Страница 42: ...e description Item Description Playback Video file playback Image Server photo browse Log Software log Server list View and edit server list Live View camera online Settings Software configure Information Server and software information Help Help Information about software and FAQ Logoff Log off from current server Live picture interface Icon Description One screen Four screen Channel configure PT...

Страница 43: ...R is different from that of the cameras Please change DVR system format Q4 Cannot find HDD a The power of the adapter is not enough Please change an adapter to try b Connection problem Please check the power and data cables c The HDD is damaged Change a new one Q5 Cannot record a Don t format HDD Please format it manually first b Don t enable record function or incorrect setup Please refer to Chap...

Страница 44: ...ished please restart DVR to achieve Notice Do not power off in the system upgrading process Otherwise it may cause that DVR cannot start Q11 Why is the hard disk used in a DVR identified a new hard disk if directly used to another same type DVR And why must we format it again When DVR only uses one hard disk the hard disk removed from one to another same type DVR can work normally without format H...

Страница 45: ...4 Lowest 128k 45 The calculation format is Total Recording capacity Used space per hour MB h coverage rate of hard disk recording time hour channel numbers For instance one customer uses PAL cameras set resolution to CIF video quality to Lower frame rate to 25 fps for enabling total 16 channels He wants the unit to record continuously in a month Below is the calculation Total Recoding capacity 56 ...

Страница 46: ...the following information to register Username Password Confirm password Email Confirm email Subscribe to Security Image and check I agree with then please click Create Account to continue 3 DynDNS website will send an e mail to your e mail address to verify the registration 4 Click the URL Link in mailbox to activate your DDNS account ...

Страница 47: ...1304 V10 47 5 Visit DynDNS website Click Sign In to login Fill the Username and Password then click Log in 6 Enter management page select Add Host Services 7 Choose a hostname and extension name of DynDNS service then click Add To Cart ...

Страница 48: ...need to check Suggestion What do you want to use this host for Work From Home Office or VPN vpn Suggestion Hosting and Design For Web Sites and Blogs web page Suggestion Remote Access For Devices dvr Suggestion 8 Shopping cart preview page for double checking click Next to continue 9 Click Activate Services to Finish 10 DDNS activated You can also see some detail information below ...

Страница 49: ...k DDNS Server www dyndns org select User Name dvruser your account on DynDNS website as step 2 Password xxxxxx your account password on DynDNS website as step 2 Host Domain dvr4093 dyndns org you create on DynDNS website as step 7 Update Interval M 12x60 a time period to sync with DynDNS service 12x60 means 12 hr 12 You could also visit DynDNS website to check if the setting works ...

Отзывы: