background image


4

      When the above steps have been carried out, the installation procedures are complete. It now 
only remains to adjust the controls of the Adp-2 and amplifier. To do this:   

 
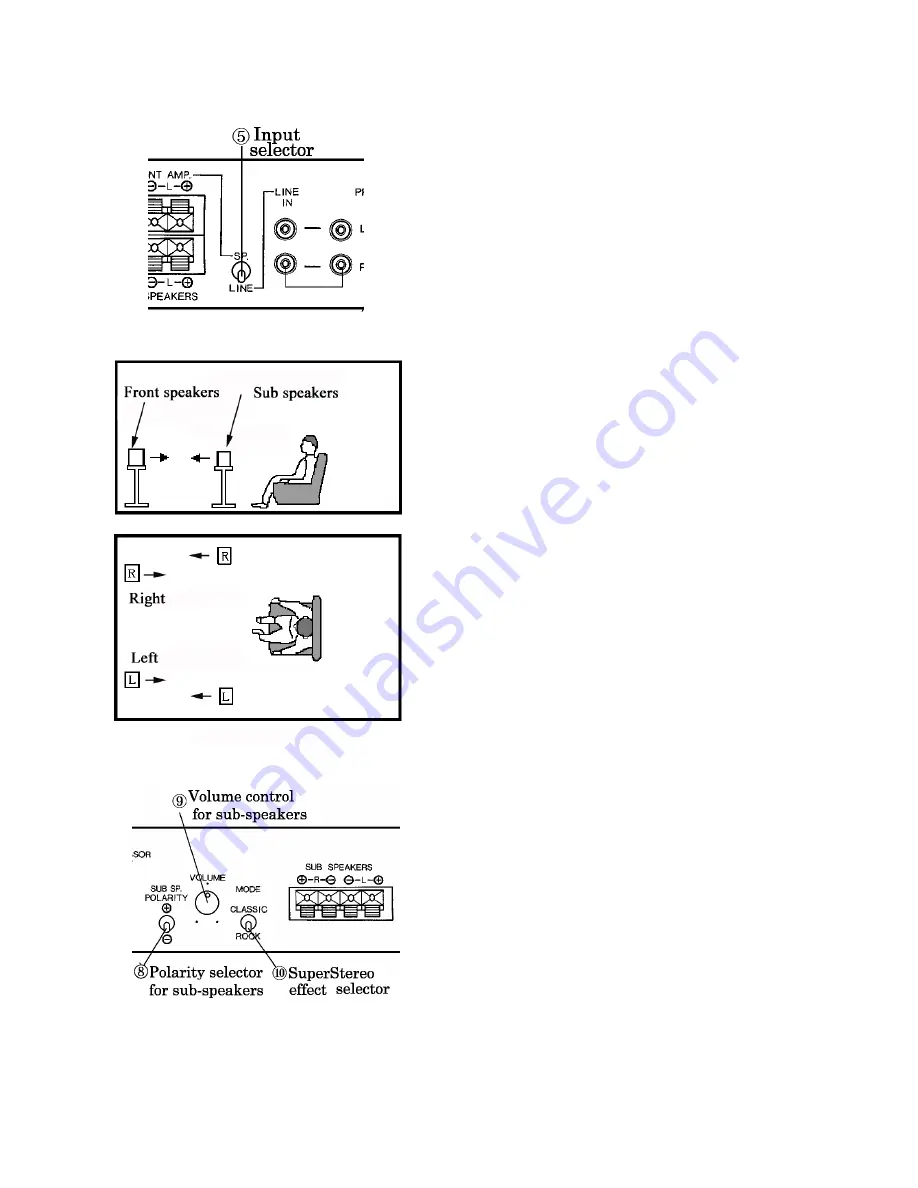
a)  Put the SP/ LINE switch on the rear panel of the 

Adp-2 ((5) in the accompanying illustrations) to 
the SP position.   

 
b)  Select either the Popular/Rock or Classic position 

using switch shown as (10).   

 
c)  Adjust the position of the sub speakers. These 

need to face towards the front speakers and for 

typical domestic listening should be between 1.5 
and 2.5 metres distant from the front speakers. 
The sub speakers are best situated at a height 
between 1.5 to 2.0 metres and they can be put 
on stands, wall shelves or even suspended from 
the ceiling. A little experimentation will soon 
determine the optimum position from the point of 
view of sound and convenience.   

 
   A great advantage of the SuperStereo system is 
that neither the room size nor the speakers 
positioning are particularly important for your listening 
enjoyment.  
 
      The best listening position is usually a little behind 
the line joining the two sub speakers. Any position 

behind the line is likely to be fine thus allowing a 
number of listeners to enjoy the benefits of the 
SuperStereo system.   
 
      Once the rear speakers have been positioned, plug 
in the amplifier and Adp-2 to the mains and switch on, 
first ensuring that the volume controls of the amplifier 
and the Adp-2 are set to a minimum.   
 
      You are now ready to play music. Adjust the volume 
controls so as to give the best results.   


Содержание DV-SS Adp-2

Страница 1: ...gardless of its scale or quality lacks the sound of the original performance There is a missing link which has been the greatest problem affecting sound reproduction SuperStereo is the first system in the long history of recorded sound to succeed in breaking through this difficult barrier The DV SS Adp 2 is designed to be straightforward to install and use so that music lovers who may not be espec...

Страница 2: ...2 ...

Страница 3: ... 2 marked TO FRONT SPEAKERS 3 Using an additional pair of speakers wires of suitable length connect one end to the Adp 2 terminals marked FROM FRONT AMP FRONT AMP means your existing amplifier 4 Connect the other end of the additional speaker wires to the speaker terminals of your existing amplifier 5 Using speaker wire connect the speaker terminals of the additional pair of speakers to the termin...

Страница 4: ...on stands wall shelves or even suspended from the ceiling A little experimentation will soon determine the optimum position from the point of view of sound and convenience A great advantage of the SuperStereo system is that neither the room size nor the speakers positioning are particularly important for your listening enjoyment The best listening position is usually a little behind the line joini...

Страница 5: ...s that the correct polarities have been observed ie the speaker wire connected to the red or terminal of the amplifier goes to the red of each of the terminals on the Adp 2 and speakers and the negative or wire to the negative terminals 6 Position the rear speakers as described above under METHOD l and ensure that the volume controls of the preamplifier and the Adp 2 are at minimum before plugging...

Страница 6: ...f the second amplifier The volume control of the Adp 2 will control the volume of the second amplifier Be sure that it is at a minimum fully anti clockwise as the rear panel faces you before switching on TAKING CARE OF YOUR ADP 2 PROCESSOR Ensure that the unit is situated so that it has adequate ventilation and that it is not exposed to excessively dusty damp or humid conditions Do not expose it t...

Страница 7: ... 4 8 ohms Delay time Digital Rock 25msec Classic 50msec Analogue 134msec 50Hz 110msec 100Hz 74msec 200Hz 36msec 500Hz 18msec 1 000Hz Reverberation analogue digital feedback gain Low pass filter mid low dispersion fc 600Hz 12dB oct high dispersion none flat Power supply voltage AC220 240 volts 50 60Hz 70VA Dimensions 430Wx63Hx230Dmm Weight 3 5kg approx Safety compliance Complies with EN 60065 1998 ...

Страница 8: ...e processor under the terms of the guarantee where a the fault is judged to have been due to accidental use misuse power surges damage in transit or where it has been used contrary to the manufacturer s introductions b repairs have been attempted by a person other than Dynavector s own service staff or other authorised personnel c where the processor has been used for hire purposes or non domestic...

Отзывы: