Dynascan DS491LT5-1 Скачать руководство пользователя страница 24

DS491LT5-1  User  Manual   

22 

display will automatically switch the 
brightness according to the time set. 

D.    When setting “Mix” mode, Timer and 

Light sensor will work at this mode.   
For example, setting "High Level Time 
= 8:00am" and "Low Level Time = 
6:00pm", the light sensor will detect 
environment brightness and then 
display will adjust the value of High 
Level during 8:00am and 6:00pm. 

High Level 

100 

Adjusts the highest brightness level.   
Range 0 

– 100. 

Low Level 

Adjusts the lowest brightness level.   
Range 0 

– 100. 

High Level Time 

08:00 

Set high level time. 

Low Level Time 

18:00 

Set low level time. 

Local Dimming 

High 

Adjusts the contrast.     
(High, Medium, Low, Off) 
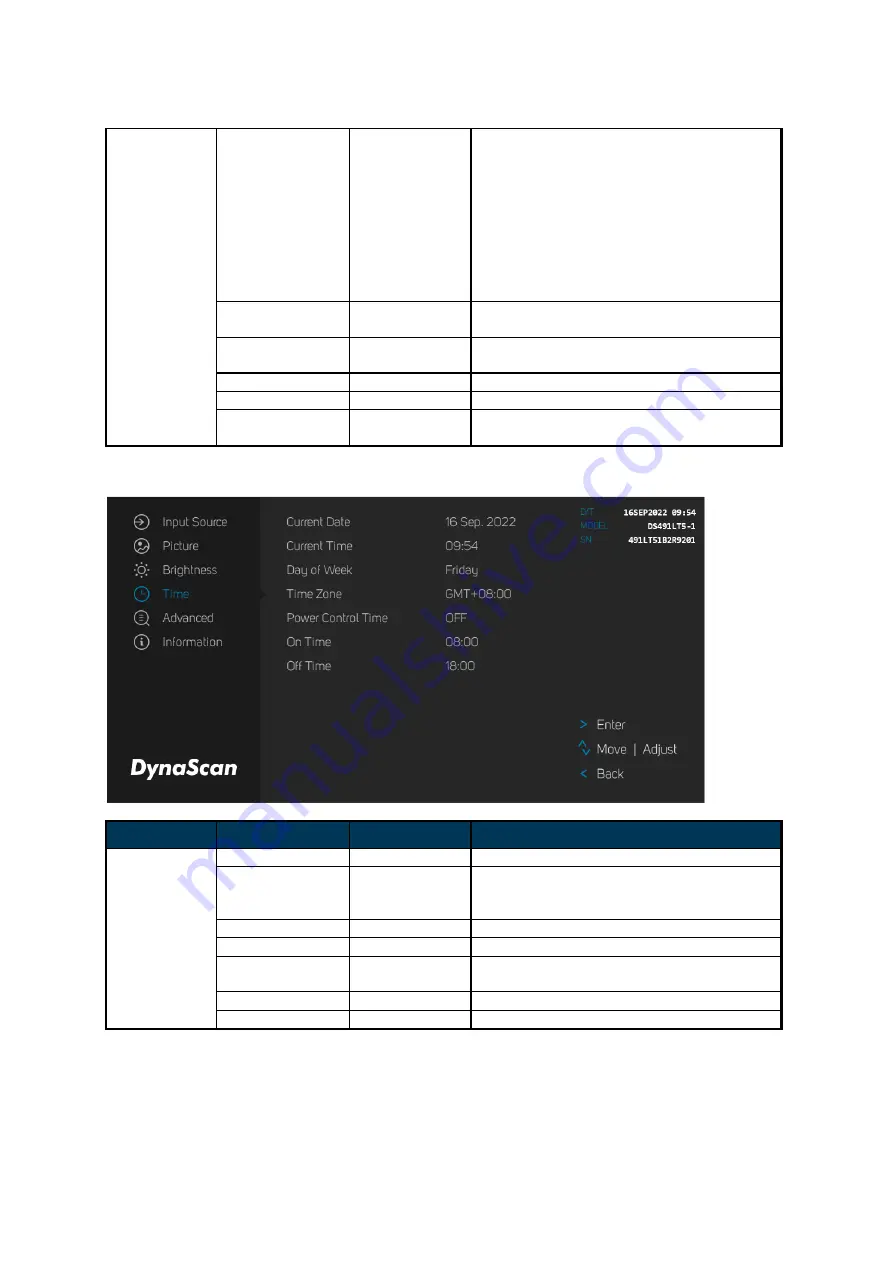
 

4. Time 


ITEM 1 

ITEM 2 

DEFAULT


DESCRIPTION


Time 

Current Date 


Set the date. 

Current Time 


Set the clock.   

Note

: The internal clock will continue to 

function when the power is turned off. 

Day of Week 


Set the day of week. (Monday to Sunday) 

Time Zone 


Set the Time Zone. 

Power Control 
Timer 

OFF 

Automatic power on / off schedule function. 

On Time 

08:00 

Set turn-on time. 

Off Time 

18:00 

Set turn-off time. 


Содержание DS491LT5-1

Страница 1: ...USER MANUAL DS491LT5 1 49 Fanless High Brightness Digital Signage Display 64909 V2 00...

Страница 2: ...ng Remote Control Batteries 8 Bien d buter 9 Contenu 9 Mise en place et remplacement des piles de la t l commande 9 Installation 10 Mounting 10 Wall Mounting 13 Connecting to a Power Source 13 Connect...

Страница 3: ...can is firmly committed to its environmental protection efforts and we believe that reducing our products impact on the environment is of the utmost importance We are dedicated to meet the latest envi...

Страница 4: ...use harmful interference in which case the user will be required to correct the interference at his own expense CAUTION Any changes or modifications not expressly approved by the grantee of this devic...

Страница 5: ...s auquel cas l utilisateur devra corriger les interf rences ses propres frais ATTENTION Tout changement ou modification non express ment approuv par le responsable de la conformit peut r voquer l auto...

Страница 6: ...while cleaning Do not use extreme force or any sharp or pointed objects to touch the display Do not drop or allow any object to fall to the display Do not operate the display with wet hands to avoid e...

Страница 7: ...ttoyage N exercez pas une force excessive et n utilisez pas d objets tranchants ou pointus pour toucher l cran Ne laissez pas tomber l cran et ne laissez aucun objet tomber dessus Afin d viter tout ch...

Страница 8: ...and other particles Unplug the LCD immediately and contact a DynaScan certified service professional as soon as possible when any of the following situations occurs Damaged power cord or power plug If...

Страница 9: ...e pour tout transport ult rieur Nettoyez l arri re de l cran LCD au moins une fois par mois afin d liminer la poussi re et autres particules D branchez imm diatement l cran LCD et contactez un r parat...

Страница 10: ...U S A Canada EU Except U K Japan Taiwan Voltage 120V 230V 100V 110V NEMA TYPE NEMA 5 15 CEE 7 7 NEMA 1 15 NEMA 5 15 IEC Display Plug IEC Plug TYPE IEC320 C13 Installing and Replacing Remote Control Ba...

Страница 11: ...rme de la fiche R gion tats Unis Canada UE Hors R U Japon Ta wan Tension 120V 230V 100V 110V TYPE NEMA NEMA 5 15 CEE 7 7 NEMA 1 15 NEMA 5 15 Fiche d affichage CEI TYPE fiche CEI IEC320 C13 Mise en pla...

Страница 12: ...disasters DynaScan recommends having certified professionals to evaluate the installation site and perform the mounting operation Do not to cover the vent and or the heat sink in order to ensure prope...

Страница 13: ...rotated clockwise when looking at the front of the display such that the left edge becomes the top edge Front Portrait mode Rotate the set clockwise 90 mandatory The orientation sticker can be found...

Страница 14: ...nd the outer edge of the LCD or video wall matrix from other objects to ensure proper ventilation For installations with screens inset into the wall refer to section Enclosures for cooling and ventila...

Страница 15: ...ation angle must be within 15 degrees of the vertical axis Do not install the wall mount while the power is turned on as it may cause serious injury from electrical shock Connecting to a Power Source...

Страница 16: ...Using the DP cable or HDMI cable provided insert one end into the DP IN or HDMI 1 IN HDMI 2 IN on the back of the display shown the in the diagram below Connect the other end of the DP cable HDMI cab...

Страница 17: ...f a PC or an AV device via a HDMI cable G RS 232 IN RS232C network input connection for remote control from PC H USB 2 0 port 1 Support for USB flash drive storage mouse and keyboard I USB 2 0 port 2...

Страница 18: ...perating Instructions Powering On Off the Display To turn on off the display press the power switch on the back of the display as shown in the diagram below NOTE The remote control only works when the...

Страница 19: ...ini USB port on the side of the display and aim the remote at the IR receiver as shown below Meanwhile the IR receiver on the display will be disabled The operating range of the remote control is 2 5...

Страница 20: ...r On Off MENU OSD On Off UP Move the cursor up or change the setting of selected item LEFT Exit the current selection RIGHT Select the highlighted item DOWN Move the cursor down or change the setting...

Страница 21: ...keypad ITEM DESCRIPTION MENU OSD On Off Power On Off UP Move the cursor up or change the setting of selected item DOWN Move the cursor down or change the setting of selected item LEFT Exit the current...

Страница 22: ...able when you press LEFT refer to p 19 to back to the last menu layer 1 Input Source ITEM 1 ITEM 2 DEFAULT DESCRIPTION Input Source Main HDMI 1 Set the Main input to display Failover 1 HDMI 2 Set the...

Страница 23: ...to adjust the screen gray scale Limited for video source uses 16 to 235 levels for R G B such as HDMI RGB Full for video source uses all levels from 0 to 255 levels Auto is for detecting the video sou...

Страница 24: ...tness level Range 0 100 Low Level 7 Adjusts the lowest brightness level Range 0 100 High Level Time 08 00 Set high level time Low Level Time 18 00 Set low level time Local Dimming High Adjusts the con...

Страница 25: ...und processes are still running and remote control in normal operation Sleep When placed in sleep mode background processes and remote control are not running The display is at a minimum power state w...

Страница 26: ...mport OSD Setting by USB Reset Default Setting Restore all settings to default Note It does not modify CURRENT DATE CURRENT TIME DATE OF WEEK TIME ZONE POWER ON TIME and POWER OFF TIME 6 Information I...

Страница 27: ...ode 0 5W MECHANICAL SPECS Bezel Width T B L R 8 7 8 7 8 5 8 5 mm Cabinet Color Black Monitor Dimension LxHxD 1096 7 x 627 2 x 82 3 mm Monitor Weight set package 20 kg 26 5 kg VESA Mounting Dimension 4...

Страница 28: ...Rate H Pixels V Lines 640 480 60 Hz 720 480 60 Hz 800 600 60 Hz 960 600 60 Hz 1024 768 60 Hz 1280 720 60 Hz 1280 768 60 Hz 1280 960 60 Hz 1280 1024 60 Hz 1366 768 60 Hz 1400 1050 60 Hz 1440 900 60 Hz...

Страница 29: ...DS491LT5 1 User Manual 27 Pin Assignments RS 232 Input PIN No NAME 01 Connected to 7 8 02 TXD 03 RXD 04 Connected to 6 05 GND 06 Connected to 4 07 Connected to 1 8 08 Connected to 1 7 09 NC...

Страница 30: ...age is unstable Check whether the cable is completely plugged in The remote control does not work Check whether there are batteries in the remote control Check the batteries for freshness polarity etc...

Страница 31: ...applications via USB flash drive storage SD card or Internet How to Switch to DSM365 Press the MENU button on either the rear panel control or remote control to show the OSD Use the navigation arrows...

Страница 32: ...DS491LT5 1 User Manual 30 www dynascandisplay com Copyright DynaScan Technology Inc All Rights Reserved...

Отзывы: