11
between the left wall panel and right wall panel. Push it all the way and against the
front panel. Please note that the front and rear are the long side and it doesn’t
matter which is the front or rear.
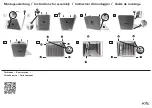
(see Figure 4)
FIG 4 Assembling Floor Panel
5.
The rear panel is ready to be installed. Remove the rear panel from the carton and
take it to the rear of the sauna room. Place the rear panel up against the left side
panel and right side panel. Use the buckles to latch the wall panels together. Pleae
note that the buckles have a guide tab that must be placed in the guide slot for
alignment.
(see Figure 5)
FIG 5
Assembling Rear Panel
6.
Locate and remove the roof panel from the carton if not already done so. Before
installing the roof panel, flop the heater cords at the top of the wall panels to the
outside of the sauna room. Open the door, lift the roof panel up and over the sauna
room, and gently lower it into place resting it on the wall panels. Make sure that all
cords/wires are slipped through the corresponding holes in the Roof Panel.
(see
FIG 6)
Содержание DYN-6308-01
Страница 24: ...24 PAGE INTENTIONALLY LEFT BLANK...


