


2
1
Main Monitor
(VGA)
A VGA output connector is offered for connecting to a VGA main
monitor.
2
Call Monitor
(BNC)
A BNC connector is provided for connecting to a call monitor.
3
Video In (BNC)
A group of BNC connectors is provided for video input streams from
installed cameras. The number of connectors equals to the number
of channels.
4
Video Out (BNC)
The same amount of BNC connectors beneath Video In (BNC) are
offered for looping out the video input.
5
Main Monitor
(BNC)
A BNC connector is provided for connecting to a main monitor.
6
Alarm I/O, RS-485 &
Audio In
The DVR provides alarm I/O, RS-485 & Audio In ports that offer
users the flexibility to connect the unit to other devices.
7
Main Monitor
(HDMI)
An HDMI connector is provided for connection to a displaying
device that transmittss data digitally to show the best video quality.
8
LAN 10/100/1000M
(RJ-45)
The
DVR
is capable of networking, and it allows the videos to be
viewed over the LAN network or the Internet via internet browsers.
9
Power Jack
Connect the power supply cord shipped with the DVR. Use of other
power supply cords may cause overloading.
16CH models:
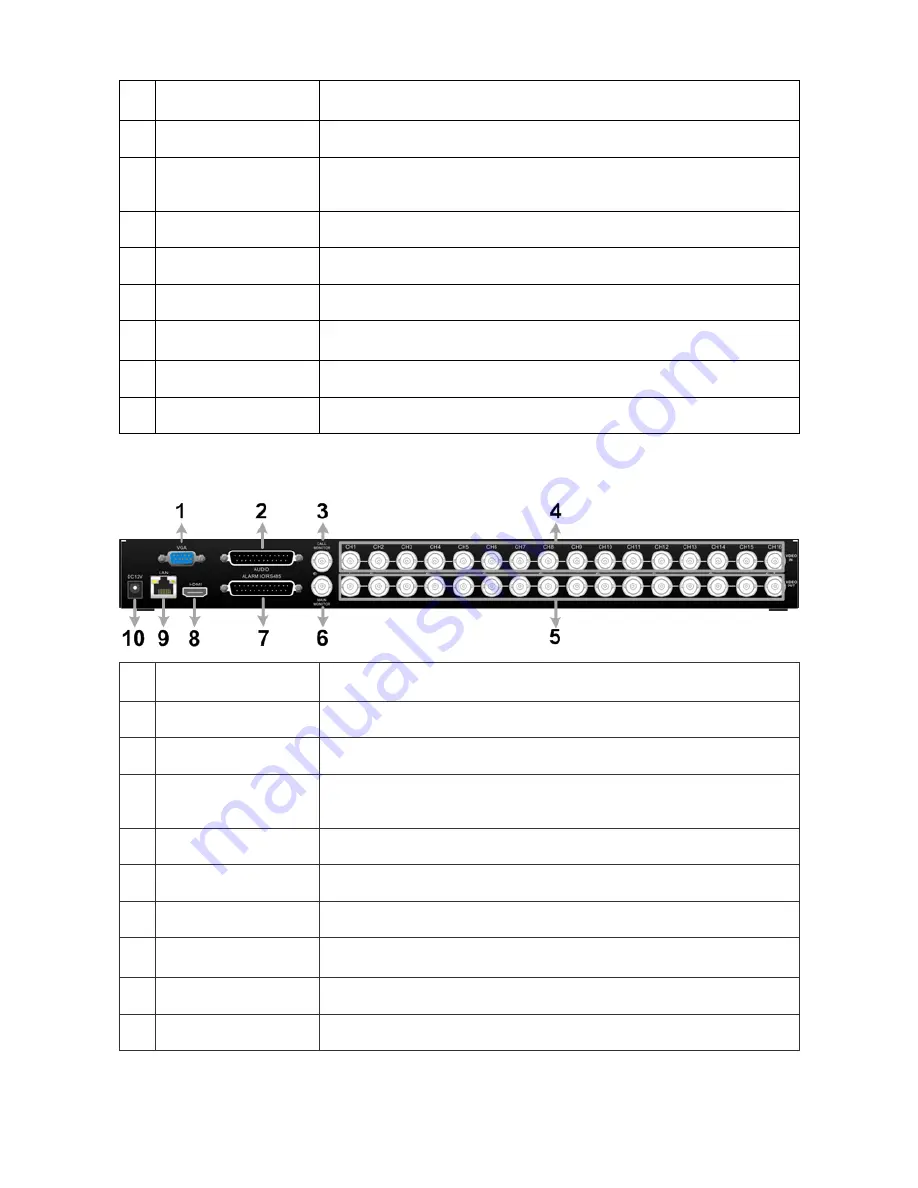
1
Main Monitor
(VGA)
A VGA output connector is offered for connecting to a VGA main
monitor.
2
Audio
An Audio connector is provided for connecting audio input devices
for all channels and audio ouput device for the Main monitor.
3
Call Monitor
(BNC)
A BNC connector is provided for connecting to a call monitor.
4
Video In (BNC)
A group of BNC connectors is provided for video input streams from
installed cameras. The number of connectors equals to the number
of channels.
5
Video Out (BNC)
The same amount of BNC connectors beneath Video In (BNC) are
offered for looping out the video input.
6
Main Monitor
(BNC)
A BNC connector is provided for connecting to a main monitor.
7
Alarm I/O & RS-485
The DVR provides alarm I/O and RS485 ports that offer users the
flexibility to connect the DVR to other devices.
8
Main Monitor
(HDMI)
An HDMI connector is provided for connection to a displaying
device that transmits data digitally to show the best video quality.
9
LAN 10/100/1000M
(RJ-45)
The
DVR
is capable of networking, and it allows the videos to be
viewed over the LAN network or the Internet via internet browsers.
10 Power Jack
Connect the power supply cord shipped with the DVR. Use of other
power supply cords may cause overloading.


