background image

Before removing a USB device from the USB Type-C™ port of your
computer, click the Safely Remove Hardware and Eject Media icon
on the Windows Taskbar, and then select the USB device that you
want to remove.

Keep foreign metal objects, such as screws, staples, and paper clips, out of
the USB Type-C™ port. Foreign metal objects can create a short circuit,
which can cause damage and fire, possibly resulting in serious injury.

HDMI™ out port

HDMI™ out port can connect with Type A
connector HDMI™ cable.

Headphone/
Microphone jack

A 3.5 mm mini headphone/microphone jack
enables connection of a monaural microphone,
stereo headphones, or a headset.

Memory media slot

This slot lets you insert a micro SD™/SDHC™/
SDXC™ memory card. Refer to the 

Memory

media

 section for more information.

Keep foreign metal objects, such as screws, staples, and paper clips, out of
the Memory media slot. Foreign metal objects can create a short circuit,
which can cause damage and fire, possibly resulting in serious injury.

Right side

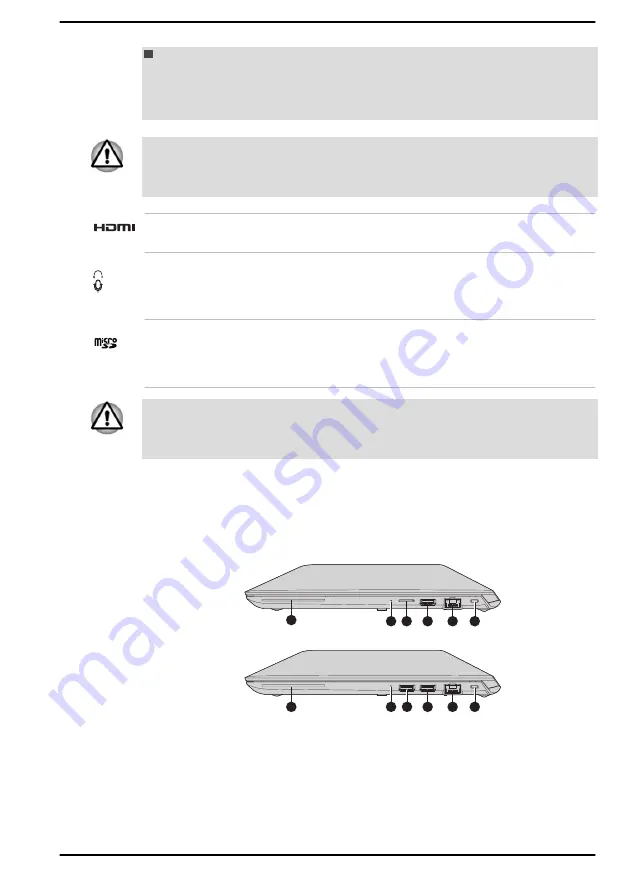
The following figures shows the right side of the computer.

Figure 3-3 The right side of the computer

4

5

2

1

3

7

4

5

6

2

1

3

1. Smart Card slot*

5. Security lock slot

2. Power indicator

6. SIM card slot*

3. Universal Serial Bus (USB 3.1 Gen1)
port

7. Universal Serial Bus (USB 3.1 Gen1)
port*

4. LAN jack


* Provided with some models.
Product appearance depends on the model you purchased.

User's Manual

3-3

Содержание TECRA A30-J

Страница 1: ...User s Manual TECRA A30 J ...

Страница 2: ...nt checklist 2 1 Conventions 2 1 Using your computer for the first time 2 2 Getting to know Windows 2 7 Turning off the power 2 9 System Recovery 2 13 Chapter 3 The Grand Tour Front with the display closed 3 1 Left side 3 1 Right side 3 3 Back 3 5 Underside 3 5 Front with the display open 3 6 Internal Hardware Components 3 9 Power Condition Descriptions 3 10 Chapter 4 Operating Basics Using the To...

Страница 3: ...nd Advanced Usage Utilities and Applications 5 1 Special features 5 8 Chapter 6 Troubleshooting Problem solving process 6 1 Hardware and system checklist 6 4 Technical support 6 15 Chapter 7 Appendix Specifications 7 1 AC Power Cord and Connectors 7 2 Information for Wireless Devices 7 3 Accessibility 7 14 Ease of Access for Dynabook notebook 7 15 Legal Footnotes 7 18 Index User s Manual iii ...

Страница 4: ...ial and distribution on a network without the permission of the copyright owner is a violation of copyright or author s rights and is subject to civil damages or criminal action Comply with copyright laws in making any reproduction from this manual Disclaimer This manual has been validated and reviewed for accuracy The instructions and descriptions it contains are accurate for your computer at the...

Страница 5: ...e reasonable protection against harmful interference in a residential installation This equipment generates uses and can radiate radio frequency energy and if not installed and used in accordance with the instructions may cause harmful interference to radio communications However there is no guarantee that interference will not occur in a particular installation If this equipment does cause harmfu...

Страница 6: ...fornia Avenue Suite 100 Irvine California USA 92617 Telephone 949 583 3000 This information is only applicable for the countries regions where it is required California Prop 65 Warning This product contains chemicals including lead known to the State of California to cause cancer and birth defects or other reproductive harm Wash hands after handling For the state of California only Export Administ...

Страница 7: ...signed to observe the applicable EMC Electromagnetic Compatibility standards However Dynabook cannot guarantee that this product still observes these EMC standards if options or cables not produced by Dynabook are connected or implemented In this case the persons who have connected implemented those options cables have to provide assurance that the system PC plus options cables still fulfils the r...

Страница 8: ... この装置は クラスB情報技術装置です この装置は 家庭環境で使 用することを目的としていますが この装置がラジオやテレビジョン 受信機に近接して使用されると 受信障害を引き起こすことがあります 取扱説明書に従って正しい取り扱いをしてください VCCI B Canadian regulatory information Canada only This digital apparatus does not exceed the Class B limits for radio noise emissions from digital apparatus as set out in the Radio Interference Regulation of the Canadian Department of Communications Note that Canadian Departme...

Страница 9: ...range FCC requires this product to be used indoors for frequency range 5 15 GHz to 5 25 GHz to reduce the potential for harmful interference to co channel Mobile Satellite systems High power radars are allocated as primary users of the 5 25 GHz to 5 35 GHz and 5 65 GHz to 5 85 GHz bands These radar stations can cause interference with and or damage this device Les dispositifs fonctionnant dans la ...

Страница 10: ...and disposed of separately from household waste Integrated batteries and accumulators can be disposed of with the product They will be separated at the recycling centres The black bar indicates that the product was placed on the market after August 13 2005 By participating in the separate collection of products and batteries you will help to assure the proper disposal of products and batteries and...

Страница 11: ...disposal ensuring that the terminal contacts are covered by non conductive tape For more detailed information about the collection and recycling programmes available in your country please visit our website http emea dynabook com environment or contact your local council office or the retail outlet where you purchased the product These symbols might not stick depending on the country and region wh...

Страница 12: ...rine getirmektedir The number of possible pixel failures of your display is defined according to ISO 9241 307 standards If the number of pixel failures is less than this standard they will not be counted as defect or failure Battery is a consumption product since the battery time depends on the usage of your computer If the battery can not be charged at all then it is a defect or failure The chang...

Страница 13: ... style Open Source licenses In case of any license issues related to OpenSSL please contact openssl core openssl org OpenSSL License Copyright c 1998 2019 The OpenSSL Project All rights reserved Redistribution and use in source and binary forms with or without modification are permitted provided that the following conditions are met 1 Redistributions of source code must retain the above copyright ...

Страница 14: ...NEGLIGENCE OR OTHERWISE ARISING IN ANY WAY OUT OF THE USE OF THIS SOFTWARE EVEN IF ADVISED OF THE POSSIBILITY OF SUCH DAMAGE This product includes cryptographic software written by Eric Young eay cryptsoft com This product includes software written by Tim Hudson tjh cryptsoft com Original SSLeay License Copyright C 1995 1998 Eric Young eay cryptsoft com All rights reserved This package is an SSL i...

Страница 15: ... thereof from the apps directory application code you must include an acknowledgement This product includes software written by Tim Hudson tjh cryptsoft com THIS SOFTWARE IS PROVIDED BY ERIC YOUNG AS IS AND ANY EXPRESS OR IMPLIED WARRANTIES INCLUDING BUT NOT LIMITED TO THE IMPLIED WARRANTIES OF MERCHANTABILITY AND FITNESS FOR A PARTICULAR PURPOSE ARE DISCLAIMED IN NO EVENT SHALL THE AUTHOR OR CONT...

Страница 16: ... You can use this software for whatever you want in parts or full form without having to pay us royalty free usage You may not pretend that you wrote this software If you use it or only parts of it in a program you must acknowledge somewhere in your documentation that you have used the FreeType code credits We specifically permit and encourage the inclusion of this software with or without modific...

Страница 17: ...HT HOLDERS BE LIABLE FOR ANY DAMAGES CAUSED BY THE USE OR THE INABILITY TO USE OF THE FREETYPE PROJECT 2 Redistribution This license grants a worldwide royalty free perpetual and irrevocable right and license to use execute perform compile display copy create derivative works of distribute and sublicense the FreeType Project in both source and object code forms and derivative works thereof for any...

Страница 18: ...s license or another one contracted with the authors grants you the right to use distribute and modify it Therefore by using distributing or modifying the FreeType Project you indicate that you understand and accept all the terms of this license 4 Contacts There are two mailing lists related to FreeType freetype nongnu org Discusses general use and applications of FreeType as well as future and wa...

Страница 19: ...e computer from Sleep Mode by pressing the power button Your ENERGY STAR certified computer should be set by default to enter a low power sleep mode after a period of inactivity Simply touching the mouse or keyboard wakes the computer in seconds These sleep features can save you up to 23 per year 200 kWh per year in electricity and prevent up to 300 pounds of greenhouse gas emissions annually To l...

Страница 20: ... heater Never cover or block the air vents including those at the base of the computer Always operate your computer on a hard flat surface Using your computer on a carpet or other soft material can block the vents Always provide sufficient space around the computer Overheating your computer or AC adaptor could cause system failure computer or AC adaptor damage or a fire possibly resulting in serio...

Страница 21: ... hot when in use but this condition does not indicate a malfunction If you need to transport the AC adaptor disconnect it and let it cool before moving it Do not lay the AC adaptor on a material that is sensitive to heat as the material could become damaged Pressure or impact damage Do not apply heavy pressure to the computer or subject it to any form of strong impact as this can damage the comput...

Страница 22: ...Do not turn on the power until condensation disappears Be careful not to subject the computer to impact or shock A failure to follow this instruction could result in damage to computer computer failure or loss of data Never transport your computer with any cards inserted This might damage either the computer and or the card resulting in computer failure Always use a suitable carry case when transp...

Страница 23: ...zardous situation which could result in death or serious injury if you do not follow instructions A caution informs you that improper use of equipment or failure to follow instructions might cause data loss equipment damage or might result in minor or moderate injury Please read A note is a hint or advice that helps you make best use of your equipment User s Manual 1 20 ...

Страница 24: ... computer taking care to save the box and packaging materials for future use Hardware Check to make sure that you have all the following items Portable Personal Computer USB C to VGA Adapter provided with some models AC adaptor and power cord 2 pin plug or 3 pin plug Cleaning cloth provided with some models Documentation Quickstart Instruction Manual for Safety and Comfort Warranty Information If ...

Страница 25: ...r use of this computer It is intended to help you be more comfortable and productive while using a notebook computer By following the recommendations in it you can reduce your chance of developing a painful or disabling injury to your hand arms shoulders or neck This section provides basic information to start using your computer It covers the following topics Connecting the AC adaptor Opening the...

Страница 26: ... correspond to both the voltage range and the frequency specified on the regulatory label of the unit Failure to do so might result in a fire or electric shock possibly resulting in serious injury Always use or purchase power cables that comply with the legal voltage and frequency specifications and requirements in the country of use Failure to do so might result in a fire or electric shock possib...

Страница 27: ... Connecting the power cord to the AC adaptor 2 pin plug Figure 2 2 Connecting the power cord to the AC adaptor 3 pin plug Either a 2 pin or 3 pin adaptor cord is included with the computer depending on the model 2 Connect the DC output plug of the AC adaptor to the DC IN 19V jack on your computer Figure 2 3 Connecting the DC output plug to the computer 1 2 1 DC IN 19V jack 2 DC output plug Product...

Страница 28: ... cord into a live wall outlet 3 Connect the DC output plug of the AC adaptor to the USB Type C port on your computer The DC IN Battery indicator glows You can also establish connection through the USB Type C adapter provided with some models Refer to the USB Type C Adapters section for more information Figure 2 6 Connecting the DC output plug to the computer 2 1 1 USB Type C port 2 DC output plug ...

Страница 29: ...slamming it shut might damage the computer Be careful not to open the display panel too far as this might put stress on the display panel s hinges and cause damage Do not lift the computer by the display panel Do not close the computer with pens or any other objects left in between the display panel and the keyboard When opening or closing the display panel place one hand on the palm rest to hold ...

Страница 30: ...on the computer 1 Open the display panel 2 Press the power button Figure 2 8 Turning on the power 1 1 Power button Product appearance depends on the model you purchased Initial setup The Windows Startup Screen is the first screen displayed when you turn on the power To install the operating system properly follow the on screen instructions on each screen When it is displayed be sure to read the li...

Страница 31: ...esktops so that running apps can be grouped for entertainment productivity or what you just want To do this click the Task view icon and then click New desktop Open the apps you want to use on that desktop To switch between desktops click Task view again Search Search on the Windows taskbar allows you to find apps files settings and more on the computer When Internet connection is available it als...

Страница 32: ...Sign in options Under Sign in options you will see options for Face Recognition and Fingerprint if your computer has fingerprint sensor and if your computer has face recognition sensor that supports it Once you have set up you will be able to sign in with a quick touch or glance You might need to add a PIN under Windows Hello PIN before you can set up Windows Hello Face and Windows Hello Fingerpri...

Страница 33: ... Turn off any peripheral devices connected to your computer Do not turn the computer or peripheral devices back on immediately Wait a short period to avoid any potential damage Restarting the computer Certain conditions require that you restart the computer for example if you change certain computer settings To restart the computer there are several ways this can be achieved Click Start Power and ...

Страница 34: ... memory devices When the AC adaptor is connected the computer will go into Sleep Mode according to the settings in the Power Options to access it click Start Windows System Control Panel System and Security Power Options If the computer enters Sleep Mode while a network application is active the application might not be restored when the computer is next turned on and the system returns from Sleep...

Страница 35: ...computer Save your data While entering Hibernation Mode the computer saves the contents of memory to the internal storage drive However for safety sake it is best to save your data manually Data will be lost if you disconnect the AC adaptor before the save is completed To prevent data loss do not switch to Hibernation Mode while transferring data to external media such as USB devices memory media ...

Страница 36: ...tton Data save in Hibernation Mode When you turn off the power in Hibernation Mode the computer takes a moment to save the current data in memory to the internal storage drive After you turn off the computer and the content of memory has been saved to the internal storage drive turn off the power to any peripheral devices Do not turn the computer or devices back on immediately Wait a moment to let...

Страница 37: ...cluding those intended to enhance internal storage drive access speed They might cause unstable operation and damage data Do not shut down log off or Sleep Hibernate while writing or rewriting the media Set the computer on a level surface and avoid places subjected to vibrations such as airplanes trains or cars Do not use on an unstable surface such as a stand A recovery image of the software on y...

Страница 38: ... AC adaptor is connected during the restoring process Do not close the display panel during the restoring process When you reinstall the Windows operating system the internal storage drive will be reformatted and all data will be lost If your model has fingerprint function before you reinstall the Windows operating system delete the registered fingerprints Otherwise same fingerprints cannot be reg...

Страница 39: ... partitions on your internal storage drive you might find that it becomes impossible to set up your computer Make sure that the AC adaptor is connected during the restoring process Do not close the display panel during the restoring process When you reinstall the Windows operating system the internal storage drive will be reformatted and all data will be lost If your model has fingerprint function...

Страница 40: ...your computer carefully to avoid scratching or damaging the surface Front with the display closed The following figure shows the front of the computer with the display panel in the closed position Figure 3 1 Front of the computer with display panel closed 1 1 1 Stereo speakers Stereo speakers The speakers emit sound generated by your software as well as audio alarms such as low battery condition g...

Страница 41: ...ry indicator shows the condition of the DC IN and the battery charge status White indicates that the battery is fully charged while the power is being correctly supplied from the AC power adaptor Refer to the Power Condition Descriptions section for more information on this feature USB Type C USB 3 1 Gen1 port One USB Type C port which complies to the USB 3 1 Gen1 standard is provided on the left ...

Страница 42: ... microphone stereo headphones or a headset Memory media slot This slot lets you insert a micro SD SDHC SDXC memory card Refer to the Memory media section for more information Keep foreign metal objects such as screws staples and paper clips out of the Memory media slot Foreign metal objects can create a short circuit which can cause damage and fire possibly resulting in serious injury Right side T...

Страница 43: ...mpatible with USB 2 0 devices Some models are equipped with this port Note that it is not possible to confirm the operation of all functions of all USB devices that are available Some functions associated with a specific device might not operate properly Before removing a USB device from the USB port of your computer click the Safely Remove Hardware and Eject Media icon on the Windows Taskbar and ...

Страница 44: ...Back The following figure shows the back of the computer Figure 3 4 The back of the computer 1 1 1 Cooling vents Product appearance depends on the model you purchased Cooling vents The cooling vents help the processor to avoid overheating Do not block the cooling vents Keep foreign metal objects such as screws staples and paper clips out of the cooling vents Foreign metal objects can create a shor...

Страница 45: ... objects can create a short circuit which can cause damage and fire possibly resulting in serious injury Carefully clean the dust on the surface of the cooling vents using a soft cloth Stereo speakers The speakers emit sound generated by your software as well as audio alarms such as low battery condition generated by the system Front with the display open This section shows the computer with the d...

Страница 46: ...hased Wireless communication antennas Depending on the configuration of your computer one of the following antennas are built in Wireless LAN Bluetooth Wireless WAN Wireless LAN Bluetooth Do not cover the wireless communication antennas area with any metal objects otherwise the wireless function might not work Legal Footnote Wireless LAN For more information regarding Wireless LAN refer to the Leg...

Страница 47: ...d to use Windows Hello Face indoors Operating outdoors might cause enrollment sign in failure due to the possible sunlight affection When enrolling your face to Windows Hello please make sure that there is no other face in preview of Windows Hello setup dialog While web camera is capturing your face make sure that your face is in front of the web camera and you look directly at it Microphones The ...

Страница 48: ... Pad control buttons The two buttons located on the bottom of the Touch Pad are used like the buttons on a standard mouse Press the left button to select a menu item or to manipulate text or graphics designated by the mouse pointer and press the right button to display a menu or other function depending on the software you are using Fingerprint Sensor This sensor enables you to enroll and sign in ...

Страница 49: ...data retention errors Legal Footnote Internal Storage Drive Capacity For more information regarding Internal Storage Drive Capacity refer to the Legal Footnotes section Power Condition Descriptions The computer operating capability and battery charge status are affected by different power conditions including whether an AC adaptor is connected and what the battery charge level is DC IN Battery ind...

Страница 50: ...e it is being charged the charge stops and the DC IN Battery indicator goes out When the temperature of the battery pack falls to a normal range charging will resume This process occurs regardless of whether the computer s power is on or off Power indicator Check the Power indicator to determine the power status of the computer The following indicator conditions should be noted White Indicates tha...

Страница 51: ...ss and hold Press your finger down and leave it there for a few seconds This shows information to help you learn more about an item or opens a menu specific to what you are doing Pinch or stretch Touch the screen or an item with two fingers and then move the fingers toward each other pinch or away from each other stretch This shows different levels of information or visually zooms in or out Rotate...

Страница 52: ...ch or damage the surface Do not use a protecting sheet for the touch screen as it might decrease its sensitivity to gestures Do not touch the screen with gloves wet hands or the tip of your fingernails as it might decrease the sensitivity The touch screen might not work correctly if part of the surface is slightly wet or covered with an object Using the Touch Pad The Touch Pad on the palm rest mig...

Страница 53: ...nce on the Touch Pad with four fingers together to open the Action Center Four Finger Scroll Place four fingers down and slide them vertically or horizontally from anywhere on the Touch Pad Slide towards left right switches between virtual desktops Slide up views all your open apps in task view Slide down shows the desktop Do not put items on the Touch Pad surface to prevent abnormal action Some o...

Страница 54: ...u purchased CAPS LOCK This indicator glows green when letter keys are locked into their uppercase format Function Keys The function keys F1 F12 are the 12 keys at the top of your keyboard Function keys let you enable or disable certain features of the computer The functions can be performed by pressing the associated function keys Key Combination Function FN F1 Enters Lock computer mode To restore...

Страница 55: ...e font sizes within one of the supported application windows FN 2 Enlarges the icon size on the desktop or the font sizes within one of the supported application windows FN 3 Decreases the playback volume of the computer FN 4 Increases the playback volume of the computer FN Space Changes the display resolution FN S Allows you to search your computer the web or within an app FN Z Toggles the mode o...

Страница 56: ...ry right mouse button Using the Fingerprint Sensor Some models are equipped with the fingerprint sensor for the purpose of enrolling and recognizing fingerprints Lightly touch and rest your finger on the fingerprint sensor to recognize fingerprints During enrollment you might need to touch and lift your finger on the sensor repeatedly until setup is complete Follow the on screen instructions to fi...

Страница 57: ...he sensor with a wet finger or any wet objects Keep the sensor surface dry and free from water vapor Do not touch the sensor with a soiled or dirty finger as minute foreign particles of dust and dirt might scratch it Do not paste stickers or write on the sensor Do not touch the sensor with a finger or any other object which might have a build up of static electricity on it Observe the following be...

Страница 58: ...nly the registered or enrolled fingerprint or fingerprints are used for identification The fingerprint sensor compares and analyzes the unique characteristics in a fingerprint However there might be instances where certain users are unable to register their fingerprints due to insufficient unique characteristics in their fingerprints The recognition success rate might differ from user to user Batt...

Страница 59: ... Do not mechanically crush or cut the battery that may result in an explosion Always dispose of used batteries according to the instructions Charging the battery When the power in the battery pack becomes low the DC IN Battery indicator flashes amber to indicate that only a few minutes of battery power remain If you continue to use the computer while the DC IN Battery indicator flashes the compute...

Страница 60: ...begin charging immediately under the following conditions The battery is extremely hot or cold if the battery is extremely hot it might not charge at all To ensure the battery charges to its full capacity charge it at room temperature of between 5 C to 35 C 41 F to 95 F The battery is nearly completely discharged In this instance leave the AC adaptor connected for a few minutes and the battery sho...

Страница 61: ...y depends on how long it can supply power on a single charge while how long the charge lasts in a battery depends on Processor speed Screen brightness Internal storage drive power off period How often and for how long you use the internal storage drive and external disk drives for example optical disc How much charge the battery contained to begin with How you use optional devices such as a USB de...

Страница 62: ...ttery indicator glows amber to indicate that the battery pack is being charged However if DC IN Battery indicator does not glow this indicates that power is not being supplied Check the connections for the AC adaptor and the power cord 5 Charge the battery pack until the DC IN Battery indicator glows white Memory media The computer is equipped with a memory media slot that can accommodate some kin...

Страница 63: ...rmat a memory card be sure to reformat it with a device such as digital camera or digital audio player that uses the memory cards not with the format command provided within Windows To format all areas of the memory card including the protected area you must obtain an appropriate application that applies the copy protection system Media care Observe the following precautions when handling the card...

Страница 64: ...efore you insert it If you insert the media in wrong direction you might not be able to remove it When inserting the memory media do not touch the metal contacts You might expose the storage area to static electricity which can destroy data Do not turn off the computer or switch to Sleep Mode or Hibernation Mode while files are being copied Failure to do so might cause data loss Removing memory me...

Страница 65: ...f 5 V Some models are equipped with a Smart Card slot on the right side of the computer The Windows hot install feature allows you to insert a Smart Card while the computer is turned on To insert a Smart Card do the following 1 Insert the Smart Card into the Smart Card slot with the metal connectors facing up 2 Press the Smart Card gently to ensure a firm connection is made When inserting a Smart ...

Страница 66: ...r 3 Locate the SIM card slot 4 To pop the SIM card tray partially open insert a slender object about 10mm diameter 0 8mm such as a straightened paper clip into the eject hole Gently pull to open the SIM card tray 5 Place the SIM card into the SIM card tray with the metal connectors facing down 6 Insert the SIM card tray into the SIM card slot and push the center of the tray to close it Press gentl...

Страница 67: ...mance of GPS varies depending on the environment Failure to pinpoint a location might happen Your current location might not be shown depending on the status of GPS or the location If you are obtaining your current location information from the computer your current location might not be detected due to the information accuracy Specifically your current location might not be detected in the follow...

Страница 68: ...ut port 1 2 1 HDMI out port 2 HDMI cable Do not plug unplug an HDMI device under the following conditions The system is starting up The system is shutting down When you unplug the HDMI cable and replug it wait at least 5 seconds before you replug the HDMI cable again Settings for display video on HDMI To view video on the HDMI display device be sure to configure the settings otherwise you might fi...

Страница 69: ...e USB Type C adapter when connecting disconnecting the AC adaptor or the USB Type C adapter If AC adaptor is connected via USB Type C adapter battery charging time might become longer Do not connect other USB Type C adapter to USB Type C port of USB Type C adapter USB C to VGA Adapter This adapter provides USB Type C port Power Delivery Charging and RGB monitor port Figure 4 7 USB C to VGA Adapter...

Страница 70: ...or via USB Type C adapter 1 2 3 4 RGB monitor port An external analog monitor can be connected to the RGB monitor port on the USB Type C adapter To connect an external analog monitor do the following 1 Connect the USB Type C adapter to the USB Type C port on your computer 2 Plug one end of the RGB cable into the RGB port of the external RGB monitor 3 Turn the external monitor s power on 4 Plug the...

Страница 71: ... Ethernet LAN 1000 megabits per second 1000BASE T This section describes how to connect disconnect to a LAN The Link speed 10 100 1000 megabits per second changes automatically depending on the network conditions connected device cable or noise and so on LAN cable types The computer must be configured properly before connecting to a LAN Logging onto a LAN using the computer s default settings migh...

Страница 72: ... connected to the computer 2 Plug one end of the cable into the LAN jack Press gently until you hear the latch click into place Figure 4 10 Connecting the LAN cable 2 1 1 LAN jack 2 LAN cable 3 Plug the other end of the cable into a LAN hub connector or router Check with your LAN administrator and hardware or software vendor before using or configuring a network connection Wireless display Your co...

Страница 73: ...vice name and then click Remove device Security lock A security lock enables you to anchor your computer to a desk or other heavy object in order to help prevent unauthorized removal or theft The computer has a security lock slot into which you can attach one end of the security cable while the other end attaches to a desk or similar object The methods used for attaching security cables differ fro...

Страница 74: ...or more details Not all the accessories are available in your region Contact your reseller or dynabook dealer for more information Sound System and Video mode This section describes some of the audio control functions Volume Mixer The Volume Mixer utility lets you control the audio volume for playback of devices and applications under Windows To launch the Volume Mixer utility right click on the s...

Страница 75: ...h usage noise may occur during video or music playback If noise occurs we recommend that you disable the eco Mode or exit applications that affect computer operation Realtek Audio Console You can confirm and change the audio configuration using the Realtek Audio Console To launch the Realtek Audio Console Click Start Realtek Audio Console Main When you launch the Realtek Audio Console the Main tab...

Страница 76: ...evice in this tab To use multi stream function do the following 1 Select Make internal and external output devices playback two different audio streams simultaneously 2 Click Start Settings System Sound 3 Click App volume and device preferences under Advanced sound options 4 Choose different output input devices for different players recorders from the drop down list Information This tab shows the...

Страница 77: ...ng system To run dynabook Settings click Start dynabook Settings This utility allows you to configure your computer settings by the following tabs Home Allows you to view the current BIOS EC version or change certain settings back to their default values eco Utility Allows you to manage the power consumption of your computer USB Charge Allows you to manage USB Charge features Keyboard Allows you t...

Страница 78: ...ife cycle of the battery might not be extended properly To access this utility click Start dynabook Settings eco Utility For details on eco Utility click Please click here for more information before you use eco Utility in this tab to see the help file USB Charging Your computer can supply USB Bus power DC5V to the USB port The port with the icon supports the following feature Power Off and Charge...

Страница 79: ...rge function is enabled the USB Wakeup function might not work for compatible ports In that case if there is a USB port that does not have the Power Off and Charge function attach the mouse or keyboard to it If all USB ports have the Power Off and Charge function change to disable Power Off and Charge function The USB Wakeup function now works but the Power Off and Charge function is disabled Meta...

Страница 80: ...System ON CDP Charge Mode is enabled your computer can supply USB bus power DC5V 1 5A to the compatible ports while the computer is turned on To set System ON CDP Charge Mode click Start dynabook Settings USB Charge Enabled Rapid USB battery charge at maximum 1 5A while PC is powered On Disabled Conventional USB battery charge while PC is powered On The System ON CDP Charge Mode might not work wit...

Страница 81: ...puter After you set the password a dialog box appears asking whether you want to save it to other media If you forget the password you can open the password file on another computer Be sure to keep the media in a safe place When entering the character string to register the password enter from the keyboard character by character and do not enter as ASCII code or copy and paste the character string...

Страница 82: ...nually The password is necessary if the computer was shut down in Hibernation mode or Boot Mode It is not needed in Sleep mode or Restart To enter a password manually do the following 1 Turn on the power as described in the Getting Started section The following dialog appears in the screen Enter Password At this point the function keys do not work They will function after you enter the password 2 ...

Страница 83: ...rvice Station The following tabs might be provided Home Allows you to view current system power consumption and temperature of your computer Software Updates Allows you to check available software updates and perform necessary operations Alerts Allows you to check available alerts Diagnostic Tools Allows you to perform tests which will help check the performance of your computer Troubleshooting Al...

Страница 84: ...lick Troubleshoot dynabook Maintenance Utility If you select the deletion method and continue with the operation you will lose all data including the operating system and recovery partition on the internal storage drives Make sure that you have already created recovery media if you want to use the computer after erasing your hard disk drive s Special features The following features are either uniq...

Страница 85: ...he computer off when the display panel is closed and turns it back on when the display panel is opened This can be specified in the Power Options Low battery automatic Hibernation Mode 1 When battery power is exhausted to the point that computer operation cannot be continued the system automatically enters Hibernation Mode and shuts itself down This can be specified in the Power Options Hibernatio...

Страница 86: ...n if necessary lowering the processor speed or by lowering the processor speed first then if necessary turning on the fan Both of these functions are controlled through the Power Options When the processor s temperature falls within normal range the fan and the processor operation returns to its standard speed If the processor s temperature reaches an unacceptably high level with either setting th...

Страница 87: ...n this chapter are meant only as a guide they are not definitive problem solving techniques In reality many problems can be solved simply but a few might require help from Technical Support If you find you need to consult others be prepared to describe the problem in as much detail as possible Preliminary checklist You should always consider the simplest solution first The items detailed in this c...

Страница 88: ...racters Make a screenshot of the current display and if possible look up the messages in the documentation included with the computer software or operating system Check that all connecting cables are correctly and firmly attached as loose cables can cause erroneous or intermittent signals Do any indicators light if so which ones what color are they and do they stay on or blink Write down what you ...

Страница 89: ...econds before turning on the power again by pressing the power button Your program stops responding If you are working with a program that suddenly freezes all operations chances are the program has stopped responding You can exit the failed program without shutting down the operating system or closing other programs To close a program that has stopped responding 1 Press CTRL ALT and DEL simultane...

Страница 90: ...ting System instead of desired advanced options do the following 1 Click Start Power and then select Restart 2 Hold down the corresponding key and then release this key just after the computer is powered on 3 Follow the on screen instructions to proceed Hardware and system checklist This section discusses problems caused by your computer s hardware or attached peripherals Basic problems might occu...

Страница 91: ...ons section for further information Problem Procedure AC adaptor does not power the computer Check the connections to make sure that the power cord adaptor is firmly connected to the computer and a working power outlet Check the condition of the cord and terminals If the cord is frayed or damaged it should be replaced while if the terminals are soiled they should be cleaned with a clean cotton clo...

Страница 92: ...ly recharge a partially charged battery the battery might not charge to its full potential In these instances you should fully discharge the battery and then attempt to charge it again Real Time Clock Problem Procedure The BIOS setting and system date time are lost The lasting time of the Real Time Clock RTC has run out You must set the date and time in the dynabook Setup Utility by using the foll...

Страница 93: ... dealer Keyboard Keyboard problems can be caused by the setup and configuration of the computer Refer to the The Keyboard section for further information Problem Procedure Output to screen is garbled Refer to your software documentation to ensure that it is not remapping the keyboard in any way remapping involves changing or reassigning the function of each key If you are still unable to use the k...

Страница 94: ...er Boot within the dynabook Setup Utility Slow performance The files on the internal storage drive might be fragmented In this instance you should run the disk defragmentation utility to check the condition of your files and the internal storage drive Refer to the operating system s documentation or online Help File for further information on operating and using the Defragmentation utility As a la...

Страница 95: ...ter waiting a short while Double tapping Touch Pad does not work In this instance you should initially try changing the double click speed setting within the Mouse Control utility 1 To access this utility click Start Windows System Control Panel Hardware and Sound Mouse 2 Within the Mouse Properties window click the Buttons tab 3 Set the double click speed as required and click OK The mouse pointe...

Страница 96: ...ouse Properties window click the Buttons tab 3 Set the double click speed as required and click OK The mouse pointer moves too fast or too slow In this instance you should initially try changing the speed setting within the Mouse Control utility 1 To access this utility click Start Windows System Control Panel Hardware and Sound Mouse 2 Within the Mouse Properties window click the Pointer Options ...

Страница 97: ...at 7 To save the changes and exit the utility press the F10 key and proceed by selecting Yes or select Exit Exit Saving Changes Yes The computer restarts immediately USB device In addition to the information in this section also refer to the documentation supplied with your USB device Problem Procedure USB device does not work Remove the USB device from the computer and then reconnect it to a free...

Страница 98: ...lowing methods Turn OFF the computer while external devices are connected Connect external devices after turning OFF of the computer If this function can still not be used change the setting to disable the function and stop using this function The battery depletes quickly even when I turned OFF the power of the computer If Power Off and Charge function is enabled the computer s battery discharges ...

Страница 99: ... or decrease volume Check the software volume settings Check to see if Mute is turned to Off Check to make sure that the headphone connection is secure Check within the Windows Device Manager application to ensure that the sound device is enabled and that the device is properly working Annoying sound is heard In this instance you might be experiencing feedback from either the internal microphone o...

Страница 100: ...o not disconnect the external monitor while the computer is in Sleep or Hibernation Mode Remember to turn off the computer before disconnecting the external monitor When the display panel and an external monitor are set to clone mode and they are turned off by the timer the display panel or the external monitor might not display when turned on again If this occurs press the function key to reset t...

Страница 101: ...luetooth Adaptor is installed in the computer The built in Bluetooth hardware cannot operate simultaneously with another Bluetooth controller If you are still unable to resolve the problem contact Technical Support Technical support If you require any additional help using your computer or if you are having problems operating the computer you might need to contact us for additional technical assis...

Страница 102: ...r assistance Consult the reseller or dealer from where you purchased your computer and or software they are your best resource for current information and support Technical support If you are still unable to solve the problem and suspect that it is hardware related read the enclosed warranty booklet or visit the technical support website http emea dynabook com support country selector User s Manua...

Страница 103: ...19 9 h millimeters not including parts that extend beyond the main body Environmental Requirements Conditions Ambient temperature Relative humidity Operating 5 C 41 F to 35 C 95 F 20 to 80 noncondensing Non operating 20 C 4 F to 60 C 140 F 10 to 90 noncondensing Wet bulb temperature 29 C maximum Conditions Altitude from sea level Operating 60 to 3 000 meters Non operating 60 to 10 000 meters maxim...

Страница 104: ...ands KEMA Denmark DEMKO Norway NEMKO Finland FIMKO Sweden SEMKO France LCIE Switzerland SEV Germany VDE United Kingdom BSI In Europe two conductors power cord must be VDE type H05VVH2 F or H03VVH2 F and for three conductors power cord must be VDE type H05VV F For the United States and Canada two pin plug configuration must be 2 15P 250 V or 1 15P 125 V and three pin plug configuration must be 6 15...

Страница 105: ...e appropriate agency Italy Approved by the appropriate agency Information for Wireless Devices Wireless Technology Interoperability The Wireless LAN is compatible with other LAN systems with Direct Sequence Spread Spectrum DSSS Orthogonal Frequency Division Multiplexing OFDM radio technology and is compliant to The IEEE 802 11 Standard on Wireless LANs Revision a b g n b g n or Revision a b g n ac...

Страница 106: ...s products like other radio devices emit radio frequency electromagnetic energy The level of energy emitted by wireless products however is far much less than the electromagnetic energy emitted by wireless devices like for example mobile phones Because wireless products operate within the guidelines found in radio frequency safety standards and recommendations Dynabook believes wireless products a...

Страница 107: ...waves can cause malfunction of such equipment possibly resulting in serious injury It might not be possible to make a network connection to a specified network name using the ad hoc network function If this occurs the new network has to be configured for all computers connected to the same network in order to re enable network connections Make sure to use new network name Security Dynabook strongl...

Страница 108: ...ency Interference Requirements This device is restricted to indoor use due to its operation in the 5 15 to 5 25GHz frequency range High power radars are allocated as primary users i e priority users of the bands 5 25 to 5 35GHz and 5 65 to 5 85GHz and that these radars could cause interference and or damage to LE LAN devices Bluetooth wireless technology Some computers in this series have Bluetoot...

Страница 109: ...ry Information The Wireless device must be installed and used in strict accordance with the manufacturer s instructions as described in the user documentation that comes with the product This product complies with the following radio frequency and safety standards Europe Restrictions for Use of 2400 0 2483 5MHz Frequencies in Europe Azerbaijan Limited implementation No license needed if used indoo...

Страница 110: ... with the following conditions Permitted to use SRD for outdoor applications without restriction on installation height only for purposes of gathering telemetry information for automated monitoring and resources accounting systems Permitted to use SRD for other purposes for outdoor applications only when the installation height is not exceeding 10m above the ground surface 3 Maximum 100mW 20dBm EI...

Страница 111: ...ecurity systems 3 Maximum EIRP density is 10mW MHz Maximum 100mW 20dBm EIRP Indoor applications is permitted to use Ukraine Limited implementation EIRP 100mW 20dBm with built in antenna s maximum gain is 6dBi Restrictions for Use of 5725 5875MHz Frequencies in Europe Russian Federation Limited implementation When duty cycle is 0 1 or using LBT Listen Before Talk technology Antenna height should no...

Страница 112: ...ncies Conducted Tx Transmit power tolerances LTE frequency band support Band 1 2100 MHz Tx 1 920 1 980 MHz 23 dBm 1 dB Rx 2 110 2 170 MHz Band 3 1800 MHz Tx 1 710 1 785 MHz 23 dBm 1 dB Rx 1 805 1 880 MHz Band 7 2600 MHz Tx 2 500 2 570 MHz 22 dBm 1 dB Rx 2 620 2 690 MHz Band 8 900 MHz Tx 880 915 MHz 23 dBm 1 dB Rx 925 960 MHz Band 20 800 MHz Tx 832 862 MHz 23 dBm 1 dB Rx 791 821 MHz WCDMA frequency...

Страница 113: ...ge susceptible de provoquer un fonctionnement indésirable Les dispositifs fonctionnant dans la bande 5 15 5 25GHz sont réservés uniquement pour une utilisation à l intérieur afin de réduire les risques de brouillage préjudiciable aux systèmes de satellites mobiles utilisant les mêmes canaux Les utilisateurs devraient aussi être avisés que les utilisateurs de radars de haute puissance sont désignés...

Страница 114: ...rs could cause interference and or damage to LE LAN devices Taiwan Article 12 Without permission granted by the NCC any company enterprise or user is not allowed to change frequency enhance transmitting power or alter original characteristic as well as performance to an approved low power radio frequency devices Article 14 The low power radio frequency devices shall not influence aircraft security...

Страница 115: ...terfere with any of the equipment listed above 2 If this equipment causes RF interference to other radio stations promptly change the frequency being used change the location of use or turn off the source of emissions 3 Contact an authorized service provider if you have problems with interference caused by this product to Other Radio Stations 2 Indication for Wireless LAN The indication shown belo...

Страница 116: ...apan Intel Wi Fi 6 AX201 The Name of the radio equipment AX201NGW DSP Research Inc Approval Number D180131003 The following restrictions apply Do not disassemble or modify the device Do not install the embedded wireless module into other device Accessibility Accessibility options provided by Windows 10 operating system are accessible through Ease of Access features of Windows settings It allows yo...

Страница 117: ... Toggle Turn on colour filters to enable or disable this feature Then select a colour filter from the menu and see which one best suits you High contrast This can be turned on using the toggle under Turn on high contrast Then choose a theme from the drop down menu to customise colour for links and button text To turn high contrast mode on or off from the sign in screen select the Ease of access bu...

Страница 118: ...or more information about Ease of Access and other accessibility features with the preloaded Windows 10 operating system click here Others Hardware Opening and closing lid can be achieved using one hand as shown below All ports used for input or output device connections are industry standards and can be used to connect to any industry standard compatible third party devices Power On Off User can ...

Страница 119: ...ipped with wireless WAN device Refer to Wireless WAN device section for more information GPS Function If your computer includes Wireless WAN device it may include GPS Refer to GPS Function section for more information HDMI out port HDMI out port digitally transfers both video and audio data and can be connected to HDMI compatible external display Refer to HDMI out port section for more information...

Страница 120: ...d problems occur you are able to use the procedures detailed in the Troubleshooting section to help determine the cause You should familiarize yourself with this section as knowing what might go wrong can help prevent problems from occurring in the first place Support Please visit our support website http emea dynabook com support country selector if you need further assistance Legal Footnotes Non...

Страница 121: ...ations might not be compatible with a 64 bit CPU operating system and therefore might not function properly Memory Main System Part of the main system memory might be used by the graphics system for graphics performance and therefore reduce the amount of main system memory available for other computing activities The amount of main system memory allocated to support graphics might vary depending o...

Страница 122: ...htness of the LCD screen will deteriorate This is an intrinsic characteristic of LCD technology Maximum brightness is only available when operating in AC power mode Screen dims when the computer is operated on battery power and you might not be able to increase the brightness of the screen Wireless LAN The transmission speed over the wireless LAN and the distance over which wireless LAN can reach ...

Страница 123: ...utomatic power off 5 8 screen 3 8 Dual Pointing Device Touch Pad 6 9 E Equipment checklist 2 1 External monitor problems 6 14 H Hard disk drive automatic power off 5 8 K Keyboard function keys 4 4 Function keys F1 F12 4 4 problems 6 7 Windows special keys 4 6 L LAN cable types 4 21 connecting 4 22 LAN jack 4 22 M Media care Card care 4 13 memory media card inserting 4 14 removing 4 14 Memory media...

Страница 124: ... 8 Internal display panel 6 7 Keyboard 6 7 Memory Media Card 6 8 Overheating power down 6 5 Power 6 4 Real Time Clock 6 6 Sound system 6 13 Technical support 6 15 Touch Pad 6 9 USB device 6 11 USB mouse 6 10 R Recovery hard disk drive 2 16 Recovery Media 2 15 S SD SDHC SDXC Card formatting 4 13 Security lock 4 23 SIM Card installing 4 16 removing 4 17 Sleep Mode setting 2 10 System automatic 5 9 S...

Отзывы: