background image

26

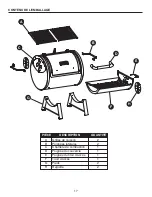
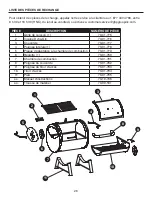
LISTE DES PIÈCES DE RECHANGE

Pour obtenir des pièces de rechange, appelez notre service à la clientèle au 1 877 447-4768, entre 

8 h 30 et 16 h 30 (HNC), du lundi au vendredi, ou écrivez à [email protected].

A

5

3

1

6

4

2

7

10

8

9

11

PIÈCE

DESCRIPTION

NUMÉRO DE PIÈCE

1

Grille de cuisson (1)

70-01-775

2

Insigne Dyna-Glo

70-01-776

3

Couvercle

70-01-777

4

Poignée latérale (1)

70-01-778

5

Plaque d’adaptation à la chambre de combustion

70-01-779

6

Registre (1)

70-01-780

7

Chambre de combustion

70-01-781

8

Poignée du couvercle

70-01-782

9

Poignée du tiroir d’accès

70-01-783

10

Tiroir d’accès

70-01-784

11

Pied

70-01-785

s.o.

Manuel d’instructions

70-10-706

s.o.

Trousse de matériel

70-09-531

Содержание DG250T

Страница 1: ...ber ________________________________ Purchase Date _________________________________ 70 10 706 Rev 10 19 18 Questions problems missing parts Before returning to your retailer call our customer service department at 1 877 447 4768 8 30 a m 4 30 p m CST Monday Friday or log on to customerservice ghpgroupinc com ...

Страница 2: ...com Use caution when lifting and moving the unit to avoid back strain or back injury Do not move the unit while it is in use DO NOT operate the unit near or under flammable or combustible materials such as decks porches or carports A minimum clearance to combustible construction is 36 in 91 4 cm from sides and back DO NOT operate the unit under overhead construction DO NOT use this smoker and gril...

Страница 3: ...oves along with long metal tongs or fireplace shovel Place the coals in aluminum foil and soak them completely with water before disposing of them in a noncombustible container Allow the unit to cool completely before conducting any routine cleaning or maintenance Refer to the Care and Maintenance section on Page 11 This product will be hot during and after use Use insulated oven mitts or gloves f...

Страница 4: ...AGE CONTENTS PART DESCRIPTION QUANTITY A Cooking Grate 2 B Side Handle 2 C Firebox Assembly 1 D Lid Handle 1 E Access Tray Handle 1 F Access Tray Assembly 1 G Leg Assembly 2 H Damper Plate 2 A A C E B D H F G ...

Страница 5: ...ents list and hardware contents above If any part is missing or damaged do not attempt to assemble the product Contact customer service for replacement parts Estimated Assembly Time 30 minutes Tools Required for Assembly not included Phillips Screwdriver Adjustable Wrench BB CC M6 x 12 Bolt Qty 12 M5 x 12 Bolt Qty 2 AA M6 Nut Qty 6 ...

Страница 6: ...C using two M6 x 12 bolts AA and two M6 nuts CC per leg Hardware Used AA M6 x 12mm Bolt x 4 2 CC AA G C CC M6 Nut x 4 1 Attach the damper plate H to the firebox assembly C using one M6 x 12 bolt AA and one M6 nut CC C AA 1 Hardware Used H AA M6 x 12mm Bolt x 1 CC M6 Nut x 1 CC ...

Страница 7: ...side of the firebox assembly using two M6 x 12 bolts AA per handle Hardware Used ASSEMBLY INSTRUCTIONS 4 Attach the lid handle D to the lid using two M6 x 12 bolts AA 4 AA M6 x 12mm Bolt x 4 3 B AA AA Hardware Used AA M6 x 12mm Bolt x 2 D ...

Страница 8: ...the access tray assembly F using two M5 x 12 bolts BB E BB 6 Hardware Used F BB M5 x 12mm Bolt x 2 5 Attach the damper plate H to the access tray assembly F using one M6 x 12 bolt AA and one M6 nut CC F AA 5 Hardware Used H AA M6 x 12mm Bolt x 1 CC M6 Nut x 1 CC ...

Страница 9: ...9 7 Slide the access tray assembly F into the firebox 8 Place the cooking grates A on the top rail of the firebox A 8 F 7 ASSEMBLY INSTRUCTIONS ...

Страница 10: ...id as recommended by the charcoal lighter fluid manufacturer After soaking the charcoal place the charcoal lighter fluid at a safe distance away from the smoker Allow the charcoal lighter fluid to soak into the charcoal for 3 minutes before lighting Make sure the access tray is pushed back into the firebox before lighting Step 2 With grill lid open stand back and carefully light charcoal and allow...

Страница 11: ... than it takes for them to completely cool remove the ashes using heat resistant gloves along with metal tongs or fire place shovel Place the ashes in aluminum foil Completely soak the ashes with water before disposing of them in a noncombustible container CAUTION All care and maintenance procedures are to be performed while the unit is completely cooled Clean the cooking grates with hot soapy wat...

Страница 12: ...ill be the responsibility of the consumer All warranty claims apply only to the original purchaser and require a proof of purchase verifying purchase date Do not return parts to GHP address without first obtaining a return authorization number from our customer service This service is available by calling toll free 1 877 447 4768 8 30 a m 4 30 p m CST Monday Friday Some states do not allow the exc...

Страница 13: ...RT 1 Cooking Grate 1pc 70 01 775 2 Dyna Glo Badge 70 01 776 3 Lid Assembly 70 01 777 4 Side Handle 1pc 70 01 778 5 Firebox Adapter Plate 70 01 779 6 Damper Plate 1pc 70 01 780 7 Firebox Assembly 70 01 781 8 Lid Handle 70 01 782 9 Access Tray Handle 70 01 783 10 Access Tray Assembly 70 01 784 11 Leg Assembly 70 01 785 n a Instruction Manual 70 10 706 n a Hardware Pack 70 09 531 A 5 3 1 6 4 2 7 10 8...

Страница 14: ..._______________________ Date d achat _________________________________ 70 10 706 Rév 19 10 2018 Des questions un problème ou des pièces manquantes Avant de retourner l article au détaillant appelez notre service à la clientèle au 1 877 447 4768 entre 8 h 30 et 16 h 30 HNC du lundi au vendredi ou écrivez à customerservice ghpgroupinc com ...

Страница 15: ...eurs et les blessures au dos Ne déplacez jamais l appareil lorsqu il est en fonction N utilisez PAS l appareil près de matériaux inflammables ou combustibles comme une terrasse un porche ou un abri à voitures ou sous de tels matériaux Le dégagement minimum entre l appareil et les constructions combustibles sur les côtés et à l arrière est de 91 4 cm 36 po N utilisez PAS l appareil sous des constru...

Страница 16: ...dans du papier d aluminium et trempez les complètement dans l eau avant de les jeter dans un contenant incombustible Laissez l appareil refroidir complètement avant de procéder à son nettoyage et entretien habituels Pour plus de renseignements consultez la section Entretien et maintenance page 24 L appareil sera brûlant pendant et après l utilisation Utilisez des mitaines de four ou des gants isol...

Страница 17: ...L EMBALLAGE PIÈCE DESCRIPTION QUANTITÉ A Grilles de cuisson 2 B Poignées latérales 2 C Chambre de combustion 1 D Poignée du couvercle 1 E Poignée du tiroir d accès 1 F Tiroir d accès 1 G Pieds 2 H 2 A A C E B D H F G ...

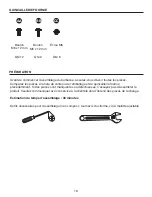
Страница 18: ...rnie précédemment Si des pièces sont manquantes ou défectueuses n essayez pas d assembler le produit Veuillez communiquer avec le service à la clientèle afin d obtenir des pièces de rechange Estimation du temps d assemblage 30 minutes Outils nécessaires pour l assemblage non compris tournevis cruciforme clé à molette ajustable BB CC Boulon M6 x 12 mm Qté 12 Boulon M5 x 12 mm Qté 2 AA Écrou M6 Qté ...

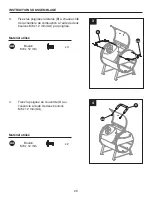
Страница 19: ...eux boulons M6 x 12 mm AA et de deux écrous M6 CC Matériel utilisé AA Boulon M6 x 12 mm x 4 2 CC AA G C CC Écrou M6 x 4 1 Fixez le registre H à la chambre de combustion C à l aide d un boulon M6 x 12 mm AA et d un écrou M6 CC C AA 1 Matériel utilisé H AA Boulon M6 x 12 mm x 1 CC Écrou M6 x 1 CC ...

Страница 20: ...uvercle à l aide de deux boulons M6 x 12 mm AA 4 AA Matériel utilisé AA Boulon M6 x 12 mm x 2 D 3 Fixez les poignées latérales B à chaque côté de la chambre de combustion à l aide de deux boulons M6 x 12 mm AA par poignée Matériel utilisé AA Boulon M6 x 12 mm x 4 3 B AA ...

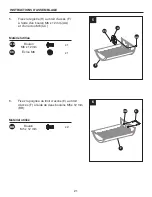
Страница 21: ...de deux boulons M5 x 12 mm BB E BB 6 Matériel utilisé F BB Boulon M5 x 12 mm x 2 INSTRUCTIONS D ASSEMBLAGE 5 Fixez le registre H au tiroir d accès F à l aide d un boulon M6 x 12 mm AA et d un écrou M6 CC F AA 5 Matériel utilisé H AA Boulon M6 x 12 mm x 1 CC Écrou M6 x 1 CC ...

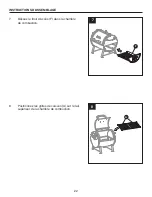
Страница 22: ...22 INSTRUCTIONS D ASSEMBLAGE 7 Glissez le tiroir d accès F dans la chambre de combustion 8 Positionnez les grilles de cuisson A sur le rail supérieur de la chambre de combustion A 8 F 7 ...

Страница 23: ... une distance sécuritaire du barbecue Laissez l allume feu liquide s imbiber dans le charbon pendant trois minutes avant l allumage Assurez vous que le tiroir d accès est bien repoussé à l intérieur de la chambre de combustion avant l allumage Étape 2 En laissant le couvercle du barbecue ouvert tenez vous à l écart allumez le charbon avec prudence et laissez le brûler jusqu à ce qu il soit recouve...

Страница 24: ...cendres à l aide de gants résistants à la chaleur de même qu à l aide de pinces en métal ou d une pelle à cendres Dyna Glo en option ou autre Placez les cendres dans du papier d aluminium Trempez les complètement dans l eau avant de les jeter dans un contenant incombustible MISE EN GARDE Toutes les procédures d entretien et de maintenance doivent être effectuées lorsque l appareil a complètement r...

Страница 25: ...té du consommateur Toutes les réclamations sous garantie s appliquent uniquement à l acheteur initial du produit et nécessitent une preuve d achat qui indique la date d achat Ne retournez aucune pièce à l adresse de GHP sans avoir obtenu au préalable un numéro d autorisation de retour de la part du service à la clientèle Pour obtenir ce service appelez sans frais au 1 877 447 4768 de 8 h 30 à 16 h...

Страница 26: ...CE DESCRIPTION NUMÉRO DE PIÈCE 1 Grille de cuisson 1 70 01 775 2 Insigne Dyna Glo 70 01 776 3 Couvercle 70 01 777 4 Poignée latérale 1 70 01 778 5 Plaque d adaptation à la chambre de combustion 70 01 779 6 Registre 1 70 01 780 7 Chambre de combustion 70 01 781 8 Poignée du couvercle 70 01 782 9 Poignée du tiroir d accès 70 01 783 10 Tiroir d accès 70 01 784 11 Pied 70 01 785 s o Manuel d instructi...

Страница 27: ...____________________ Fecha de compra _______________________________ 70 10 706 Rev 19 10 2018 Preguntas problemas piezas faltantes Antes de volver a la tienda llame a nuestro Departamento de Atención al Cliente al 1 877 447 4768 de lunes a viernes de 8 30 a m a 4 30 p m hora central estándar o escriba a customerservice ghpgroupinc com ...

Страница 28: ...a evitar un esguince o lesión en la espalda No mueva la unidad mientras esté encendida NO ponga en funcionamiento la unidad cerca ni debajo de materiales combustibles o inflamables como pisos de madera porches o cocheras La distancia mínima desde los laterales y la parte trasera hasta la estructura combustible debe ser de 36 91 4 cm NO ponga en funcionamiento la unidad debajo de estructuras aéreas...

Страница 29: ... brasas en una hoja de aluminio y mójelas por completo con agua antes de desecharlas en un contenedor no combustible Deje que la unidad se enfríe completamente antes de realizar la limpieza o el mantenimiento de rutina Consulte la sección Cuidado y mantenimiento de la página 37 Este producto estará caliente durante y después del uso Utilice manoplas o guantes aislantes para horno para protegerse d...

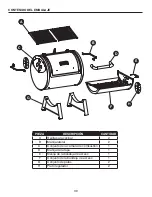
Страница 30: ...CANTIDAD A Rejilla para cocinar 2 B Manija lateral 2 C Conjunto de la cámara de combustión 1 D Manija de la tapa 1 E Manija de la bandeja de acceso 1 F Conjunto de la bandeja de acceso 1 G H Conjunto de patas Plato regulador 2 2 A A C E B D H F G ...

Страница 31: ...ornillería y herramientas de arriba Si falta alguna pieza o hay una pieza dañada no intente ensamblar el producto Comuníquese con el servicio de atención al cliente para solicitar las piezas de repuesto Tiempo estimado de ensamblaje 30 minutos Herramientas requeridas para el ensamblaje no incluidas destornillador Phillips llave ajustable BB CC Perno M6 12 Cant 12 Perno M5 12 Cant 2 AA Tuerca M6 Ca...

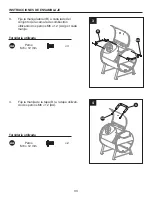
Страница 32: ...o dos pernos M6 12 AA y dos tuercas M6 CC en cada pata Tornillería utilizada AA Perno M6 12 mm 4 2 CC AA G C CC Tuerca M6 4 1 Fije el plato regulador H al conjunto de la cámara de combustión C utilizando un perno M6 12 AA y una tuerca M6 CC C AA 1 Tornillería utilizada H AA Perno M6 12 mm x 1 CC Tuerca M6 x 1 CC ...

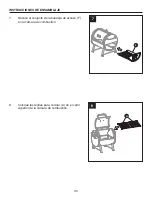
Страница 33: ...ámara de combustión utilizando dos pernos M6 12 AA por cada manija Tornillería utilizada AA Perno M6 12 mm 4 3 B AA INSTRUCCIONES DE ENSAMBLAJE 4 Fije la manija de la tapa D a la tapa utilizan do dos pernos M6 12 AA 4 AA Tornillería utilizada AA Perno M6 12 mm 2 D ...

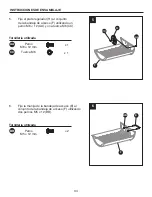
Страница 34: ...la bandeja de acceso F utilizando dos pernos M5 12 BB E BB 6 Tornillería utilizada F BB Perno M5 12 mm 2 5 Fije el plato regulador H al conjunto de la bandeja de acceso F utilizando un perno M6 12 AA y una tuerca M6 CC F AA 5 Tornillería utilizada H AA Perno M6 12 mm x 1 CC Tuerca M6 x 1 CC ...

Страница 35: ...35 7 Deslice el conjunto de la bandeja de acceso F en la cámara de combustión 8 Coloque las rejillas para cocinar A en el carril superior de la cámara de combustión A 8 F 7 INSTRUCCIONES DE ENSAMBLAJE ...

Страница 36: ...para encender carbón a una distancia segura del ahumador Deje que el líquido penetre en el carbón durante 3 minutos antes de encender Asegúrese de que la bandeja de acceso esté colocada contra la pared trasera de la cámara de combustión antes del encendido Paso 2 Con la tapa de la parrilla abierta aléjese de la unidad encienda cuidadosamente el carbón y deje que se queme hasta que quede cubierto d...

Страница 37: ...tilizando guantes resistentes al calor y una pinza de metal o pala para hogar Coloque las cenizas en una hoja de aluminio Moje las cenizas por completo con agua antes de desecharlas en un contenedor no combustible PRECAUCIÓN todos los procedimientos de cuidado y mantenimiento se realizarán con la unidad completamente fría Limpie las rejillas para cocinar con agua caliente y jabonosa Enjuague y seq...

Страница 38: ...c serán responsabilidad del consumidor Todos los reclamos en virtud de la garantía solo se aplican al comprador original y requieren una prueba de la compra que verifique la fecha de compra No devuelva piezas a la dirección de GHP sin antes obtener el número de autorización de devolución emitido por nuestro servicio al cliente Este servicio está disponible a través del número gratuito 1 877 447 47...

Страница 39: ... Rejilla para cocinar 1 pieza 70 01 775 2 Placa Dyna Glo 70 01 776 3 Conjunto de la tapa 70 01 777 4 Manija lateral 1 pieza 70 01 778 5 Plato adaptador de la cámara de combustión 70 01 779 6 Plato regulador 1 pieza 70 01 780 7 Conjunto de la cámara de combustión 70 01 781 8 Manija de la tapa 70 01 782 9 Manija de la bandeja de acceso 70 01 783 10 Conjunto de la bandeja de acceso 70 01 784 11 Conju...

Отзывы: