background image

DYMO

®

 6000 Labelmaker

10

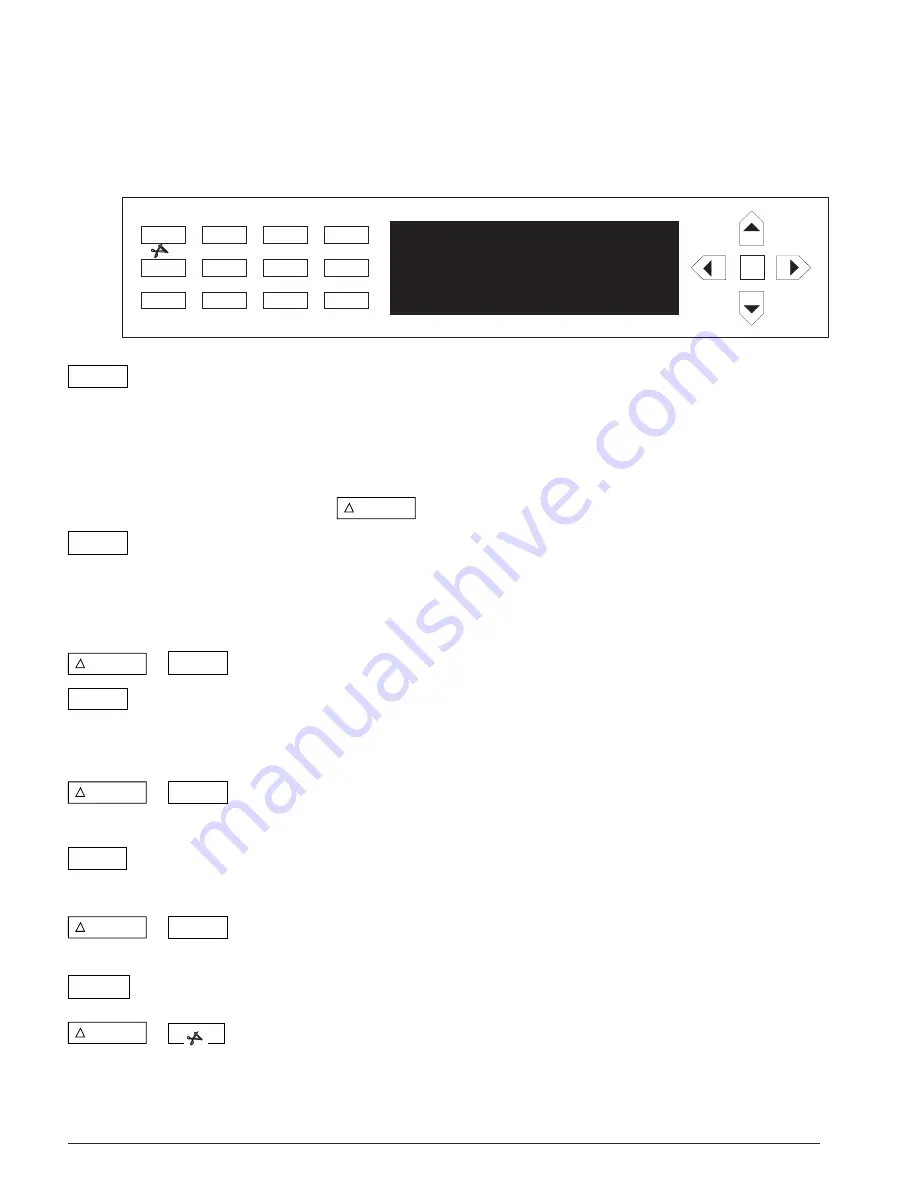
Description of keys

The keyboard

The keyboard is divided into two distinct areas:

1.

The function keys —

ON/OFF

Switches the power on and off. The Labelmaker will switch off
automatically if no keys are pressed after one minute.

The following keys have a dual function. The main function, as
printed on the key top, is performed by simply pressing the key.
For the secondary function, as printed above the key, press and
hold down 

 followed by the key required.

SIZE

Changes the character height. The height is normally adjusted
automatically as you key in the characters (see ‘Auto-scaling’). To
change the height manually, press this key repeatedly to step
through the character sizes available, as shown on the display.

 + 

SIZE

PREVIEW

Shows a view of the whole label on the display.

STYLE

A menu appears from which you can select normal (A), bold (A), or

outline 

outline 

(

A

A

) character styles, as indicated down the right hand side

of the display. The whole label will change to your chosen style.

 + 

STYLE

ITALIC

Changes the whole label into italic text (A), as indicated in the
bottom right hand corner of the display.

SYMBOL

Selects from a number of symbol characters. The selected symbol
is inserted into the label at the cursor position.

 + 

SYMBOL

BARCODE

A menu appears from which you can choose to convert the label
into a barcode label.

PRINT

Prints the label, then cuts the label at the end.

 + 

PRINT

Feeds out approximately 30mm (1

1

/

"

) of label tape, then cuts the

tape.

ON/OFF

PRINT

SIZE

STYLE

VERT

UL/BOX

BARCODE

MR

LENGTH

CASSETTE

COPIES

SYMBOL

123...n

COLOUR

M in

MC

WIDTH

ITALIC

NEW

JUSTIFY

SEARCH

PREVIEW

M

"

Содержание RhinoPRO 6000

Страница 1: ...DYMO 6000 Electronic Labelmaker User s Guide ESSELTE DYMO ...

Страница 2: ...rical business equipment UL 1950 EN 55022 Specification for limits and methods of measurement of radio interference characteristics of information technology equipment FCC pt15 J Federal communications commission radio frequency Class B emissions Written by DAW Publications Cambridge Addendum Please note that the ESC function referred to in this manual can be obtained by pressing 1 ESC or 1 ESC ...

Страница 3: ... 18 Keying in 18 Display window 19 Inserting characters 19 Deleting characters 20 Storing a label in the memory 20 Deleting a label 20 Inserting an existing label from memory 20 Editing an existing label 21 Formatting the label 22 Using the M key 22 Label sizes 23 Auto scaling 23 Character sizes 23 Text styles 25 Mixed styles and pages 25 Mixing auto scaling and fixed size text 26 Colour 26 Bar co...

Страница 4: ...m the standard Helvetica font Text can be arranged horizontally underlined outline outline or within a line box or a mix of these on any label Creation of bar code labels to a number of bar code standards with or without accompanying text Power is supplied from internal re chargeable batteries or from an external AC adaptor supplied Labels can be up to four lines deep with automatic re sizing of t...

Страница 5: ...to the cassette compartment rubber or vinyl objects on the Labelmaker for a long time as it may become stained DO clean the Labelmaker with a soft dry or damp cloth do not use any solvents use only the special AC adaptor designed for the DYMO 6000 Labelmaker disconnect from the AC power supply and remove the cassettes if the Labelmaker is not to be used for a long period of time clean the print he...

Страница 6: ...al batteries should be charged for AT LEAST 24 hours before using the machine on battery power for the first time Connect the round plug from the AC adaptor into the power input socket on the Labelmaker see Fig 1 then plug the AC adaptor into a convenient wall socket Switch on at the wall socket and leave it on charge for AT LEAST 24 hours You can use the Labelmaker with power from the AC adaptor ...

Страница 7: ...ing the AC adaptor for continuous operation The AC adaptor will also charge the internal batteries all the time it is connected to the AC supply If you have been using the Labelmaker from battery power re connect it to the AC adaptor after use to ensure that the batteries are always fully charged Note that the batteries cannot be overcharged The external interface socket at the rear of the Labelma...

Страница 8: ...all socket 2 Open the cassette compartment lid and check that both the tape and ink ribbon cassettes are fitted correctly see Fig 2 TAPE CASSETTE INK RIBBON CASSETTE Print head Ensure tape and ribbon are positioned as shown between print head and pinch roller Fig 2 Correct label tape and ink ribbon paths If no cassettes are installed or you need to change one of them see Changing cassettes page 28...

Страница 9: ...on 5 When you have finished press PRINT A label will be printed and will emerge from the slot in the left hand end of the Labelmaker Wait until the cutter mechanism has cut off the label then remove it from the machine You should now have a high quality printed name label don t waste it If this is your personal machine why not fix the label to the underside to identify its owner You have just foun...

Страница 10: ...ilable as shown on the display SIZE PREVIEW Shows a view of the whole label on the display STYLE A menu appears from which you can select normal A bold A or outline outline A A character styles as indicated down the right hand side of the display The whole label will change to your chosen style STYLE ITALIC Changes the whole label into italic text A as indicated in the bottom right hand corner of ...

Страница 11: ...or SEARCH functions COPIES Displays a small box enabling you to use or to select the number of multiple copies of a label Press ESC to cancel COPIES 123 n Enables a number label or barcode label to be incremented by 1 on each of up to 100 copies of a label Press ESC to cancel CASSETTE Press to select the correct label format for the tape cassette installed If the label format tape width are incomp...

Страница 12: ... and numerical values When editing text on a single line label pressing moves the cursor to the end of the label Pressing or moves the cursor to the beginning or end of the line Cursor keys 2 The main typewriter style keyboard The main QWERTY keyboard follows the conventional typewriter style layout Keys with single legends e g A function in the normal way with A producing UPPER CASE characters On...

Страница 13: ...cter to the left of the cursor Del Clear All Press to clear the complete label from the display If the label has already been stored in memory it will be retained unchanged All function settings e g width justify fixed length etc are retained 1 ESC or Press ESC to escape from a selection menu or function which you 1 ESC do not wish to complete You can create international language characters by co...

Страница 14: ...ill flash on and off to warn you You can continue to edit the label but there will be no response to the PRINT key CASSETTE Pressing CASSETTE enables you select the correct label format to match the label tape width installed Note however that the format of your label may be altered when you select a different width Justify L ranged left centred ranged right Auto scaling see page 23 T Fig 4 LCD di...

Страница 15: ...will change to show m m for one second to confirm If you then change the label pressing M in again will save a separate copy of the latest version of the label to the memory i e both your original label and the changed version will be stored in the memory To recall a label from memory press MR and use or to scroll through the memory until the label required is displayed You can use or to move the ...

Страница 16: ...elmaker will search for and group together all labels which include DYMO 6 Use or to search through these labels for the label required Note that the search function is not case sensitive any combination of upper and lower case letters can be used to search for any combination in a label e g dymo 6 will find DYMO 6 or Dymo 6 etc Press to place a copy of the selected label in the display at the cur...

Страница 17: ...ow around the table and to place the cursor over the character required e g Press the display will revert to your label with the selected symbol character in position Fax 284 1826 Pressing SYMBOL again will display the table with the cursor on the same symbol for repeat insertions if required Each further press of SYMBOL will switch the display between the symbols table and your label If the Label...

Отзывы: