


3
Introduction
The Dymo 1000+ Electronic Labelmaker enables
you to create a wide variety of high quality self-
adhesive labels of up to 100 characters.
The Labelmaker uses 6mm (
1
/
4
"), 9mm (
3
/
8
") or
12mm (
1
/
2
")
wide tape cassettes in a number of
label colours. Labels are tab-cut for easy removal
from the backing tape. Text can be printed
horizontally or
in a variety
of sizes and styles and is always centred on the label.
Warranty Registration
Please complete the warranty registration card and
return it to your national customer service address
within seven days– see the warranty booklet for details.
Power Supply
BATTERIES
• Apply pressure to thumb catch and open hinged
access door – see fig A, page 2.
• Insert six size AA alkaline or re-chargeable
nickel-cadmium batteries, observing the polarity
markings A
➊
, and close cover.
• Remove batteries if the Labelmaker is to be
unused for some time.
AC ADAPTOR (optional)
• Connect the AC adaptor to socket A
➋
.
Inserting
the adaptor plug disconnects the supply from
the batteries.
• Unplug the AC adaptor from the Labelmaker
before disconnecting the mains power to the
adaptor, otherwise last label memory settings
will be lost (see also ON/OFF
).
Changing the cassette
• Open hinged access door as above.
• Hold as shown, then lift cassette B
➊
straight up
and out.
• Ensure tape and ribbon B
➋
are taut across
mouth of cassette and tape passes between
guide posts before installing as shown. If
necessary, turn spool B
➌
clockwise to tighten
ribbon.
• Insert cassette and push
firmly C
➌
until it
clicks into place.
• Ensure tape and ribbon are positioned as shown
between pinch roller C
➊
and print head C
➋
.
• When using 6mm cassettes (
1
/
4
") it is necessary
to slide switch B
❹
to the left prior to inserting
cassettes. A notch in the cassette will fit over the
switch when correctly set.
v
e
r
t
i
c
a
l
l
y
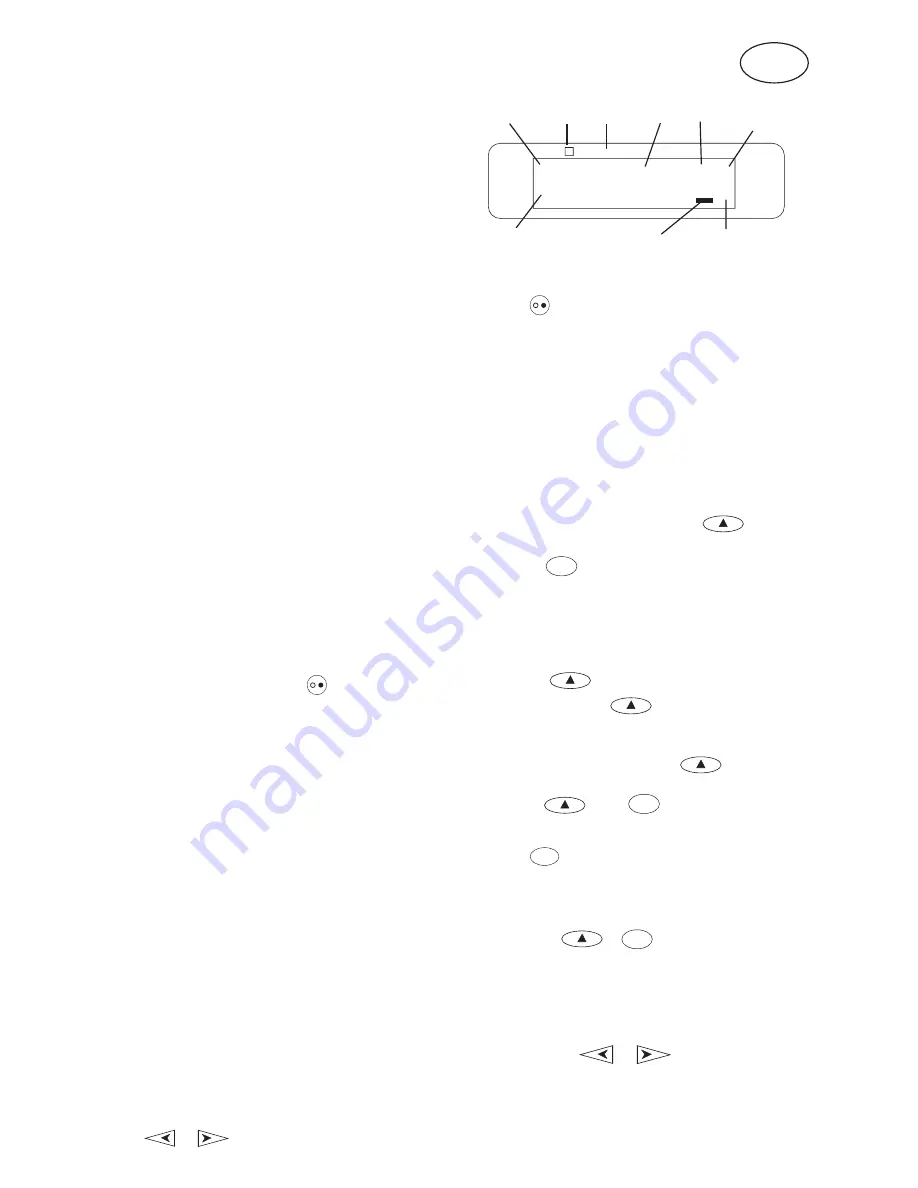
• Eight indicators – as shown below.
• The display will flash if you press an
incorrect key in a function sequence.
CURSOR
Shift on
Fixed label
length set
Function keys
ON/OFF
Switches the power on and off.
• Switches off automatically after two minutes if
no keys are pressed.
The last label created will
be retained and displayed when next turned on.
Any stored last label settings will also be
retained.
Note: If the batteries are removed for more than a
few seconds, all text and settings will be lost.
When power is restored, the display will show a
flashing cursor (no text) and the settings will be
full height standard width text with
and all
other settings off.
CAPITALS
CAPS
• Press for all subsequent characters in UPPER
CASE (CAPITALS), as confirmed by the
CAPS
indicator in the display.
• Press again to cancel and return to lower case.
SHIFT KEY
Press only -
DO NOT HOLD DOWN
• Press and release
before pressing an
alphabet key to produce an UPPER CASE (CAPS)
character.
• For dual purpose keys, press
first to
produce the legend above the key.
• Pressing
while
CAPS
is set will give a lower
case character.
DELETE
DEL
• Press to delete the character to the left of the
cursor, or to exit certain function key operations.
CLEAR TEXT
+
DEL
CLEAR
• Press to clear all the current text and cancel any
fixed length setting, but leave the text size and
other settings unchanged. Also use to exit or
clear certain function key operations.
CURSOR KEYS
or
• Press to move the cursor along the text, one
character at a time.
• Press and hold to scan quickly through the text.
CAPS
▼
ITALIC
OUTLINE
VERT
LENGTH
SET
▲
▲
▲
▲
▲
▲
▲
1 2 3 4 5 6 7 8
-
▲
Italic Outline
Vertical
text
The Display
The display shows:
• Up to eight text characters, plus the cursor,
at one time.
Use
or
to move along the text.
GB
Box Underline
CAPS on


