background image

2

3

2

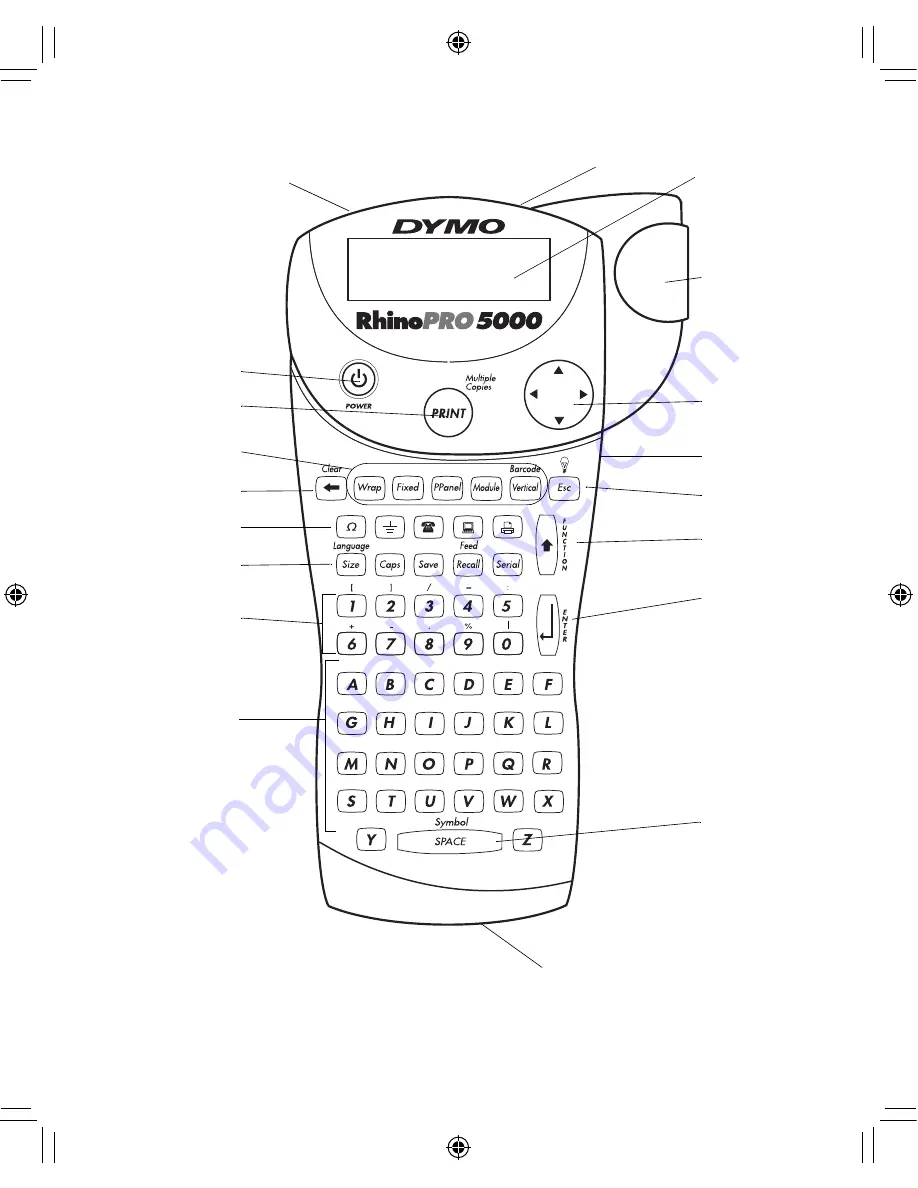
Figure 1  

RhinoPRO 5000 Printer

Print Key

Navigation Key

Function/Shift

Enter/OK 

Space Bar/

Symbol Key

Function Keys

Alpha Keys

Numeric Keys

Backspace/Clear All

Power Key

Escape/Backlight

Tape Exit

AC Power Connector

LCD Display

Symbol Keys

Quick Access Keys

Thumb Latch for Tape 

Compartment

Thumb Latch for 

Battery Compartment

Cutter Lever

3

About Your New Printer

With your new DYMO RhinoPRO

 5000 printer, 

you can create a wide variety of high-quality, self-

adhesive labels. You can choose to print your 

labels in many different sizes and styles. The 

printer uses DYMO RhinoPRO Industrial label 

cassettes in widths of 6 mm (1/4”), 9 mm (3/8”), 

12 mm (1/2”), or 19 mm (3/4”). RhinoPRO label 

cassettes are also available in a wide range of 

materials.
Visit 

www.dymo.com

 for information on obtaining 

tapes and accessories for your printer.

Warranty Registration

Please complete the warranty registration card and 

return it to the appropriate address, or you can 

register online at 

www.dymo.com

.

Getting Started

Follow the instructions in this section to print your 

first label.

Power Supply

The printer is powered by standard batteries, a 

rechargeable battery pack or an AC power adapter. 

To save power, the printer will automatically turn off 

after five minutes of inactivity.

Inserting the Batteries

The printer uses six AA batteries.

To insert the batteries

1. Press the thumb latch on the bottom of the 

printer to open the battery compartment door. 

See Figure 1.

Figure 1  

2. Insert the batteries following the polarity 

markings (+ and –).

3. Close the battery compartment door.

Remove the batteries if the printer will not be 

used for a long period of time.

Using the Battery Pack

An optional, rechargeable battery pack can be 

used to power the printer. The battery pack can be 

purchased through your local DYMO reseller.
The printer must be connected to external power 

through the AC adapter and turned ON to charge 

the battery pack. When the battery pack is 

completely discharged, allow four to five hours to 

fully charge the battery.

When connected to external power, the 

battery charging indicator may continue to display 

even though the battery pack is fully charged.

To use the battery pack

1. Open the battery compartment door. 
2. Insert the battery pack following the polarity 

markings (+ and –). See Figure 2.

Figure 2  

Press thumb

latch

GB

Manual_RhinoPRO5000_WEU.indd   2

23-07-2004   10:51:05

Содержание Rhino 5200 Hard case Kit by

Страница 1: ...D Page 2 Page 14 Pagina 28 Seite 40 User Guide Guide D Utilisation Gebruikershandleiding Bedienungsanleitung www dymo com NL F GB Manual_RhinoPRO5000_WEU indd 1 23 07 2004 10 51 00...

Страница 2: ...bol Key Function Keys Alpha Keys Numeric Keys Backspace Clear All Power Key Escape Backlight Tape Exit AC Power Connector LCD Display Symbol Keys Quick Access Keys Thumb Latch for Tape Compartment Thu...

Страница 3: ...inactivity Inserting the Batteries The printer uses six AA batteries To insert the batteries 1 Press the thumb latch on the bottom of the printer to open the battery compartment door See Figure 1 Figu...

Страница 4: ...he cassette switch for the size of the tape cassette that you are inserting See Figure 4 A notch in the cassette fits over the switch when the cassette is in the correct position The first time you us...

Страница 5: ...on the inside front cover of this User Guide The following sections describe each feature in detail Power A The Abutton turns the power on and off If no keys are pressed after five minutes the power i...

Страница 6: ...our label in five font sizes extra small small medium large and extra large The font size you can use depends on the size of label tape that is installed in the printer To set the font size 1 Press 2...

Страница 7: ...l a label from memory 1 Press The memory locations are displayed 2 Use the arrow keys to find the memory location for the label you want and then press Deleting a Label from Memory When you no longer...

Страница 8: ...r each port To print a patch panel label using serialization 1 Press 2 Enter the distance between each port and press The default is 12 mm 0 5 and the value can be set in increments of 0 1 mm 0 005 3...

Страница 9: ...ge 6 To create a barcode 1 Enter the text you wish to appear before the barcode on the label Optional 2 Press 3 Select CODE 39 or CODE 128 and press 4 Enter the text for the barcode between the barcod...

Страница 10: ...umber of copies of each label to print See Printing Multiple Copies on page 9 and Figure 11 Figure 11 Adjusting Print Quality Advanced Depending on the label material you choose you may need to lighte...

Страница 11: ...he printer is turned on Replace discharged batteries Poor Print Quality Replace discharged batteries Ensure tape cassette is installed properly Clean the print head Replace the tape cassette Poor Cutt...

Страница 12: ...EN 55024 addendums A1 A2 Electromagnetic Compatibility EMC Information Technology equipment Immunity Characteristics Emissions EN 61000 6 3 Electromagnetic Compatibility EMC Part 6 Generic Standards...

Страница 13: ...13 Manual_RhinoPRO5000_WEU indd 13 23 07 2004 10 51 49...

Отзывы: