background image

6

Inserting the Optional Battery Pack

The printer can operate using an optional rechargeable, 
Lithium-ion battery pack (DYMO Li-ion Battery 7.4V 
1400mAh).

Make sure the power adapter is disconnected 

before handling the Lithium-ion battery pack.

To insert the battery pack

1

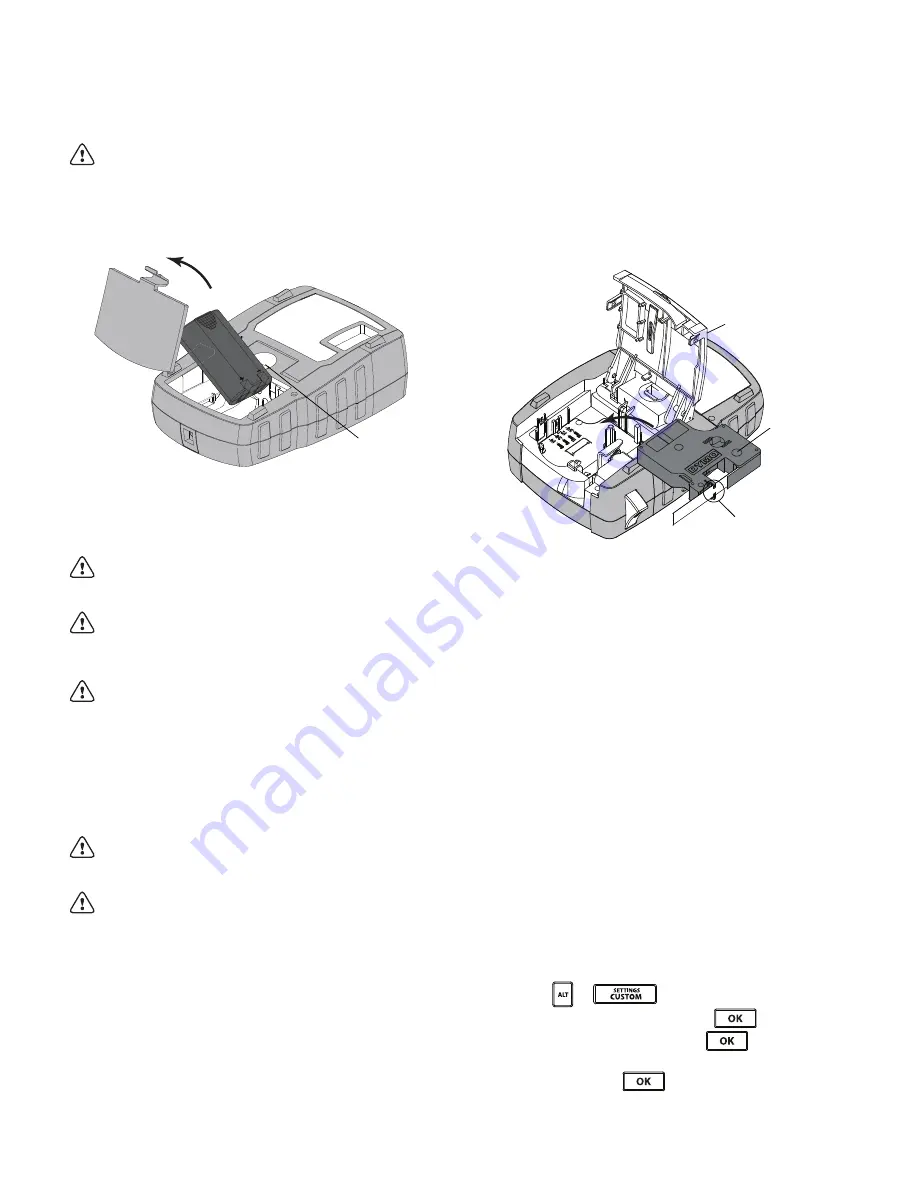
Press the thumb latch on the back of the printer to 
remove the battery compartment cover. See Figure 4.

Figure 4 

2

Insert the battery pack into the battery compartment 
following the polarity markings. See Figure 4.

3

Replace the battery compartment cover. 

Make sure to read the Lithium-ion Safety 

Precautions found on page 19.

Removing the Optional Battery Pack

Remove the battery pack if the printer will not be used for 
a long period of time.

Make sure the power adapter is disconnected 

before handling the Lithium-ion battery pack.

To remove the battery pack

1

Unplug the power adapter.

2

Press the thumb latch on the back of the printer to 
remove the battery compartment cover.

3

Remove the battery from the battery compartment.

Make sure to read the Lithium-ion Safety 

Precautions found on page 19.

Recharging the Battery Pack

The battery pack automatically recharges while the printer 
is connected to a power source through the power 
adapter. Charging the battery pack for the first time will 
take approximately eight hours; recharging the battery 
pack will take approximately two hours.

Inserting and Removing the Label Cartridge

Your printer comes with a starter label cartridge. Visit 

www.dymo.com

 for information about purchasing 

additional label cartridges.

To insert the label cartridge

1

Gently lift the label cartridge door on the back of 
the printer.

2

Make sure the label and ribbon are taut across the 
mouth of the cartridge and that the label passes 
between the label guides. 

If necessary, turn the ribbon rewind spool clockwise 
to tighten the ribbon.

3

Insert the cartridge with the label and ribbon 
positioned between the label guides. See Figure 5.

Figure 5 

4

Press firmly on the cartridge until the cartridge snaps 
into place.

To avoid label jams, make sure both sides of the label 
cartridge snap into place.

5

Close the label cartridge door.

To remove the label cartridge

1

Gently lift the label cartridge door on the back of the 
printer.

2

Gently remove the label cartridge.

3

Insert a new label cartridge as described above.

4

Select the width of the new label cartridge when 
prompted.

Setting the Label Width

Each time you insert a label cartridge into the printer, you 
are prompted to set the label width so the printer knows 
what size label you are currently using. Some of the 
features you use to design labels depend on the width of 
the label. You can change the label width setting at any 
time from the Settings menu.

To set the label width

1

Press 

 + 

.

2

Select 

Print options

 and press 

.

3

Select 

Label width

 and press 

.

4

Select the width of the label currently inserted in the 
printer and press 

.

Press thumb 
latch to open

Lift

Label guides

Ribbon 
rewind spool

Содержание Rhin 4200

Страница 1: ...Rhino 4200 User Guide...

Страница 2: ...may be reproduced or transmitted in any form or by any means or translated into another language without the prior written consent of Sanford L P Trademarks DYMO and RHINO are registered marks in the...

Страница 3: ...utton 8 Hot Keys 8 Working with Labels 8 Creating a Label 8 Adding a Label 8 Removing a Label 9 Printing Labels 9 Formatting a Label 9 Changing the Text Size 9 Changing the Text Style 9 Rotating Text...

Страница 4: ...st 14 Deleting Items from the Favorites list 14 Printing Options 14 Printing Multiple Copies 14 Collating Multiple Copies 14 Printing Separator Lines between Cells 15 Pausing Between Labels 15 Advanci...

Страница 5: ...ot 10 Favorites 18 Alt 3 LCD Display 11 Add Remove 19 Hot Keys 4 Cutter button 12 Custom Settings 20 Escape 5 Print 13 Serial Feed 21 Clear 6 OK 14 Library Save 22 Power 7 Navigation 15 Size Styles 23...

Страница 6: ...ery pack or AC power adapter For optimal power use the optional rechargeable Lithium ion battery pack or the AC power adapter To save power the printer automatically goes into standby mode after two m...

Страница 7: ...nd Removing the Label Cartridge Your printer comes with a starter label cartridge Visit www dymo com for information about purchasing additional label cartridges To insert the label cartridge 1 Gently...

Страница 8: ...ou reconnect the power and turn on the printer LCD Display The LCD display includes a caption bar showing the current label type and feature indicators across the top and on the right side showing whi...

Страница 9: ...Guide Working with Labels You can create a single label or a group of labels A group of labels can be created manually by adding labels to the current label or automatically using serialization See Cr...

Страница 10: ...ed for the height and width of the label you are creating MAX font is not used when Auto text size is selected To set the text size Press Each time you press the next available text size is selected C...

Страница 11: ...efault fixed length is 25 mm 1 0 Any change you make to the fixed length setting remains in effect until you change the setting To set the label length 1 Press 2 Select the length of the label and pre...

Страница 12: ...el type without losing your data If the data from one label type will not fit in the new label type the text that will not fit is shaded in the display When you change from a multi cell label such as...

Страница 13: ...rrent label only Press to save the settings as the new custom default for this label type Turning Off Custom Defaults You can choose to turn custom defaults on or off for each label type individually...

Страница 14: ...e place the cursor within the text you want to save 2 Press 3 Select Term and press 4 Select a location for the term and press The term is added to the My terms category of the library Inserting Terms...

Страница 15: ...ou no longer need an item in the Favorites list you can delete the item from the Favorites list To delete an item from the Favorites list 1 Press 2 Select the symbol term or label to delete and press...

Страница 16: ...n 6 5 mm 1 4 increments To advance the label 1 Press 2 Press to advance the label Adjusting the Print Contrast Depending on the label material you choose you may need to lighten or darken the printed...

Страница 17: ...16 Symbols The following tables show the commonly used symbols by category Arrows and Brackets Hazard and Warning Pro AV and Security Numbers Currency Electrical...

Страница 18: ...SPKR VOLUME CONTROL OPTICAL ZONE PHONO CATV NANNY CAM COMPONENT PROJECTOR COMPOSITE REMOTE DVD RF DVI RGB DVR RS 232 HDMI SAT HDTV S VIDEO IR TOUCH SCREEN KEYPAD TV MONITOR VCR BACK DOOR HIGH WATER CA...

Страница 19: ...roperly See Inserting and Removing the Label Cartridge Unable to return to the previous menu Press to return to the previous menu Nothing shows in the display Ensure the printer is turned on Insert ne...

Страница 20: ...This could cause deterioration of performance or failure This may also damage the protection device installed in the battery pack This could damage equipment or injure users Thoroughly follow the inst...

Страница 21: ...products Device Certification This product is CE marked in accordance with the EMC directive and the low voltage directive and is designed to conform with the following international standards Applied...

Отзывы: