background image

THERMAL TICKET PRINT SERVER

Star TSP series printer set up

The Star TSP series set up instructions cover the TSP-700 receipt printer.

Place the receipt roll inside your Star TSP-700 receipt printer and feed a small section of the
receiptroll out of the printer. Close the printer lid.

Please ensure you have installed the Star TSP printer driver before following the
configuration steps below...

Ÿ

Open Devices and Printers from the Start Menu,

Ÿ

Right click the Star TSP printer icon,

Ÿ

On the pop-up menu, click Printing Preferences

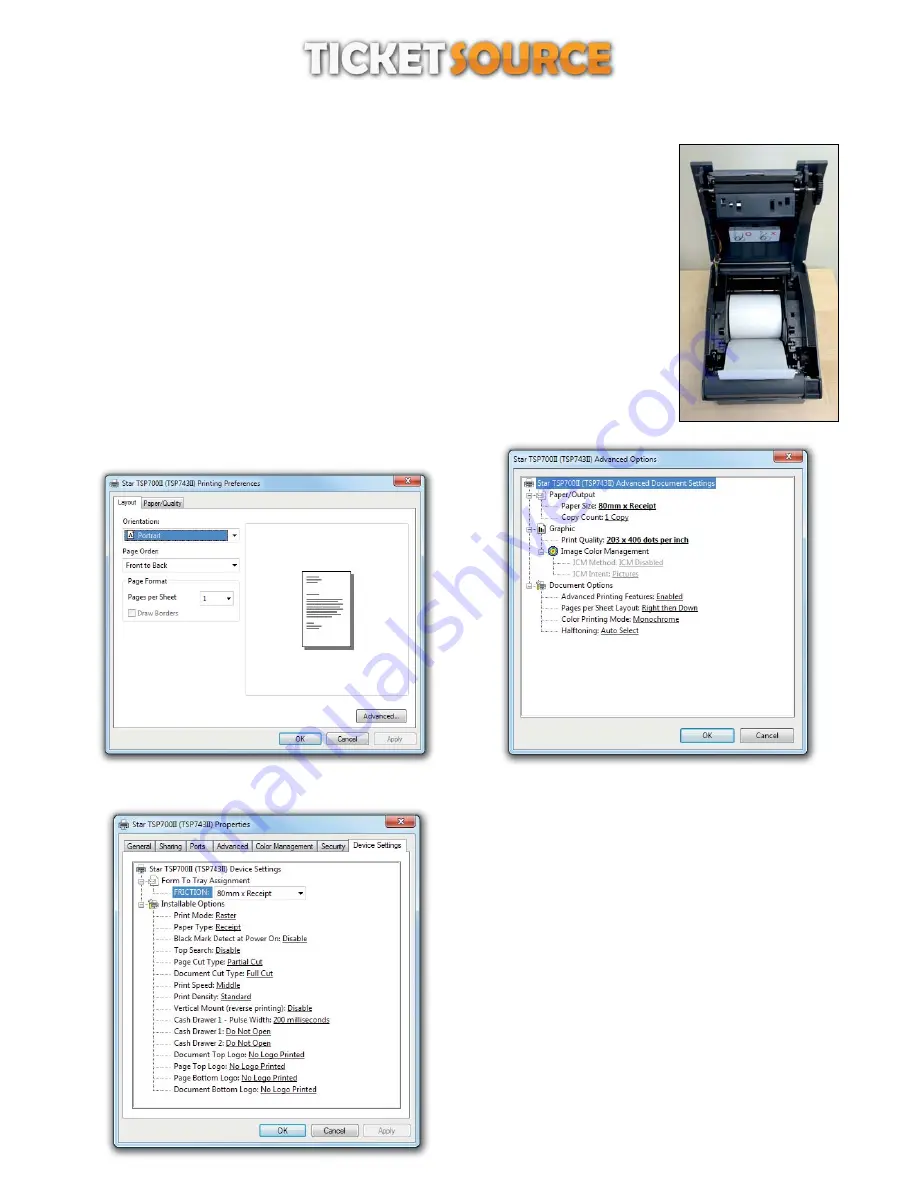
Configuring the printer

Step 1 - click the “Advanced...” button

Step 2

Ÿ

Set Paper Size to “80mm x Receipt”,

Ÿ

Set Print quality to “203 x 406 dots per inch”,

Ÿ

Click “OK”.

Step 3

Ÿ

Open Devices and Printers from the Start Menu,

Ÿ

Right click the Star TSP printer icon,

Ÿ

On the pop-up menu, click Printer Properties,

Ÿ

Click the “Device Settings” tab,

Ÿ

Set Friction to “80mm x Receipt”,

Ÿ

Set Page Cut Type to “Partial Cut”,

Ÿ

Set Document Cut Type to “Full Cut”,

Ÿ

Set Print Speed to “Middle” for best quality results,

Ÿ

Set Print Density to “Standard”,

Ÿ

Click “OK”.

3

Содержание LabelWriter 300 series

Страница 1: ...urce thermal ticket print server is designed to operate on systems running Microsoft Windows 7 Windows 8 or Windows10andrequiresanavailableInternetconnectionwheninuse Before you start Before installing the TicketSource thermal ticket print server you will need to install and configure your thermal ticket printeranditsprinterdrivertobeusedwiththeprintserver asperthemanufacturer sinstructions Please...

Страница 2: ...eed from underneath and the left edge of the card roll is firmly against the side of the spool 5 Slide the spool guide onto the right side of the spool and press the guide tightly against the side of the card roll between the roll and the spool leaving no gap Note To ensure proper feeding of cards during printing the card roll must fit snugly against both sides of the card spool with no gaps 6 Ins...

Страница 3: ...icesandPrintersfromtheStartMenu RightclicktheStarTSPprintericon Onthepop upmenu clickPrintingPreferences Configuring the printer Step1 clickthe Advanced button Step2 SetPaperSizeto 80mmxReceipt SetPrintqualityto 203x406dotsperinch Click OK Step3 OpenDevicesandPrintersfromtheStartMenu RightclicktheStarTSPprintericon Onthepop upmenu clickPrinterProperties Clickthe DeviceSettings tab SetFrictionto 80...

Страница 4: ...TIONLEDlightsup To toggle the feed sensor between transparent and reflective mode hold down the MODE REPEAT button and press the STOPbutton reflective mode thebuzzerwillsoundtwiceandthePRINTLEDwillflashslowly transparent mode thebuzzerwillsoundonceandthePRINTLEDwilllightupconstantly With the feed sensor set to reflective mode releasethe MODE REPEAT button and press the STOP button to exit the sens...

Страница 5: ...tingPreferences THERMAL TICKET PRINT SERVER Citizen CL series printer set up Step 1 Create a new stock size for the printer by clicking the New buttonintheStocksection Step 2 setting the stock dimensions Provide a descriptive name for the stock enter the stock dimensions 76 00mm width x 140 00mm height exposed liner width left 0 0mm andright0 0mm click OK andclick Apply Step 3 setting the stock or...

Страница 6: ...rce branded thermal ticket stock setting the ticket cutter Set the Start Offset to 0 0mm and theStopOffset 18 0mm Click Apply Step 6 Click the Graphics tab and set the Dithering option to None Please note choosing an alternative Dithering option could render barcodes unreadable to a barcode scanner Click Apply andclick OK tofinish Step7 ArebootofyourcomputerwillberequiredforsomeoftheCitizenprinter...

Страница 7: ...igure1 Figure 1 Ticket settings clickthe ThermalTicketSettings tab ticktheoption Enablethermalticketprintingofyourin housebookings figure2 Figure 2 Thermal Ticket Settings clickthe AddnewPrinter link provideadescriptionforyourprintere g TicketSourceBoxOffice figure3 click savechanges Figure 3 Add a New Printer makeanoteofthePrinterIDthatisgeneratedfortheprinter figure4 Figure 4 the Printer ID ...

Страница 8: ...ermal Ticket Print Server Software Figure 6 TicketSource Thermal Ticket Print Server installer Figure 7 TicketSource Thermal Ticket Print Server in the system tray Configuring the TicketSource Thermal Ticket Print Server The TicketSource thermal ticket print server automatically runs in the background on your computer displayed as a clickable TS iconinyoursystemtray figure7 Before you can start pr...

Страница 9: ...ttings link established Figure 10 System tray icon link established clickthe PrinterSettings optiontospecifyyourprintingpreferences figure11 chooseyourthermalticketprinterfromthelistofprintersinstalledonyourcomputer selectthetickettemplatethatmatchesyourthermalticketstockfromthelistofavailabletemplates click ApplyChanges Figure 11 Printer Settings youshouldnowbeabletoclick PrintTestTicket toprinta...

Страница 10: ...lable on the booking confirmation page following each completed booking made by you in your TicketSource account figure 13 orbyretrievingacustomer srecordandviewinganexistingbooking Figure 13 Print tickets 10 Advanced Configuration Multiple TicketSource accounts IfyouhavemultipleTicketSourceaccounts havingsetuptheTicketSourcethermalticketprintserverononeaccount you caneasilyconfigureeachsubsequent...

Страница 11: ...servertoprintthermaltickets A Yes TheTicketSourcethermalticketprintservercommunicatesdirectlywiththeTicketSourcewebsitetoretrieveticket details Q DoIneedtoinstalltheTicketSourcethermalticketprintserveroneachTicketSourceuser scomputers A No The TicketSource thermal ticket print server software only needs to be installed on the computer to which the thermalticketprinterisconnected Q IstheTicketSourc...

Отзывы: