5
•
Large height is available on 19 and 24mm labels only.
Medium height is available on all except 6mm labels.
Small height is available on all labels.
•
Press
SIZE
to select the size menu:
B
Use
to select the size symbol required, then press
to confirm the selection.
The
"
B
"
(BIG FONT)
mode will produce highly visible
labels using the entire print height. In “B” mode, all text
will be printed as capitals (without accents).
•
To create a label in "
B
" mode use
or
to move the
cursor under "
B
" and press (
BFONT
lights in display).
•
When "
B
" is selected, all other options are not available.
JUSTIFY
JUST
Labels are normally printed with the text left-justified. On
multi-line labels, press
JUST
to select left-justified, right-
justified or centred text, as shown in the display. See
also
LABEL LENGTH
.
VERTICAL TEXT
VERT
•
Rotates the text through 90° so that the label is printed
, as confirmed by the
VERT
indicator in the display.
•
Press again to cancel and return to horizontal text.
Note: Vertical text is not available on multi-line labels.
MULTI-LINE PRINTING
•
Press
to start the next line of text on a multi-line
label, e.g.
This is a two
line label
in the display will be
printed as:
This is a two
and the display will
line label
indicate 2 lines:
Labels can be created as follows:
6mm
1 line small text
9mm
Up to 2 lines
small text
9mm 1 line medium text
12mm
Up to 2 lines
small text
12mm 1 line medium text
The line indicator in the display will confirm the number
of lines in the label.
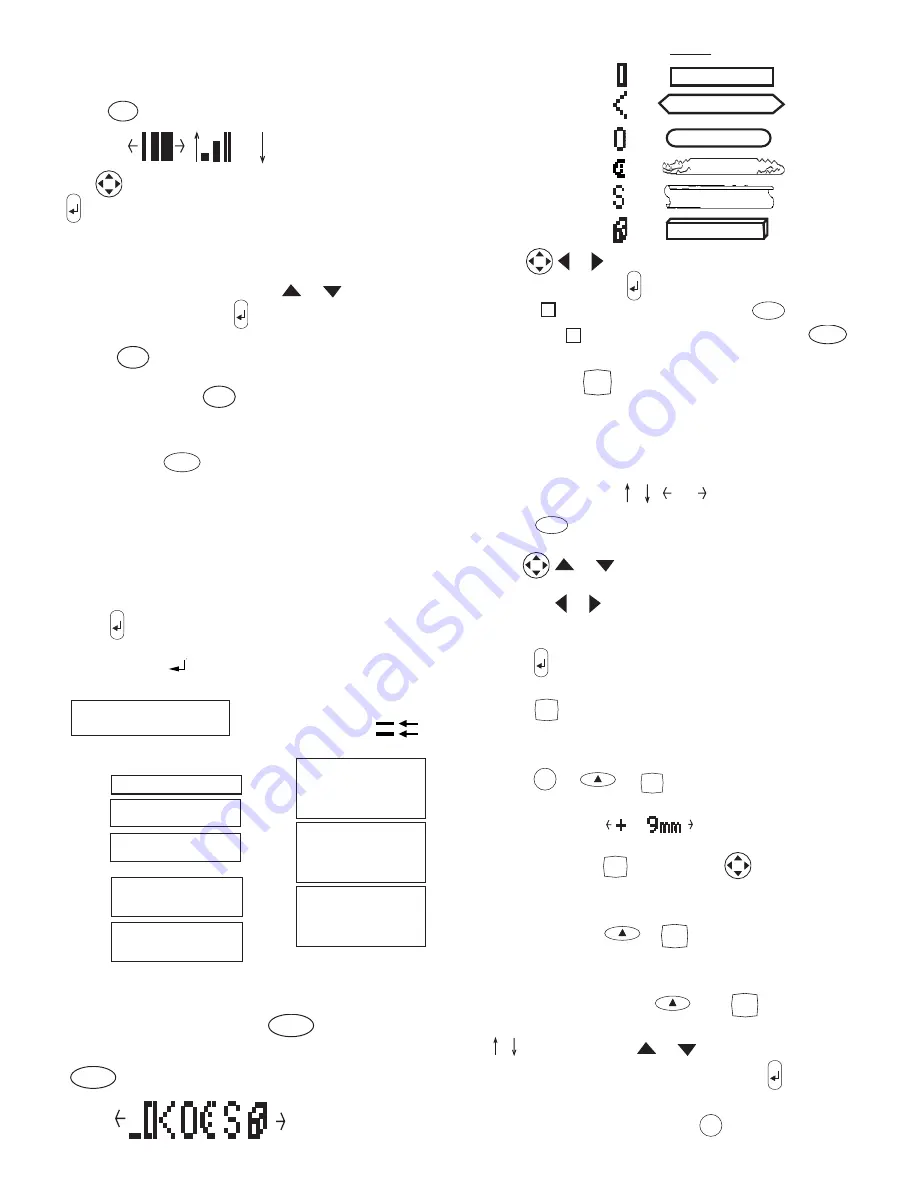
BOXED/UNDERLINED PRINTING
BOX/UL
•
If no Box/Underline option has been selected, pressing
BOX/UL
once will display the menu below:
v
e
r
t
i
c
a
l
l
y
Up to
4 lines
small
text
Up to 2 lines
medium text
1 line large text
1
2
3
Underlined -
—
=
DYMO
Square Box -
=
Pointed Box -
=
Round Corners - =
Crocodile Box -
=
Scroll Box -
=
3-D Box -
=
•
Use
or to move the cursor under the desired
option. Either press
to select the option (confirmed
by the
or — indicator displayed), or
DEL
to exit .
•
When the
or — indicator is displayed, press
BOX/UL
to cancel the Box/Underline option.
LABEL LENGTH
LTH
The length is normally calculated automatically, according
to the length of the text on the label.
The label length function displays the last used fixed label
length, eg:
40mm
10
1
•
Press
DEL
to exit the length function without
changing the length, or:
•
Use
or
to increase (5000mm / 196.85
inches max.) or decrease the length in 1mm / 0.04 inch
steps, or or to increase or decrease the length in
10mm / 0.4 inch steps. The minimum fixed label length
is 45mm / 1.8 inches.
•
Press
to fix the length for all subsequent labels,
confirmed by the
LTH SET
indicator in the display.
•
Press
LTH
to cancel the fixed length and restore the
automatic length.
•
If the fixed length is too short for the text, when you
press
or
+
CAPS
PREVIEW
the display will show how
much longer the label is than the fixed length, eg:
and it will not print. Either cancel the fixed length (see
above), or press
LTH
twice and use
to increase the
length; the label is now long enough and can be
printed.
MULTIPLE COPIES
+
STYLE
COPIES
•
Your LabelManager can provide multiple copies within
the range 1-99.
•
To use this facility press
then
STYLE
COPIES
to show the
last number of copies set on the display, for example
# = 03
. Use
or
to increase or decrease
the number of copies required, then press
to
confirm
(
COPIES
indicator lights in the display). To
print the desired quantity press
.
19mm
or
24mm
19mm
or
24mm
19mm
or
24mm
Содержание LabelManager 300
Страница 1: ...3 QWERTY EU AZERTY...
Страница 6: ...Esselte NV 2000...


