background image

BlueWave® MX-250 Emitter User Guide 


11 

Figure 6. Slide Glass Cover Out 


Figure 7. Insert New Glass Cover 


6.


Reinstall the side cover removed in Step 3. 

7.


Insert the two screws removed in Step 2 and tighten.  

Spare Parts 


Item 

Part Number 

BlueWave® MX-250 Emitter Glass Replacement Kit  

42929 


Содержание BlueWave RediCure MX-250 Emitter

Страница 1: ...BlueWave MX 250 Emitter User Guide LED Flood Curing Emitters Instructions for Safe Use Setup and Operation Maintenance Ordering Spare Parts and Accessories ...

Страница 2: ...ng systems optimize the speed of automated assembly allow for 100 in line inspection and increase throughput System designs enable stand alone configuration or integration into your existing assembly line Please note that most dispensing and curing system applications are unique Dymax does not warrant the fitness of the product for the intended application Any warranty applicable to the product it...

Страница 3: ...verview 5 Description of BlueWave MX 250 Emitters 5 Unpacking 6 Parts Included 6 Installation 6 Important Information 6 Mounting Connections 7 Troubleshooting Maintenance 9 Product Cleaning and Care 10 Glass Window Replacement 10 Compatible Devices 11 Spare Parts 11 Specifications 13 Declaration of Conformity 14 Warranty 15 Index 15 ...

Страница 4: ...e You can also email Dymax Europe GmbH at info_de dymax com Please see the back cover for worldwide contact information For more information about this product visit dymax com Safety WARNING If you use this UV LED light source without first reading and understanding the information in the UV Light Safety Guide SAF001 injury can result from exposure to high intensity light To reduce the risk of inj...

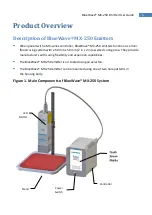
Страница 5: ...with a 50 mm x 50 mm 2 in x 2 in asserted curing area They provide manufacturers with curing flexibility and expansion capabilities The BlueWave MX 250 emitter is air cooled using an axial fan The BlueWave MX 250 emitter can be mounted using one of two hole patterns in the housing body Figure 1 Main Components of BlueWave MX 250 System Stand Power Switch Controller LED Emitter Touch Screen Display...

Страница 6: ...your order contact your local Dymax representative or Dymax Customer Support to resolve the problem Parts Included BlueWave MX 250 LED Emitter Assembly User Guide Installation The BlueWave MX 250 emitter is part of a MX series curing system and requires connection to a controller via an interconnect cable for proper operation Important Information Do not connect any components while power is appli...

Страница 7: ... pinching or kinking of the interconnect cable The cooling air intake on top of unit must be free flowing do not cover Exhausting air on sides must be given at least 1 mm 0 04 of clear space to obstructions for safe use Figure 2 BlueWave MX 250 Emitter Dimensions When multiple emitters are mounted side by side maintain 1 mm 0 04 of clear space between units For outermost units maintain 20 mm 0 8 o...

Страница 8: ...BlueWave MX 250 Emitter User Guide 8 Figure 3 Example of Installation Using Array Stand ...

Страница 9: ...ting on admin screen should match the desired input trigger channel LED head is not connected to the correct port channel Verify that the head is connected to the desired port channel BlueWave MX 250 LED suddenly stops producing light Over temperature shutdown was triggered Verify alarms Footswitch defective Activate unit using the front control panel Replace the footswitch if the unit operates fr...

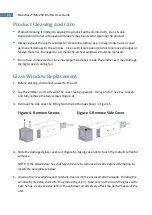
Страница 10: ...Replacement 1 Before starting disconnect power to the unit 2 Lay the emitter on its side with the cover facing upwards Using a 5 64 hex key loosen and fully remove the two screws Figure 4 3 Remove the side cover by lifting from the bottom as shown in Figure 5 Figure 4 Remove Screws Figure 5 Remove Side Cover 4 Slide the damaged glass cover out Figure 6 taking care not to touch the metallic reflect...

Страница 11: ...igure 6 Slide Glass Cover Out Figure 7 Insert New Glass Cover 6 Reinstall the side cover removed in Step 3 7 Insert the two screws removed in Step 2 and tighten Spare Parts Item Part Number BlueWave MX 250 Emitter Glass Replacement Kit 42929 ...

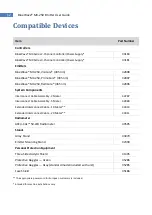
Страница 12: ... Interconnect Cable Assembly 2 Meter 42287 Interconnect Cable Assembly 5 Meter 42889 Extended Interconnect Cable 10 Meter 43010 Extended Interconnect Cable 20 Meter 43011 Radiometer ACCU CAL 50 LED Radiometer 40505 Stands Array Stand 43070 Emitter Mounting Stand 42390 Personal Protection Equipment Three Sided Acrylic Shield 41395 Protective Goggles Green 35286 Protective Goggles Gray standard mode...

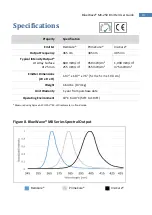
Страница 13: ... At 25 mm 680 mW cm2 255 mW cm2 950 mW cm2 355 mW cm2 1 090 mW cm2 375 mW cm2 Emitter Dimensions W x D x H 1 97 x 1 97 x 7 6 5 cm x 5 cm x 19 3 cm Weight 1 64 lbs 0 74 kg Unit Warranty 1 year from purchase date Operating Environment 10 C to 40 C 50 F to 104 F Measured using Dymax ACCU CAL 50 LED radiometer in flood mode Figure 8 BlueWave MX Series Spectral Output RediCure PrimeCure VisiCure ...

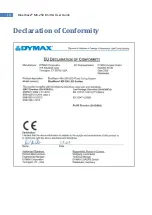
Страница 14: ...BlueWave MX 250 Emitter User Guide 14 Declaration of Conformity ...

Страница 15: ...ies and may result in damage to the equipment IMPORTANT NOTE DYMAX CORPORATION RESERVES THE RIGHT TO INVALIDATE ANY WARRANTIES EXPRESSED OR IMPLIED DUE TO ANY REPAIRS PERFORMED OR ATTEMPTED ON DYMAX EQUIPMENT WITHOUT WRITTEN AUTHORIZATION FROM DYMAX THOSE CORRECTIVE ACTIONS LISTED ABOVE ARE LIMITED TO THIS AUTHORIZATION Index Cleaning 10 Compatible Devices 12 Components 5 Connections 7 Declaration...

Страница 16: ...tection of property and persons Nothing in this bulletin shall act as a representation that the product use or application will not infringe a patent owned by someone other than Dymax Corporation or act as a grant of license under any Dymax Corporation Patent Dymax Europe GmbH recommends that each user adequately test its proposed use and application of the products before actual repetitive use us...

Отзывы: