background image


23 

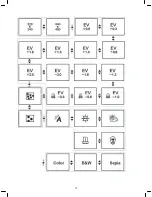
Select white balance mode:   

1.  Press 

up button 

 or 

down button 

 to select white balance option, and then press the 

confirm button 

.  

2.  Press 

up button 

 or 

down button 

 to select your desired white balance mode, and 

press the 

confirm button 

.  


White balance options: auto, sun light, cloudy, light bulb, florescent light.   


Exposure adjustment:   

1.  Press 

up button 

 or 

down button 

 to select exposure option, and then press the 

confirm button 

.  

2.  Press 

up button 

 or 

down button 

 to select your desired exposure level, and press the 

confirm button 

.  


EV value range: –2.0 ~ +2.0 


Color effects:   

1.  Press 

up button 

 or 

down button 

 to select color effects option, and then press the 

confirm button 

.  

2.  Press 

up button 

 or 

down button 

 to select your desired special effects, and press the 

confirm button 

.  


Color effects to select are: color, monochrome, retro.   

Auto shutter:   

1.  Press 

up button 

 or 

down button 

 to select auto shutter timer option, and then press 

the 

confirm button 

.  

2. Press 

up button 

 or 

down button 

 to select your desired auto shutter count down time, 

and press the 

confirm button 

.  


The available timer options are: off, 5 sec, 10 sec, 30 sec.   


Select date indicator:   

1.  Press 

up button 

 or 

down button 

 to select date indicator option, and then press the 

confirm button 

.  

2.  Press 

up button 

 or 

down button 

 to select whether to show the date indicator, and 

press the 

confirm button 

.  


Date indicator selection: on, off.   

Return to photo mode:   

Press the 

MENU button 

to return to the photo mode.   


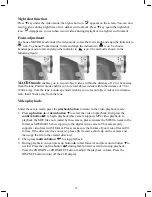
Flash light function:   

Under the photo mode, press the 

up buttom 

 to cycle through the flash light modes.   


How to take a picture:   

 Step one: 

Make sure the digital video camera is turned on   

 Step two: 

Aim the digital video camera at the object to capture, and view the filming angle 

from the LCD screen   

 Step three: 

Press the 

shutter button 

slightly to the first stage to lock the focus   

 Step four: 

Press the 

shutter button

 to the second stage, when capturing the picture, the 

LCD screen image will freeze until it is saved to the memory. When the screen 
returns to the browsing status, the user can begin to shoot the next picture.   


Содержание DXG-571V

Страница 1: ...User s Manual DXG 571V...

Страница 2: ...you on how to use your digital video camera and how to install the accompanying software By reading through this manual you will learn how to use this digital video camera to take pictures record vid...

Страница 3: ...ow to use your digital video camera 10 Preparations before operation 10 4 Using your digital video camera 11 Function list 11 Video mode 14 Status indicator 14 Hotkey menu 14 Capturing video 16 White...

Страница 4: ...26 Exit photo playback menu 29 Audio mode 30 Status indicator 30 Begin recording 30 Recording playback 30 Volume adjustment 30 Audio playback menu 31 Exit audio playback menu 32 Setup mode 32 Status i...

Страница 5: ...holder shall not violate copyright laws In addition if filming is prohibited for live performances and exhibitions even if just for personal use filming is not allowed Memory card transfers of data an...

Страница 6: ...not open the battery lid If the digital video camera interior is water logged please immediately turn off power and remove the battery Care and handling of digital video camera 1 If t the lens LCD sc...

Страница 7: ...NP 60 Li Ion battery optional CD includes drivers Quick Start Guide Digital Video camera Lens cap Pouch Lens cap strap USB AV out cable AA alkaline battery X4 DC IN Connector optional DC IN 5V Adapter...

Страница 8: ...utton 3 Focus knob Focus adjustment Front view 1 Lens 1 Lens 2 Filming indicator 3 Flash 2 Filming indicator 4 Stereo MIC 3 Flash 4 Stereo MIC Connector ports Connect the video camera to a computer or...

Страница 9: ...ifferent modes pressing this button will switch to playback mode Under playback mode pressing this button will enter different modes according to the mode selection button location Left view 1 Up butt...

Страница 10: ...battery pivot out this support to secure the battery 3 DC power plug Insert the DC IN 5V power plug to supply external DC voltage to the unit 4 Battery compartment lid Battery status indicator 1 Batte...

Страница 11: ...se insert the memory card as illustrated below into the memory card slot To remove the memory card lightly press the memory card in and the memory card will automatically pop up Note When the memory c...

Страница 12: ...light LED mode On off Capture Video start stop Digital zoom 1x 4x EV adiustment 2EV 2EV Size 320 240 640 480 Image quality fine standard Video menu Video playback Night shot mode On off Effects normal...

Страница 13: ...e retro Photo menu White balance auto sun light light bulb florescent light cloudy Size 4048x 3040 3264 x 2448 2592 x 1944 2048 x 1536 1600 x 1200 640 x 480 Image quality fine standard Date indicator...

Страница 14: ...bian Format confirm cancel Memory message Photo count Video count Audio count Remaining space Factory default confirm cancel TV standard NTSC PAL Light source frequency 60Hz 50Hz Auto shutoff off 1min...

Страница 15: ...tatus 11 Number of image files 12 Digital zoom status 13 Image size Hotkey menu Under the movie mode continuously press the confirm button left of the LCD screen to access the hotkey function selectio...

Страница 16: ...15...
Страница 17: ...tton 2 Use the up button or down button to select your desired image size and press the confirm button Image size options VGA 640X480 QVGA 320X240 The control procedures are as below each submenu such...

Страница 18: ...vels to choose from Select color effects 1 Press the up button or down button to select the color effects option and press the confirm button 2 Use the up button or down button to select your desired...

Страница 19: ...in a distance more than 130cm away from the lens Video playback Under the movie mode press the playback button to return to the video playback mode 1 Press up button or down button to select the video...

Страница 20: ...2 Press up button or down button to confirm or cancel press the confirm button to either delete single video or cancel deletion protected files cannot be deleted Delete all video 1 Press up button or...

Страница 21: ...onfirm button 2 Press up button or down button to confirm or cancel press the confirm button to either unprotect all videos or cancel undo protection only undo protected files Exit movie playback menu...

Страница 22: ...to access the hotkey function selection this can control the captured video such as Image file size exposure image quality white balance self timer color effect setups After pressing the confirm butt...

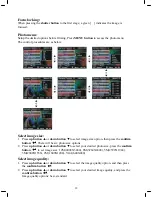
Страница 23: ...on then press the confirm button There will be six photo size options 2 Press up button or down button to select your desired photo size press the confirm button to set image size 12M 4048X3040 8M 326...

Страница 24: ...ton 2 Press up button or down button to select your desired auto shutter count down time and press the confirm button The available timer options are off 5 sec 10 sec 30 sec Select date indicator 1 Pr...

Страница 25: ...ppears on the screen You can now shoot photos during the night time or in a darker environment Press key again the night shot icon disappears you can then take shots during daylight or in a lighter en...

Страница 26: ...to to be played is not created by this camera please rename the photo file name in the format as PHOT0001 jpg The suffix 0001 of PHOT should be changed according to the number of photos already stored...

Страница 27: ...tton to confirm or cancel press the confirm button to either delete single photo or cancel deletion protected files cannot be deleted Protect single photo 1 Press up button or down button to select th...

Страница 28: ...rt option and then press the confirm button Unit will enter the auto playback mode Under auto playback mode each photo will be displayed for a set period of time Press the confirm button under the aut...

Страница 29: ...s up button or down button to select the DPOF option then press the confirm button 2 Press up button or down button to set the print date option then press the confirm button to print the date on all...

Страница 30: ...utton can select the number of print copies Print photo press the up button or down button to select the photo you wish to print Print copies press the ZOOM IN button and ZOOM OUT button to set the nu...

Страница 31: ...ting files inside camera The extension name should be wav Copy it to the DCIM 100FSCAM directory If such directory is not existed please record any audio file first then you can copy the files Please...

Страница 32: ...Protect single audio 1 Press up button or down button to select the single audio choice to protect then press the confirm button 2 Press up button or down button to confirm or cancel press the confir...

Страница 33: ...utton to either unprotect all audio or cancel undo protection only undo protected files Procedures as below Start Stop Exit audio playback menu Under the audio playback menu interface press the MENU b...

Страница 34: ...and press the confirm button to perform setup Date time yr mo date hr min sec Button beep on off Format confirm cancel Factory defaults confirm cancel Memory info video file count photo file count au...

Страница 35: ...34 Setup Exit setup To exit setup mode press the DISP SET button to return to the interface before pressing MENU button then press MENU button to return to the interface before that...

Страница 36: ...nd white plug of the USB cable to the video input of the TV port Step two Switch the TV to the correct channel If the TV standard is not correct you can switch to the appropriate standards 1 Enter the...

Страница 37: ...al video camera is installed with four AA batteries Step two Connect the smaller end of the USB cable plug to the USB port on digital video camera Step three Connect the larger plug of the USB cable t...

Страница 38: ...image on the computer display please focus onto the target before using the digital camera You will be able to visually connect with friends through the Internet using the webcam camera System requir...

Страница 39: ...e press the up button or down button to select webcam and then press the confirm buttom Then follow the below procedures Step one Right click on My Computer Step two Then select Device manager Step th...

Страница 40: ...he drivers are already installed and connected to the camera the camera built in memory and the SD memory card will be shown in Windows My Computer as removable storage Drag and drop files normally as...

Страница 41: ...follow the on screen instructions 5 Use the included USB cable to connect the camera with the PC as described in the chapter Connect to PC 2 Presto Video Works Presto Video Works is an advanced appli...

Страница 42: ...tton and follow the on screen instructions After application is started you can find more information on Presto Mr Photo in the help files 4 XviD codec installation XviD codec installation 1 Insert th...

Страница 43: ...42 5 Please follow the instructions and use Browse to choose the installation path to use press Next to continue...

Страница 44: ...e choose the name of the folder to install program and press Next to continue 7 At the install additional tasks screen press Next to continue 8 At the ready to install screen press Install to begin in...

Страница 45: ...44 9 Install in progress To stop installation please press Cancel 10 The screen below will be shown after installation is complete press Finish to end program installation...

Страница 46: ...t the supplied CD ROM in the CD ROM drive 2 If the CD ROM doesn t automatically boot use Windows Explorer to execute the InstallMgr exe file in the root directory The following screen is displayed 3 C...

Страница 47: ...ding WAV Image resolution 4048x 3040 firmware simulated 3264 x 2448 firmware simulated 2592 x 1944 2048 x 1536 1600 x 1200 640 x 480 Digital zoom 4x Focus range MACRO 12cm 14cm Portrait 70cm 120cm Lan...

Страница 48: ...n for repair Error message when entering direct printing service For error messages appearing when entering direct printing service you should remove the USB plug from the digital video camera and che...

Страница 49: ...t www dxgusa com for any product updates or special announcements You can also check out our online support desk where you can register your product send emails to our technical support and find a lis...

Отзывы: