background image

6

PREPARATIONS

Battery Installment

Rechargeable and alkaline battery packs are suitable for use to power your instrument. 

To install/remove batteries:

1.  Un-screw the bolt at the bottom of instrument base. Remove the battery pack. 
2.  Use either alkaline battery or Ni-Mh battery pack. When inserting alkaline batties, 

pay attention to the correct polarity according to the representation on the inside 
of the battery compartment. Always replace all batteries at the same time. Only 
use batteries from one brand and with the identical capacity.

3.  When installing the battery pack onto base, be certain that electrode connection 

align properly. Secure by tighten the bolt onto the bottom of instrument base.

Remove the batteries from the tool when not using it for extended periods. When storing 
for extended periods, the batteries can corrode and discharge themselves.

Charging Rechargeable NiMh Battery Pack

Insert the charger into the outlet and the charging port of the instrument or the battery 
pack. Turn on the power. The charger LED will display 1 of 3 modes:

Red flashing light 

Battery NOT Charging 

Check connections

Red light 

Battery Charging  

Take up to 8 hrs to fully charge

Green light 

Battery Fully Charged 

Ready for Use 

Note:

•   When using the standard rechargeable batteries of the instrument, recharging 

takes up to 8 hours (4 x 5000 mAh Ni-Mh batteries).

•   Power required for the charger: Frequency: 50-60HZ; Voltage: 85-265V.
•   Instrument can be used while charging batteries
•   Brand-new rechargeable batteries or rechargeable batteries unused for long 

period need to be recharged and discharged three times to attain full capacity.

Содержание SitePro SLR202GR

Страница 1: ...SitePro us com Operating Safety Instructions Consignes de fonctionnement s curit Instrucciones de funcionamiento y seguridad model SLR202GR IMPORTANTE Leer antes de usar IMPORTANT Lire avant usage IM...

Страница 2: ...or used in extreme temperature or during rapid temperature change The laser may not function properly if used out of the ambi ent temperature range Store inside the carry case and place in a dry area...

Страница 3: ...www SitePro us com 3 1 2 7 6 5 3 4 9 8 2 3 Fig A...

Страница 4: ...320 ft 98m Leveling Type Degrees Electronic 5 Beam Rating Class 3R 635nm Grade Slope Capability Dual 10 00 Dial in Variable Rotation Speed Settings 0 60 120 300 and 600 RPM Scanning Angle Settings 10...

Страница 5: ...aser beam can be repositioned in clock wise or counter clock wise rota tion When laser in Slope Grade Mode these buttons are used to adjust the value of the X and Y slope grade Slope Grade Mode When l...

Страница 6: ...atteries from the tool when not using it for extended periods When storing for extended periods the batteries can corrode and discharge themselves Charging Rechargeable NiMh Battery Pack Insert the ch...

Страница 7: ...level sturdy surface or preferably secured to a 5 8 11 tripod Press the Power keypad once and allow time for the instrument to self level After self leveling the laser instrument will begin operating...

Страница 8: ...art H I Single Slope Dual Slope WINDY Clock Wise or RPM Scanning Mode Beam Positioning Manual Mode Variable Speed Smart H I Single Slope Dual Slope Power WINDY Counter Clock Wise Beam Positioning keyp...

Страница 9: ...e instrument is set upright for horizontal rotation the slope of the X axis and Y axis can be adjusted by entering the Slope Grade Mode Press the Grade Mode button RPM Scanning Mode Beam Positioning M...

Страница 10: ...pe Dual Slope Power WINDY button Allow the instrument to self level ACCURACY CHECK Follow these instructions for checking axis accuracy Horizontal Surface Checking Place the laser instrument at the po...

Страница 11: ...ser radiation Avoid direct eye exposure Class 3R lasers product Complies with 21 CFR 1040 10 1040 11 except for deviations persuant to Laser Notice 50 June 6 2007 Radiaci n laser No mire hacia el rayo...

Страница 12: ...possible to point y1 Measure the distance beween points y1 and y2 The deviation of the plumb up beam should be less than 0 16 in 4mm z B A Approx 100 ft 30m 1 5 ft 0 5m 1 5 ft 0 5m z B A Approx 100 f...

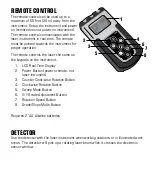
Страница 13: ...the laser the same as the keypads on the instrument 1 LCD Real Time Display 2 Power Button powers remote not laser intrument 3 Counter Clock wise Rotation Button 4 Clock wise Rotation Button 5 Sweep M...

Страница 14: ...ENVIRONMENT PROTECTION Recycle raw materials bat teries instead of disposing of waste The unit accessories packaging used batteries should be sorted for environ mentally friendly recycling in accorda...

Страница 15: ...must return the tool transportation prepaid along with any relevant paperwork RGA number if you have obtained one proof of purchase contact information and any request for new accessories etc to our...

Страница 16: ...Dave White s SitePro LLC Otterbein IN www sitepro us com UM 27SLR202 r 1 5 15 Printed in China...

Отзывы: