


9
DVDO-Matrix-44-Mini_V1.0.0
DVDO
DVDO-Matrix-44-Mini 4x4 HDMI Matrix with Audio Outputs
User Manual
Installation and Wiring
Installation
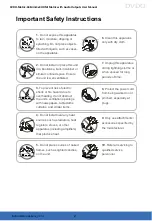
Note:
Before installation, please ensure the device is disconnected from the
power source.
Steps to install the matrix on a suitable location:
1. Attach the installation bracket to the enclosure using the screws provided in
the package separately.
2. The bracket is attached to the enclosure as shown.
3. Repeat steps 1-2 for the other side of the unit.
4. Mount and affix the unit in the rack mount with the mounting screws.
Wiring
Steps for device wiring:
1. Connect HDMI IN
Connect the HDMI sources (such as PC, Blu-ray player, Apple TV, 4K media
player, etc) to the HDMI IN 1-4.
2. Connect HDMI OUT
Connect HDMI display device (such as TV, projector, LED/LCD display) to
the HDMI OUT 1-4.
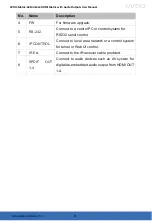
3. Connect SPDIF OUT
Connect audio devices to SPDIF OUT (1-4) ports, SPDIF OUT ports can
output audio de-embedding from HDMI OUT 1-4.
Содержание DVDO-Matrix-44-Mini
Страница 1: ...Version V1 0 0 DVDO Matrix 44 Mini 4x4 HDMI Matrix with Audio Outputs User Manual...
Страница 24: ......


