background image

dutchblue.

com

dutchblue.

com

39

БЪЛГАРСКИ

Характеристики:

Максимално натоварване
Настройка на височината

Тегло на продукта

136 кг

150 мм
100 мм

50 мм

3,8 кг (нето)

Поддръжка

Редовно проверявайте дали монтажните винтове са здраво затегнати и дали 
повдигнатата тоалетната седалка е здраво закрепена към тоалетната чиния.
Редовно проверявайте повдигнатата тоалетна седалка за повреди и износване, 
като обръщате специално внимание на състоянието на седалката и монтажния 
механизъм. Не използвайте продукта, ако пластмасовата седалка е напукана или 
деформирана по някакъв начин, ако забележите доказателства за други повреди 
или общо износване.

•  
 
•  
  

Грижа и почистване

За да почистите продукта след всяка употреба, избършете с мек сапун и разтвор с 
топла вода и изплакнете добре. Подсушете с чиста кърпа.
При по-силно замърсяване избършете с разреден разтвор на белина и изплакнете 
добре преди да подсушите.
Не използвайте вода с температура над 80 °C.
Не използвайте почистващи машини под високо налягане, пароструйки или 
агресивни, абразивни почистващи препарати или прибори (като телена четка),
тъй като те могат да доведат до влошаване  изправността на продукта.

•  
 

•  
•    
  

Содержание 7509

Страница 1: ...leiding Toiletverhoger met armleuningen hoogte verstelbaar Manual de usuario Asiento de inodoro elevado y ajustable en altura con apoyabrazos Istruzioni per uso Sedile WC rialzato regolabile in altezz...

Страница 2: ...dutchblue com...

Страница 3: ...EATIES 4 8 12 16 20 24 28 32 36 User Manual Gebrauchsanweisung Mode d emploi Gebruikershandleiding Manual de usuario Istruzioni per uso Instrukcja u ytkowania Instru es de uso English Deutsch Fran ais...

Страница 4: ...s located under the rear rim of the toilet Unscrew and remove the long plastic nuts from the rear of the toilet seat raiser Position the unit onto your toilet bowl inserting the rear mounting bolts th...

Страница 5: ...eat on the opposite side holding the bar to prevent it falling Reposition the bar to the desired height Holding the bar in place reinsert the adjustment knob on both sides and tighten until rm The rea...

Страница 6: ...or cleaning Swing armrests up and ip up the toilet seat to access the armrest locking button Press the locking button in and pull the armrests out Store safely when not in use Inserting armrests The...

Страница 7: ...e mounting attachment Do not use the toilet seat raiser if the plastic seat is cracked or deformed in any way or if you see evidence of any other damage or general wear Care cleaning To clean the unit...

Страница 8: ...sen und entfernen Sie die langen Plastikmuttern von der R ckseite der Toilettensitzerh hung Positionieren Sie die Toilettensitzerh hung auf der Toilettensch ssel und f hren Sie die hinteren Befestigu...

Страница 9: ...ndern Positionieren Sie die Stange auf die gew nschte H he Halten Sie die Stange fest setzen Sie den Einstellknopf auf beiden Seiten wieder ein und ziehen Sie ihn fest an Die hintere Stange wird auf d...

Страница 10: ...nach oben und klappen Sie den Toilettensitz hoch um auf den Verriegelungsknopf der Armlehne zuzugreifen Dr cken Sie den Verriegelungsknopf hinein und ziehen Sie die Armlehnen heraus Bei Nichtgebrauch...

Страница 11: ...icht wenn der Kunststo sitz in irgendeiner Weise gerissen oder deformiert ist oder wenn Sie Anzeichen f r andere Sch den oder allgemeine Abnutzung sehen P ege Reinigung Um die Toilettensitzerh hung na...

Страница 12: ...oilette D vissez et retirez les longs crous en plastique l arri re de l l vateur de si ge de toilette Placez l unit sur la cuvette des toilettes en ins rant les boulons de montage arri re travers les...

Страница 13: ...viter qu elle ne tombe Repositionnez la barre la hauteur souhait e En maintenant la barre en place r ins rez le bouton de r glage des deux c t s et serrez jusqu ce qu il soit ferme La barre arri re es...

Страница 14: ...abattez le si ge des toilettes pour acc der au bouton de verrouillage de l accoudoir Appuyez sur le bouton de verrouillage et retirez les accoudoirs Stocker en toute s curit lorsqu il n est pas utilis...

Страница 15: ...le rehausseur de si ge de toilette si le si ge en plastique est ssur ou d form de quelque mani re que ce soit ou si vous voyez des preuves de tout autre dommage ou usure g n rale Entretien et nettoyag...

Страница 16: ...nder de achterrand van het toilet bevinden Draai de lange plastic moeren los en verwijder ze van de achterkant van de toiletbrilverhoger Plaats de unit op de toiletpot en steek de achterste montagebou...

Страница 17: ...en dat deze valt Verplaats de balk naar de gewenste hoogte Houd de stang op zijn plaats plaats de afstelknop aan beide kanten terug en draai hem stevig vast De achterstang wordt op dezelfde manier afg...

Страница 18: ...en klap de toiletbril omhoog om toegang te krijgen tot de vergrendelingsknop van de armsteun Druk de vergrendelingsknop in en trek de armsteunen naar buiten Veilig opbergen als je hem niet gebruikt Ar...

Страница 19: ...rilverhoger niet als de plastic bril op enigerlei wijze gebarsten of vervormd is of als u aanwijzingen ziet voor enige andere schade of algemene slijtage Verzorging en reiniging Om het apparaat na elk...

Страница 20: ...lle y retire las tuercas de pl stico largas la parte trasera del elevador del asiento del inodoro Coloque la unidad en la taza del inodoro insertando los pernos de montaje traseros a trav s de los ori...

Страница 21: ...que se caiga Vuelva a colocar la barra a la altura deseada Manteniendo la barra en su lugar vuelva a insertar la perilla de ajuste en ambos lados y apriete hasta que quede rme La barra trasera se aju...

Страница 22: ...reposabrazos hacia arriba y levante el asiento del inodoro para acceder al bot n de bloqueo del reposabrazos Presione el bot n de bloqueo y extraiga los apoyabrazos Almacene de forma segura cuando no...

Страница 23: ...ccesorio de montaje No use el elevador del asiento del inodoro si el asiento de pl stico est agrietado o deformado de alguna manera o si ve evidencia de cualquier otro da o o desgaste general Cuidado...

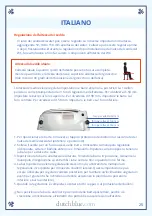
Страница 24: ...te Svitare e rimuovere i lunghi dadi di plastica da la parte posteriore del rialzo del sedile Posizionare l unit sulla tazza del WC inserendo i bulloni di montaggio posteriori attraverso i fori esiste...

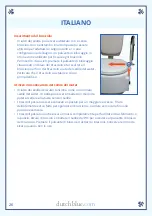
Страница 25: ...osizionare la barra all altezza desiderata Tenendo la barra in posizione reinserire la manopola di regolazione su entrambi i lati e serrare no a quando non ferma La barra posteriore viene regolata all...

Страница 26: ...zia Alzare i braccioli e ribaltare il sedile del WC per accedere al pulsante di blocco del bracciolo Premere il pulsante di blocco ed estrarre i braccioli Conservare in modo sicuro quando non in uso I...

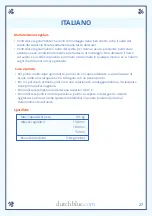
Страница 27: ...utilizzare il rialzo del sedile se il sedile di plastica incrinato o deformato in qualsiasi modo o se si notano segni di altri danni o usura generale Cura e pulizia Per pulire l unit dopo ogni utiliz...

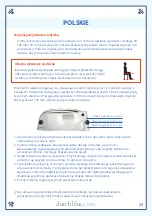
Страница 28: ...moc pary rub nakr tek umieszczonych pod tyln kraw dzi toalety Odkr i zdejmij d ugie plastikowe nakr tki z ty u podno nika deski sedesowej Umie urz dzenie na muszli klozetowej wk adaj c tylne ruby mocu...

Страница 29: ...ek aby nie spad Ustaw dr ek na danej wysoko ci Przytrzymuj c dr ek na miejscu ponownie w o y pokr t o regulacyjne po obu stronach i dokr ci do oporu Tyln belk reguluje si w ten sam spos b u ywaj c wbu...

Страница 30: ...pod okietniki do g ry i podnie desk sedesow aby uzyska dost p do przycisku blokuj cego pod okietnik Wci nij przycisk blokuj cy i wyci gnij pod okietniki Przechowywa bezpiecznie gdy nie jest u ywany W...

Страница 31: ...li plastikowa deska jest p kni ta lub zdeformowana w jakikolwiek spos b lub je li widzisz oznaki jakiegokolwiek innego uszkodzenia lub og lnego zu ycia Piel gnacja i czyszczenie Aby wyczy ci urz dzeni...

Страница 32: ...rio Desparafuse e remova as porcas de pl stico longas da parte traseira do elevador do assento do vaso sanit rio Posicione a unidade no vaso sanit rio inserindo os parafusos de montagem traseiros nos...

Страница 33: ...para evitar que ela caia Reposicione a barra na altura desejada Segurando a barra no lugar reinsira o bot o de ajuste em ambos os lados e aperte at car rme A barra traseira ajustada da mesma maneira...

Страница 34: ...ara cima e levante o assento do vaso sanit rio para acessar o bot o de travamento do apoio de bra o Pressione o bot o de travamento e puxe os apoios de bra o para fora Armazene com seguran a quando n...

Страница 35: ...do acess rio de montagem N o use o elevador de assento do vaso sanit rio se o assento de pl stico estiver rachado ou deformado de alguma forma ou se voc vir evid ncias de qualquer outro dano ou desgas...

Страница 36: ...dutchblue com dutchblue com 36 50 100 150 1 2 3 4 5...

Страница 37: ...dutchblue com dutchblue com 37 3 50 100 150 90 1 2 3 4 5 50 100 150 1 3 3 50 100 150...

Страница 38: ...dutchblue com dutchblue com 38...

Страница 39: ...dutchblue com dutchblue com 39 136 150 100 50 3 8 80 C...

Страница 40: ...anises Bulgaria Parizhka Komuna 26 9000 Varna Deutschland Subbelrather Str 15a 50823 K ln sterreich Europaplatz 2 1 2 1150 Wien France 57 rue d Amsterdam 75008 Paris Belgi Belgique Square de Mee s 37...

Отзывы: