background image

FR 04

• Ne pas utiliser d’objets insolites pour nettoyer l’appareil. 


• AVERTISSEMENT ! Pour prévenir d’éventuels dommages auditifs, ne 


pas écouter à un volume élevé pendant une longue période.

3) INSTALLATION ET UTILISATION DE L’APPAREIL

Ouvrir l’emballage avec précaution avant d’en sortir l’appareil. S’assurer que l’appareil 

soit complet et en bon état. S’il y a des composants manquants ou endommagés, 

contacter le fournisseur et ne pas utiliser le produit. Conserver l’emballage ou le 

recycler conformément aux réglementations locales.

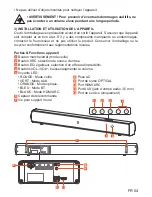
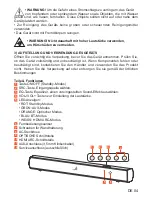
Parties & Fonctions appareil


Bouton marche/arrêt (mode veille)


Bouton SRC, sélection de source d’entrée.


Bouton EQ, égaliseur, sélection d’un effet audio prédéfini.


Boutons VOL-/VOL+, baisser/augmenter le volume.


Voyants LED :


ROUGE : Mode veille.


VERT : Mode AUX.


ORANGE : Mode optique.


BLEU : Mode BT.


BLANC : Mode HDMI ARC.


Capteur de télécommande


Vis pour support mural


Prise AC


Port de sortie OPTICAL


Port HDMI ARC


Port AUX (jack d’entrée audio 3,5 mm)


Port de service (uniquement)

1
2
3
4
5

9

10

11

12

6
7

8

7

9

10

11

12

8

5

6

4

1

2

3

Содержание DO-SV-BTSB2-B

Страница 1: ......

Страница 2: ......

Страница 3: ...ation Read the instructions for use carefully and keep them safe If you give this device to other people please also pass on this manual Only use this device in accordance with the instructions in this user manual The device is not a toy Keep it out of the reach of children and pets All warnings on the appliance and in the operating instructions should be adhered to WARNING Do not leave packaging ...

Страница 4: ...being cleaned Make sure the power cord cannot be trodden on or pinched Do not allow the power cord to hang over sharp edges and keep it away from hot objects and naked flames When plugging in the power cord make sure people cannot accidentally pull it out or trip over it Remove the power cord from the power socket during lighting storms or if unused for long periods of time This device is a Class ...

Страница 5: ...lation openings with items like newspapers tablecloths curtains etc Do not place the device under mechanical stress Do not use or store the device in an environment subject to strong static electricity or magnetic fields Improper use of the device could damage the product Please handle the device carefully Impacts or falls even from a low height can damage the device Do not use the device if it ha...

Страница 6: ...regulations Parts features device Power ON OFF button Standby mode SRC button select the input source EQ button equalizer select a preset sound effect VOL VOL buttons decrease increase the volume level LED Indicators RED Standby mode GREEN AUX mode ORANGE Optical mode BLUE BT mode WHITE HDMI ARC mode Remote control sensor Wall bracket screws AC power socket OPTICAL out port HDMI ARC port AUX port ...

Страница 7: ...te control is operated near other products that generate infrared rays or if other remote control devices using infra red rays are used near the device Conversely the other products may operate incorrectly First time use The remote control has a pre installed lithium CR2025 battery Remove the protective tab to activate the remote control battery Inserting the remote control battery 1 Push the secu...

Страница 8: ...t included are required for installation Do not over tighten screws Use an electronic stud finder to check the wall before drilling and mounting 1 Remove the screws from the device 2 Attach the wall brackets to the device using the screws removed from the device 3 Drill 2 parallel holes Ø 3 8 mm each according to wall type in the wall The distance between the holes should be 775 mm 4 Firmly fix 1 ...

Страница 9: ...our TV minimum HDMI 1 4 Then press the SRC button on the device until the LED indicator lights up white or press the HDMI ARC button on the device s remote control to select HDMI ARC source mode The LED indicator will light up white Please note Your TV must support the HDMI CEC and ARC function HDMI CEC and ARC must be set to ON on your TV The setting method for HDMI CEC and ARC may differ dependi...

Страница 10: ...put source e g TV game console DVD player etc is changed to PCM with optical and HDMI ARC output AUX Port You can connect the device to any AV and TV via the AUX port The AUX port allows you to send audio from your TV to your device via an AUX 3 5 mm connection To use the AUX function please make sure your TV features an AUX port Connect an AUX cable between the TV s AUX out port and the AUX port ...

Страница 11: ... s remote control to switch the device to standby mode The LED Indicator will light up red Disconnect the power plug from the electrical outlet if you want to switch the device OFF completely Please note If the device is not in use no input it will automatically go into standby mode after 15 minutes If the device s external input signal is too low it will automatically go to standby mode after 15 ...

Страница 12: ... The LED indicator will light up in the color of the selected source You can operate your sound and playback features directly from your audio device Please note If there is no sound output and the LED indicator for the selected source mode is flashing make sure the audio setting of the input source e g TV game console DVD player etc is changed to PCM with optical and HDMI ARC output Making a BT c...

Страница 13: ...pairing mode The existing connection will be interrupted If a paired BT audio player is becoming out of range it will disconnect from the device and you will hear the voice prompt disconnected If no other BT device pairs with the device within two minutes the player will restore its previous connection mode Listening to music from BT enabled audio player You can listen to your stored music if the ...

Страница 14: ...ithout prior notice Your product has been manufactured using high quality materials and components which can be recycled and used again At the end of its service life this product cannot be disposed of in normal domestic waste but must be taken to a special collection point for recycling electrical and electronic equipment This is indicated in the user manual and in the packaging by the waste cont...

Страница 15: ... gebruiksaanwijzingen zorgvuldig en bewaar ze op een veilige plek Als u dit apparaat aan iemand anders geeft geef deze handleiding daar dan bij Gebruik dit apparaat uitsluitend volgens de instructies in deze gebruikshandleiding Dit apparaat is geen speelgoed Houd het buiten bereik van kinderen en huisdieren Houd u aan alle waarschuwingen weergegeven op het apparaat en in de handleiding WAARSCHUWIN...

Страница 16: ...e vertoont Haal altijd de stekker uit het stopcontact wanneer u het apparaat niet gebruikt of wilt reinigen Zorg ervoor dat niemand op het stroomsnoer kan staan of dat het snoer anderszins kan worden bekneld Laat het stroomsnoer niet over scherpe randen hangen en houdt het uit de buurt van warme objecten en open vuur Wanneer u de stekker van het stroomsnoer in het stopcontact steekt zorg er dan vo...

Страница 17: ...ie blootstaan aan trillingen vrieskou een te hoge luchtvochtigheid of een buitensporige hoeveelheid stof Plaats het apparaat niet in de buurt van warmtebronnen zoals radiatoren verwarmingselementen kachels of andere producten waaronder versterkers die warmte produceren Bescherm het apparaat tegen direct zonlicht overmatige vochtigheid en corrosieve omgevingen Zorg ervoor dat ventilatie openingen n...

Страница 18: ... niveau te houden 3 INSTALLATIE EN GEBRUIK VAN HET APPARAAT Open de verpakking voorzichtig en haal het apparaat eruit Controleer of het apparaat volledig en onbeschadigd is Mochten er onderdelen beschadigd zijn of ontbreken neem dan contact op met de verkoper en gebruik het product niet Bewaar de verpakking of recycle deze zoals voorgeschreven door lokale regelgeving Onderdelen en functies van het...

Страница 19: ...g kan het apparaat op afstand worden bediend Zelfs als de afstandsbediening wordt gebruikt binnen het effectieve bereik 6 m kan de werking van de afstandsbediening worden belemmerd door obstakels tussen het apparaat en de afstandsbediening Het apparaat werkt mogelijk niet goed als de afstandsbediening wordt gebruikt in de buurt van andere apparaten die infraroodstraling genereren of wanneer een an...

Страница 20: ...ugels aan het apparaat met de schroeven die uit het apparaat zijn verwijderd 3 Boor 2 parallelle gaten in de wand elk Ø 3 8 mm afhankelijk van het soort wand De afstand tussen de gaten moet 775 mm zijn 4 Duw indien nodig in elk gat in de wand 1 plug Vervangen van de batterij van de afstandsbediening 1 Druk op de vergrendeling 2 Trek de batterijhouder naar buiten en verwijder de oude batterij 3 Pla...

Страница 21: ...nding Om de ARC functie te kunnen gebruiken moet u controleren of uw TV is uitgerust met HDMI CEC en ARC Wanneer de afstandsbediening van de TV correct is ingesteld kunt u deze gebruiken om het volume van het aangesloten apparaat aan te passen 5 Steek 1 schroef in elk gat elke plug Laat tussen de wand en de schroefkop een ruimte van 5 mm over Til het apparaat met de daaraan gemonteerde wandbeugels...

Страница 22: ...n ARC kan per TV verschillen Zie de handleiding van uw TV voor meer informatie over de ARC functie De ARC functie wordt alleen ondersteund door HDMI 1 4 kabels Optische poort U kunt het apparaat aansluiten op elke AV en TV met een optische poort De optische poort biedt de mogelijkheid via een optische verbinding audio te sturen van uw TV naar uw apparaat Om de optische functie te kunnen gebruiken ...

Страница 23: ...diokabel 3 5 mm naar 3 5 mm meegeleverd om de koptelefoon aansluiting van een extern audioapparaat te verbinden met de AUX poort van het apparaat Voedingsaansluiting Voordat u het stroomsnoer aansluit moet u controleren of alle andere aansluitingen zijn uitgevoerd Controleer vóór gebruik of de netspanning gelijk is aan de spanning vermeld op het apparaat Steek de stekker in het stopcontact Steek d...

Страница 24: ...tielampje blauw knipperen Als de bron van het apparaat in HDMI ARC modus staat en er geen actief input signaal is gaat het LED indicatielampje wit knipperen Volumeregeling Druk op de knop volume en op het apparaat of de knop VOL en VOL op de afstandsbediening van het apparaat om het volume te regelen Als u het geluid wilt uitschakelen drukt u op de MUTE knop op de afstandsbediening Druk nogmaals o...

Страница 25: ...apparaat om de BT modus te selecteren Het LED indicatielampje knippert langzaam blauw Het apparaat staat nu in de koppel modus Houd uw BT audiospeler tijdens het koppelingsproces binnen 1 m van het apparaat Laat uw BT audiospeler naar compatibele BT apparaten zoeken en selecteer DO SV BTSB2 in de lijst met gevonden apparaten Na een succesvolle koppeling hoort u een stem paired zeggen en wordt het ...

Страница 26: ...naar uw opgeslagen muziek luisteren als de verbonden BT audiospeler A2DP Advanced Audio Distribution Profile ondersteunt Het apparaat ondersteunt AVRCP Audio Video Remote Control wat betekent dat u de afstandsbediening van het apparaat kunt gebruiken om muziek af te spelen op de BT audiospeler Om muziek af te spelen op uw verbonden audiospeler gebruikt u de bedieningsknoppen op uw mediaspeler Om m...

Страница 27: ...d en opnieuw gebruikt kunnen worden Aan het eind van de levensduur van dit product mag het niet worden meegegeven met het normale huishoudelijk afval maar moet het naar een speciaal inzamelpunt worden gebracht voor het recyclen van elektrische en elektronische apparatuur Dit wordt in de handleiding en op de verpakking weergegeven door de afvalcontainer met een kruis erdoor De gebruikte grondstoffe...

Страница 28: ...ations générales Lire attentivement le mode d emploi et bien le conserver Si l appareil est donné à une autre personne lui donner aussi ce mode d emploi Utiliser cet appareil uniquement comme décrit dans ce mode d emploi Cet appareil n est pas un jouet Le tenir hors de portée d enfants et d animaux domestiques Tous les avertissements sur le produit et dans les instructions d utilisation doivent êt...

Страница 29: ...e l appareil n est pas utilisé ou s il est nettoyé S assurer que le cordon d alimentation ne puisse pas être piétiné ou coincé Ne pas laisser pendre le cordon d alimentation sur des bords tranchants et le garder éloigné d objets chauds et de flammes nues Lorsque le cordon d alimentation est branché faire attention que personne ne puisse le tirer accidentellement ou trébucher sur celui ci Retirer l...

Страница 30: ... est de 5 cm La ventilation ne doit pas être gênée en recouvrant les ouvertures de ventilation avec des articles tels que des journaux nappes de table rideaux etc Ne pas exposer l appareil à des contraintes mécaniques Ne pas utiliser ou stocker l appareil dans un endroit soumis à une forte électricité statique ou des champs magnétiques Une utilisation inappropriée e l appareil peut endommager le p...

Страница 31: ...ur et ne pas utiliser le produit Conserver l emballage ou le recycler conformément aux réglementations locales Parties Fonctions appareil Bouton marche arrêt mode veille Bouton SRC sélection de source d entrée Bouton EQ égaliseur sélection d un effet audio prédéfini Boutons VOL VOL baisser augmenter le volume Voyants LED ROUGE Mode veille VERT Mode AUX ORANGE Mode optique BLEU Mode BT BLANC Mode H...

Страница 32: ...s générateurs de rayons infrarouges ou si d autres télécommandes utilisant des rayons infrarouges sont utilisées à proximité de l appareil la télécommande pourrait ne pas fonctionner correctement Les autres produits pourraient également ne pas fonctionner correctement Première utilisation La télécommande a une pile lithium CR2025 pré installée Retirer la languette de protection pour activer la pil...

Страница 33: ...de l appareil et des supports muraux Des outils supplémentaires non inclus sont nécessaires pour l installation Ne pas trop serrer les vis Utiliser un détecteur électronique de montants pour contrôler le mur avant de percer les trous et l installation 1 Retirer les vis de l appareil 2 Fixer les supports muraux à l appareil en utilisant les vis retirées de l appareil 3 Percer 2 trous parallèles Ø 3...

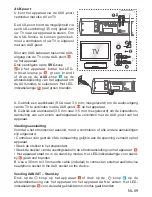
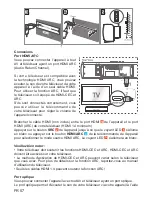
Страница 34: ...HDMI 1 4 minimum Appuyer sur le bouton SRC de l appareil jusqu à ce que le voyant LED s allume en blanc ou appuyer sur le bouton HDMI ARC de la télécommande de l appareil pour sélectionner le mode source HDMI ARC Le voyant LED s allumera en blanc Veuillez bien noter Votre téléviseur doit soutenir les fonctions HDMI CEC et ARC HDMI CEC et ARC doivent être activés sur votre téléviseur La méthode d a...

Страница 35: ... ex téléviseur console de jeu lecteur DVD etc soit changé en PCM avec sortie optique et HDMI ARC Port AUX Vous pouvez connecter l appareil avec tout AV et téléviseur via le port AUX Le port AUX permet d écouter le son de votre téléviseur via votre appareil à l aide d une connexion AUX 3 5 mm Pour utiliser la fonction AUX votre téléviseur doit avoir un port AUX Brancher un câble AUX entre le port d...

Страница 36: ...ommande de l appareil pour le mettre en mode veille Le voyant LED s allumera en rouge Débrancher la fiche de la prise électrique si vous souhaitez éteindre entièrement l appareil Veuillez bien noter Si l appareil n est pas utilisé aucune entrée il se mettra automatiquement en mode veille après 15 minutes Si le signal d entrée externe de l appareil est trop faible il se mettra automatiquement en mo...

Страница 37: ...u appareil audio Pendant que appareil est en position ON appuyer sur le bouton SRC de l appareil ou le bouton OPTICAL HDMI ARC AUX de la télécommande pour sélectionner le mode source souhaité Le voyant LED s allumera en la couleur de la source sélectionnée Vous pouvez régler le son et écouter des numéros directement à partir de votre appareil audio Veuillez bien noter S il n y a pas de son émis et...

Страница 38: ...é est à proximité il se connectera automatiquement à l appareil Veuillez bien noter Si un code PIN est requis pour établir une connexion BT entrer 0000 S il y a une connexion BT existante appuyer et maintenir enfoncé le bouton PAIR de la télécommande pour activer de nouveau le mode de couplage La connexion existante sera interrompue Si un lecteur audio couplé s éloigne trop il sera déconnecté de l...

Страница 39: ... le transport Tous contenus et spécifications mentionnés dans ce manuel peuvent être modifiés sans préavis Votre produit a été fabriqué en utilisant des matériaux de haute qualité et des composants qui peuvent être recyclés et réutilisés À la fin de sa durée de vie ce produit ne doit pas être jeté avec les ordures ménagères ordinaires mais il doit être remis à un point de collecte spécial pour le ...

Страница 40: ...e für den Gebrauch sorgfältig durch und bewahren Sie sie sicher auf Wenn Sie dieses Gerät an andere Personen weitergeben geben Sie bitte auch diese Bedienungsanleitung mit Verwenden Sie dieses Gerät nur entsprechend der Anleitungen in dieser Bedienungsanleitung Das Gerät ist kein Spielzeug Von Kindern und Haustieren fernhalten Alle Warnungen auf dem Gerät und in der Bedienungsanweisung müssen befo...

Страница 41: ...hen Sie den Stecker aus der Steckdose wenn das Gerät nicht gebraucht oder gereinigt wird Achten Sie darauf dass niemand auf das Netzkabel treten oder es einklemmen kann Das Netzkabel darf nicht über scharfen Kanten hängen Halten Sie es von heißen Objekten und offenem Feuer fern Achten Sie beim Einstecken des Netzkabels darauf dass es nicht versehentlich herausgezogen werden kann oder Personen darü...

Страница 42: ...en oder anderem Equipment aufstellen einschließlich Verstärkern die Wärme erzeugen Das Gerät nicht direkter Sonneneinstrahlung Wärmequellen starker Feuchtigkeit oder korrosiven Umgebungen aussetzen Die Lüftungsöffnungen nicht blockieren Für eine ausreichende Belüftung muss ein Mindestabstand von 5 cm eingehalten werden Die Lüftung darf nicht durch verdeckte Lüftungsöffnungen mit Gegenständen wie Z...

Страница 43: ...en Sie ob das Gerät vollständig und unbeschädigt ist Wenn Komponenten fehlen oder beschädigt sind kontaktieren Sie den Händler und verwenden Sie das Produkt nicht Heben Sie die Verpackung auf oder entsorgen Sie sie gemäß der örtlichen Bestimmungen Teile Funktionen Taste ON OFF Standby Modus SRC Taste Eingangsquelle wählen EQ Taste Equalizer einen voreingestellten Sound Effekt auswählen VOL VOL Tas...

Страница 44: ... Entfernung Auch wenn die Fernbedienung innerhalb des effektiven Radius 6 m bedient wird könnte die Bedienung über die Fernbedienung unmöglich sein wenn sich Hindernisse zwischen dem Gerät und der Fernbedienung befinden Das Gerät könnte nicht richtig funktionieren wenn die Fernbedienung in der Nähe von Produkten bedient wird die Infrarotstrahlen produzieren oder wenn sich andere fernbediente Gerät...

Страница 45: ...Option B Die Montage darf nur von qualifiziertem Personal erfolgen Die falsche Montage kann zu schweren Verletzungen und Schäden führen Wenn Sie das Gerät selber montieren möchten überprüfen Sie zuerst die elektrischen Leitungen und Anschlüsse die sich in der Wand befinden könnten Der Monteur ist dafür verantwortlich sicherzustellen dass die Wand die Gesamtlast von Gerät und Wandhalterungen sicher...

Страница 46: ...telle Sie können das Gerät an jedes AV und TV mit einer HDMI ARC Audio Return Channel Schnittstelle anschließen Die ARC Funktion erlaubt Ihnen mit einer einzigen HDMI Schnittstelle Audioinhalte von Ihrem ARC fähigen Fernseher an Ihr Gerät zu übertragen Um die ARC Funktion zu verwenden muss Ihr Fernseher über HDMI CEC und ARC verfügen Bei korrekter Einrichtung können Sie die Fernbedienung Ihres Fer...

Страница 47: ...Fernseher mit einer optischen Schnittstelle anschließen Die optische Schnittstelle erlaubt Ihnen Audioinhalte über einen optischen Anschluss von Ihrem Fernseher an Ihr Gerät zu übertragen Um die optische Funktion verwenden zu können muss Ihr Fernseher über eine optische Schnittstelle verfügen Entfernen Sie die Abdeckung von der optischen Schnittstelle schließen Sie dann das optische Kabel nicht en...

Страница 48: ...Anschluss Sie können das Gerät über den AUX Anschluss an jedes AV und jeden Fernseher anschließen Die AUX Funktion erlaubt Ihnen über einen AUX Anschluss 3 5 mm Audioinhalte von Ihrem Fernseher an Ihr Gerät zu übertragen Um die AUX Funktion verwenden zu können muss Ihr Fernseher über einen AUX Anschluss verfügen Schließen Sie ein AUX Kabel zwischen dem AUX Anschluss des Fernsehers und dem AUX Ansc...

Страница 49: ... Fernbedienung des Geräts um den gewünschten Modus auszuwählen Hinweis Wenn sich die Gerätequelle im BT Modus befindet und die BT Verbindung nicht mehr aktiv oder außer Reichweite ist wird die LED Anzeige blau leuchten Wenn sich die Gerätequelle im HDMI ARC Modus befindet und kein aktives Eingangssignal vorhanden ist wird die LED Anzeige weiß leuchten Lautstärkeeinstellung Drücken Sie die Lautstär...

Страница 50: ...g herstellen Sie müssen Ihr BT fähiges Audiogerät mit dem Gerät koppeln wenn Sie es zum ersten Mal benutzen Drücken Sie die Taste SRC am Gerät oder die Taste BT auf der Fernbedienung des Geräts um den BT Modus auszuwählen Die LED Anzeige wird langsam aufleuchten Das Gerät ist jetzt im Kopplungsmodus Halten Sie während des Kopplungsprozesses Ihr BT fähiges Audiogerät einen Meter entfernt Lassen Sie...

Страница 51: ...b von zwei Minuten kein anderes BT Gerät gekoppelt wird wird der Player in seinen vorherigen Anschlussmodus zurückgesetzt Musik über ein BT fähiges Audiogerät hören Sie können gespeicherte Musik hören wenn Ihr BT fähiges Audiogerät das Advanced Audio Distribution Profile A2DP unterstützt Das Gerät unterstützt Audio Video Remote Control AVRCP was bedeutet dass Sie die Fernbedienung des Geräts verwe...

Страница 52: ...toffe leisten Sie einen wichtigen Beitrag zum Schutz unserer Umwelt Sie können die nächstgelegene Sammelstelle bei Ihrer Gemeinde erfragen ANWEISUNGEN ZUM SCHUTZ DER UMWELT EEAG Rückgewinnung von Elektro und Elektronik Altgeräten Abstand Fernbedienung 6 m 30 Winkel Abmessungen 95 x 9 x 5 5 cm B x H x T Gewicht 2 3 kg 5 LAGERUNG TRANSPORT Vor der Lagerung des Geräts muss es gemäß diesem Benutzerhan...

Страница 53: ......

Страница 54: ...wing the provisions of the Directives Energy Related Product Directive ERP 2009 125 EC Radio Equipment Directive RED 2014 53 EU RoHS Directive 2011 65 EU And standards to which Conformity is declared ERP 1275 2008 RED EN300 328 1 V2 1 1 2016 11 EN301 489 1 V2 1 1 2017 02 EN301 489 17 V3 2 0 2017 03 EN62479 2010 EN55020 2007 A11 2011 EN55032 2012 EN60065 2014 EN62479 2010 EN61000 3 2 2014 EN61000 3...

Страница 55: ......

Страница 56: ...Version 2017 11 18 ...

Отзывы: